> ## Documentation Index
> Fetch the complete documentation index at: https://documentation.idenfy.com/llms.txt
> Use this file to discover all available pages before exploring further.
# Field Management
> Configure required and optional data fields for individual and company verification forms in the iDenfy dashboard field management.
Whether you are onboarding an **Individual** or a **Company**, the system uses the same logic to collect data. The only difference is the specific data points available in the "Standard" categories.
### 1. Default Fields (Always Included)
These fields are mandatory to ensure the entity can be identified in the system.
| Entity Type | Default Fields |
| ----------- | ------------------------------------------ |
| Individual | Name, Surname |
| Company | Company Name, Registration Number, Country |
### 2. Adding Standard Fields
If you need more than just the basics, you can pull from our pre-defined library of data points.
1. Click the **+ Fields** button.
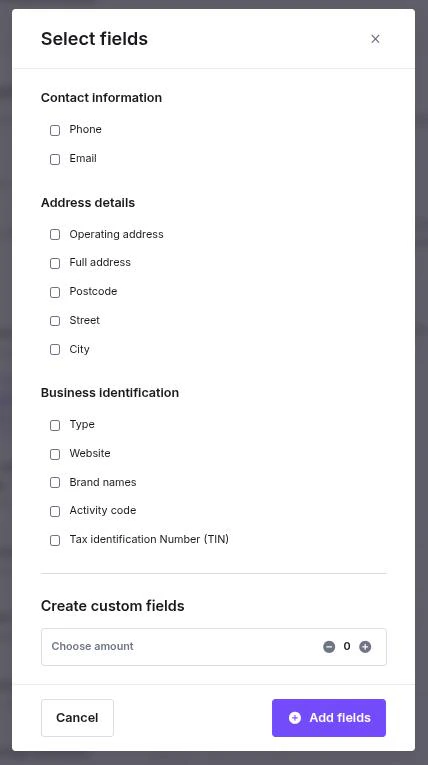
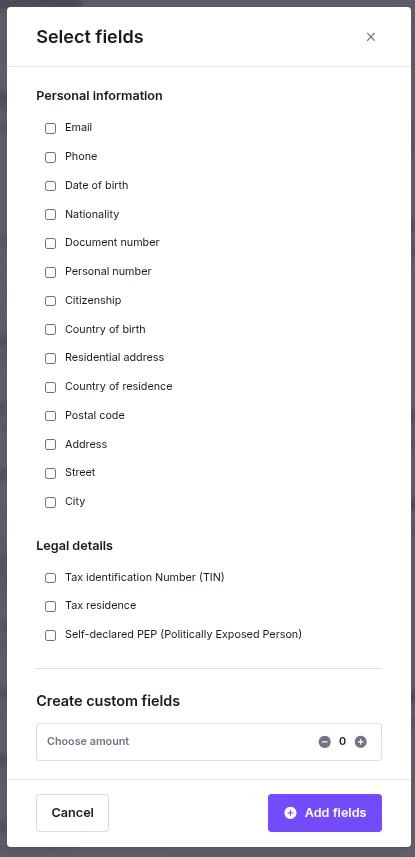
2. A popup will appear. Browse the categories (e.g., *Personal Info* for individuals or *Business Identification* for companies).
3. **Check the boxes** for the data points you require (e.g., Date of Birth, VAT, or City).
4. Click **Add Fields** to save your selection.
### 3. Creating Custom Fields
Need something hyper-specific that isn't in our list? You can build it yourself.
* **Location:** Scroll to the bottom of the **+ Fields** popup to **Create custom fields**.
* **Configuration:** Once added, you can define:
* **Label:** The name of the field (e.g., "Internal Reference ID").
* **Type:** Select between Text or Number.
* **Required:** Toggle whether the client *must* fill this out to proceed.
**Company Fields:**
 ***
**Individual Fields:**
***
**Individual Fields:**
 ***
### Comparison of Optional Categories
While the process is the same, the categories adapt to the entity type:
| Category Type | Individual Options | Company Options |
| ------------- | --------------------------------------------- | --------------------------------- |
| Contact | Email, Phone | Email, Phone, Website |
| Location | Residential Address, Nationality, Citizenship | Operating Address, Postcode, City |
| Legal/ID | Passport No., PEP Status, TIN | TIN, Activity Code, Brand Names |
***
## Reordering Fields
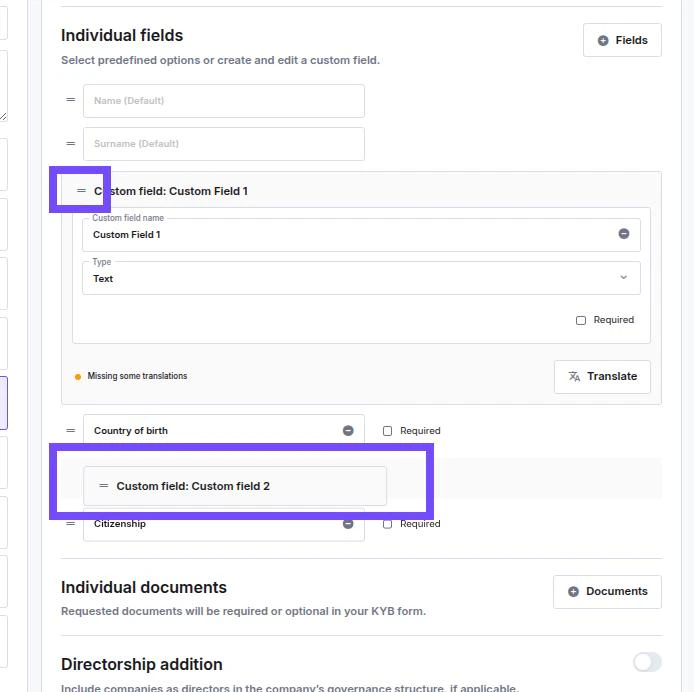
You can change the order in which fields appear to the client by clicking and holding the **Drag Handle (::)** on the left side of any field row and moving it up or down.
***
### Comparison of Optional Categories
While the process is the same, the categories adapt to the entity type:
| Category Type | Individual Options | Company Options |
| ------------- | --------------------------------------------- | --------------------------------- |
| Contact | Email, Phone | Email, Phone, Website |
| Location | Residential Address, Nationality, Citizenship | Operating Address, Postcode, City |
| Legal/ID | Passport No., PEP Status, TIN | TIN, Activity Code, Brand Names |
***
## Reordering Fields
You can change the order in which fields appear to the client by clicking and holding the **Drag Handle (::)** on the left side of any field row and moving it up or down.