> ## Documentation Index
> Fetch the complete documentation index at: https://documentation.idenfy.com/llms.txt
> Use this file to discover all available pages before exploring further.
# Zapier Webhooks
> Connect iDenfy verification webhooks to Zapier to automate KYC, AML, and KYB workflows across 5,000+ apps with minimal code needed.
## Purpose
Webhooks by Zapier enables seamless access to iDenfy API endpoints, requiring minimal programming knowledge. This integration supports services such as:
* **KYC (Know Your Customer)**
* **AML (Anti-Money Laundering)**
* **Potentially KYB (Know Your Business)**
## Key Concepts
Initiating KYC Verification and Receiving Results are two distinct steps. Each step involves specific API interactions outlined below.
### 1. Creating a Verification Session
To initiate verification, you need to create a verification session using the designated [API endpoint](/kyc/generate-token).
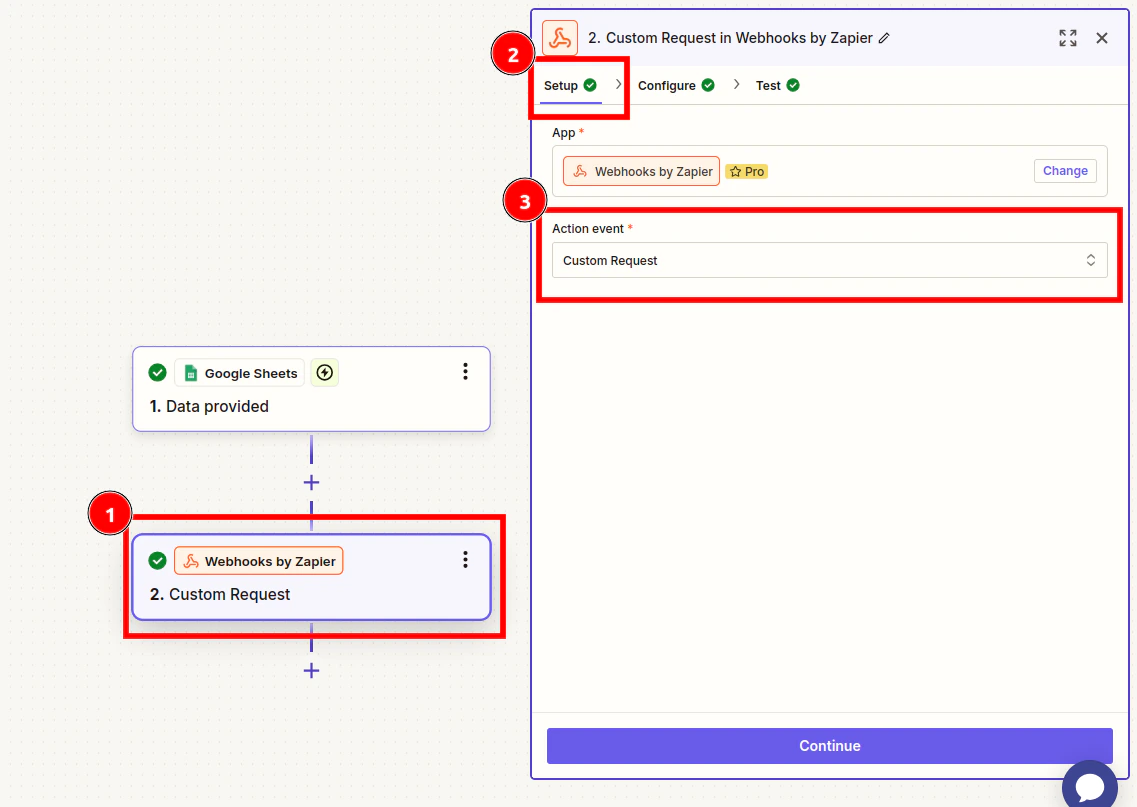
1. **Set up the initial trigger** in Zapier.
2. **Add a new action step** for Webhooks by Zapier.
* **App:** Search for "Webhooks by Zapier."
* **Action Event:** Select "Custom Request."
 3. **Configure the Request:**
* **Method:** As described in the iDenfy documentation.
* **URL:** Enter the endpoint URL from the iDenfy documentation.
* **Data:** Input required parameters. You can map data from earlier steps in the Zap.
* **Basic Authentication:** Use your iDenfy API credentials in the format: `API Key|API Secret` (e.g., `key123|secret@#$123`).
3. **Configure the Request:**
* **Method:** As described in the iDenfy documentation.
* **URL:** Enter the endpoint URL from the iDenfy documentation.
* **Data:** Input required parameters. You can map data from earlier steps in the Zap.
* **Basic Authentication:** Use your iDenfy API credentials in the format: `API Key|API Secret` (e.g., `key123|secret@#$123`).
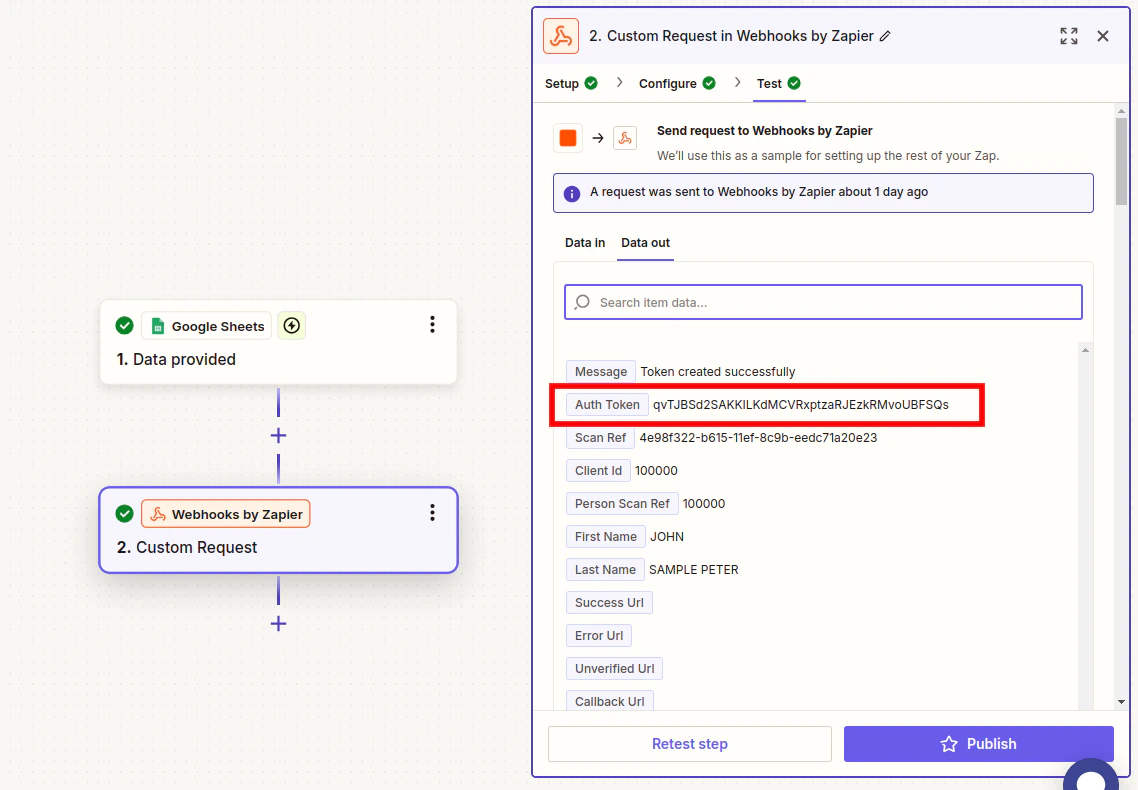
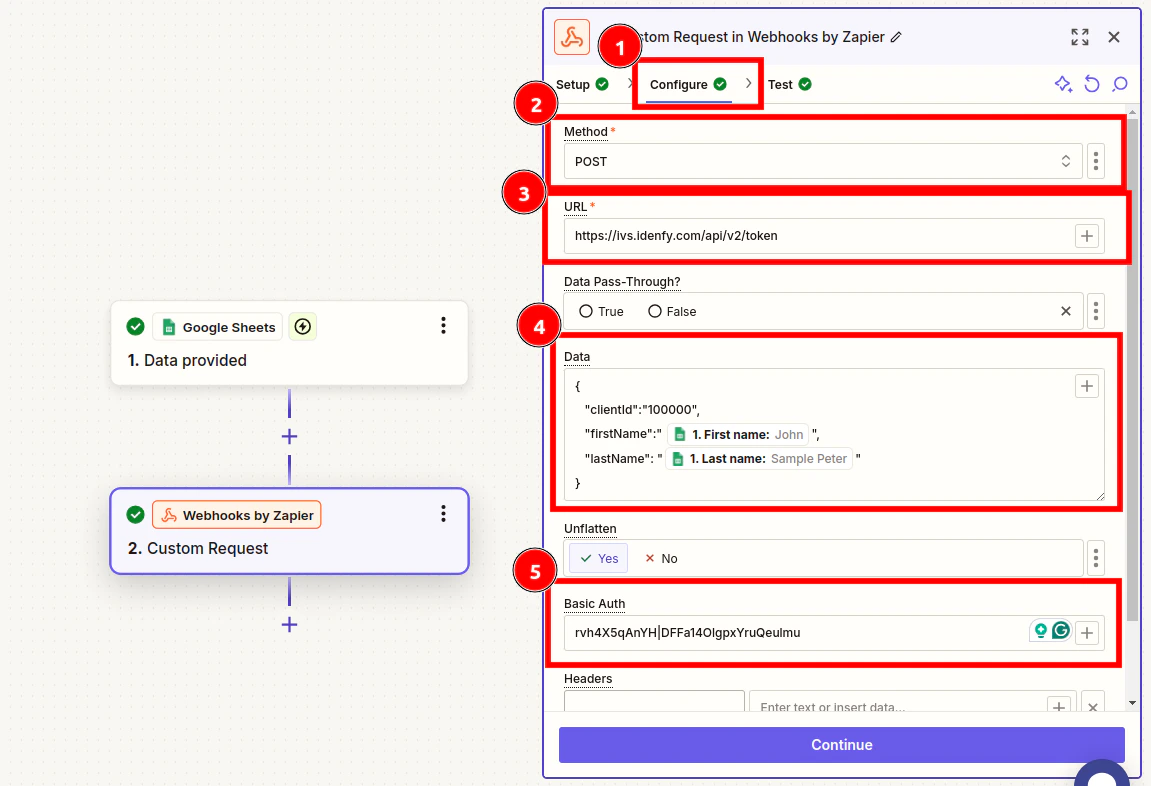 4. When configured **successfully**, this step generates a verification token.
 ### 2. Generating a Verification Link
To create a unique verification link for a client:
1. Generated Auth Token: `qvTJBSd2SAKKILKdMCVRxptzaRJEzkRMvoUBFSQs`
2. Append the generated Auth Token to the base URL: `https://ivs.idenfy.com/api/v2/redirect?authToken=`
3. Example: `https://ivs.idenfy.com/api/v2/redirect?authToken=qvTJBSd2SAKKILKdMCVRxptzaRJEzkRMvoUBFSQs`
Once you create this link, you can include it in automated emails, notifications, or other integrations depending on your setup.
### 3. Receiving Verification Results
You can configure Webhooks by Zapier to receive results as notifications.
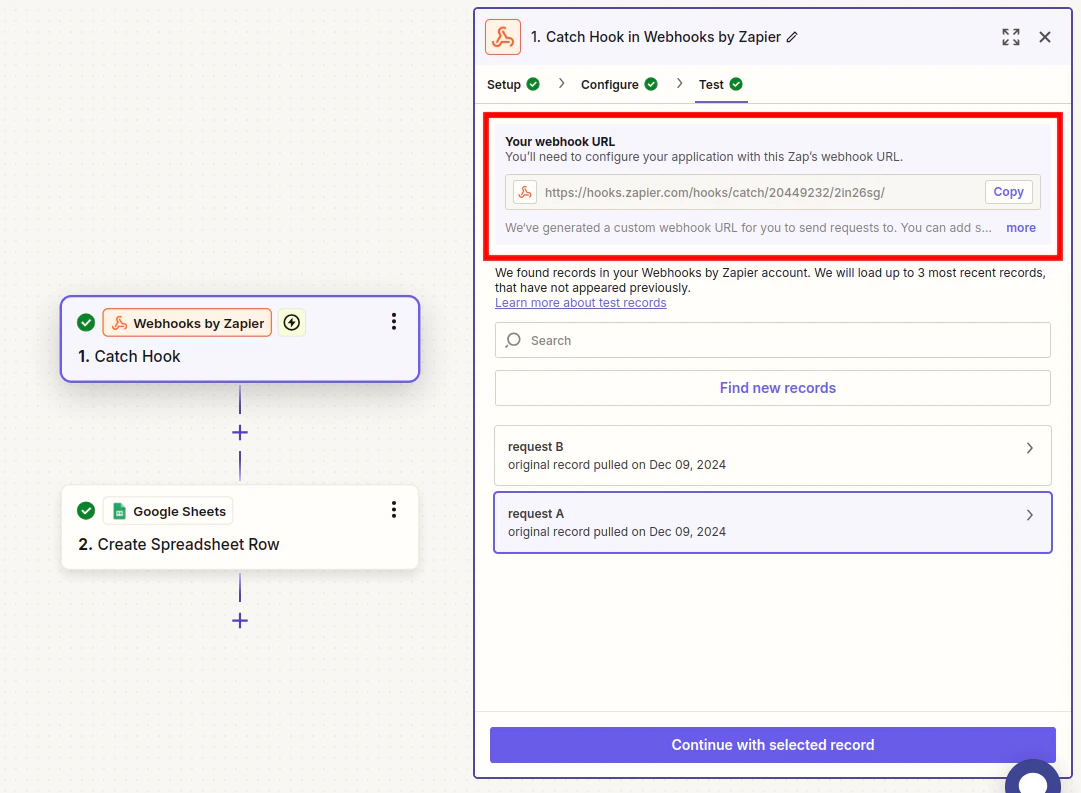
1. **Create a New Zap** and select the trigger event **Catch Hook**.
2. In **Configure**, leave the *Pick off a Child Key* field empty.
3. Copy the URL from the **Your webhook URL** section.
### 2. Generating a Verification Link
To create a unique verification link for a client:
1. Generated Auth Token: `qvTJBSd2SAKKILKdMCVRxptzaRJEzkRMvoUBFSQs`
2. Append the generated Auth Token to the base URL: `https://ivs.idenfy.com/api/v2/redirect?authToken=`
3. Example: `https://ivs.idenfy.com/api/v2/redirect?authToken=qvTJBSd2SAKKILKdMCVRxptzaRJEzkRMvoUBFSQs`
Once you create this link, you can include it in automated emails, notifications, or other integrations depending on your setup.
### 3. Receiving Verification Results
You can configure Webhooks by Zapier to receive results as notifications.
1. **Create a New Zap** and select the trigger event **Catch Hook**.
2. In **Configure**, leave the *Pick off a Child Key* field empty.
3. Copy the URL from the **Your webhook URL** section.
 4. [Set up the notification](/guides/dashboard/settings/system-notifications-webhooks-emails) in the iDenfy dashboard.
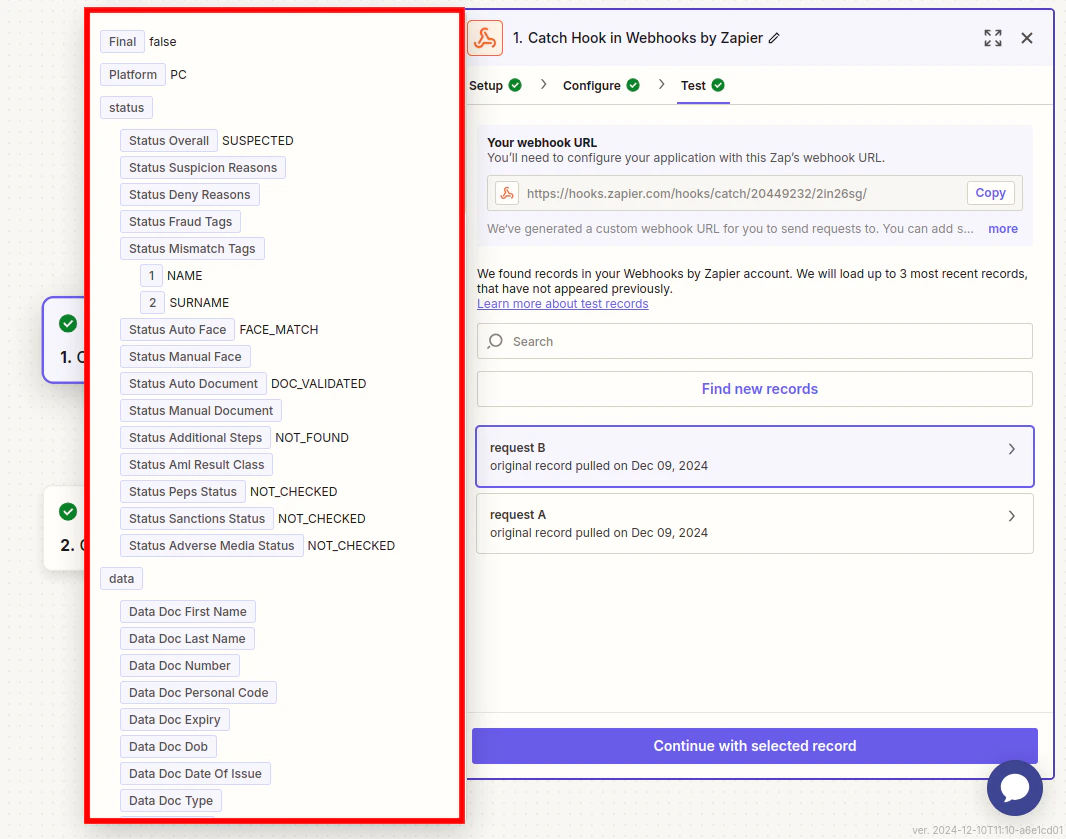
5. You will receive information in parsed fields, which you can use according to your needs.
4. [Set up the notification](/guides/dashboard/settings/system-notifications-webhooks-emails) in the iDenfy dashboard.
5. You will receive information in parsed fields, which you can use according to your needs.
 ### 4. Using AML Services
For AML, follow the same steps as "Creating a Verification Session."
* Use the API endpoint provided in the documentation, specifically in the section about [AML](/aml/retrieve-profile).
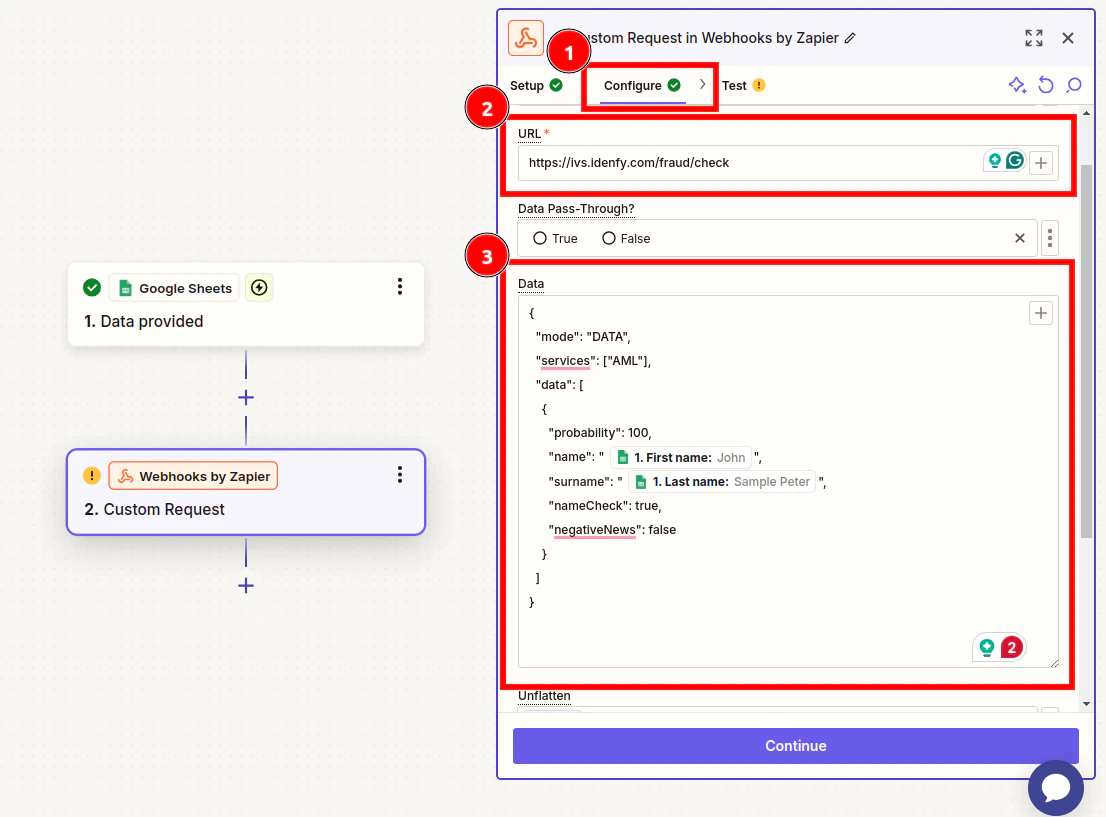
* Using the Data section from the examples in the documentation, configure the AML search to match your needs.
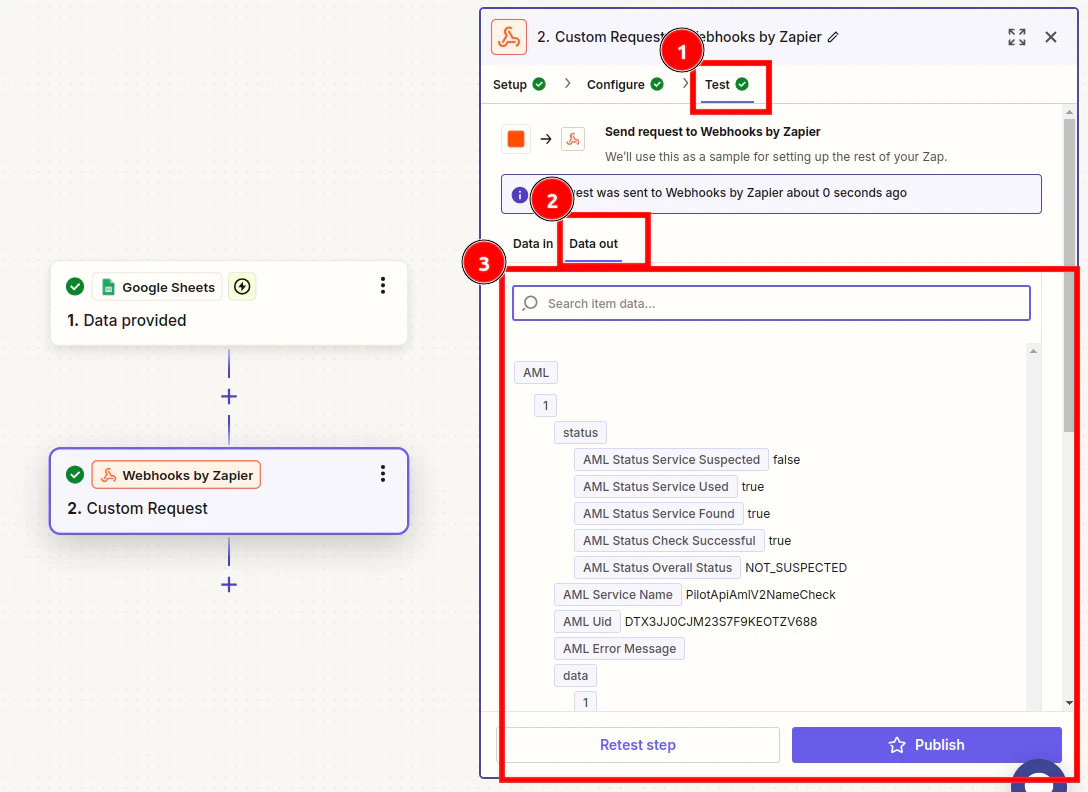
The results will be returned in the same request.
**Request example:**
### 4. Using AML Services
For AML, follow the same steps as "Creating a Verification Session."
* Use the API endpoint provided in the documentation, specifically in the section about [AML](/aml/retrieve-profile).
* Using the Data section from the examples in the documentation, configure the AML search to match your needs.
The results will be returned in the same request.
**Request example:**
 **Response in the same step:**
 ## Best Practices
* Always refer to the latest iDenfy API documentation.
* Securely [manage API credentials](/guides/dashboard/settings/api-keys).
* Test webhook configurations thoroughly.
* Implement robust error handling.
## Best Practices
* Always refer to the latest iDenfy API documentation.
* Securely [manage API credentials](/guides/dashboard/settings/api-keys).
* Test webhook configurations thoroughly.
* Implement robust error handling.