> ## Documentation Index
> Fetch the complete documentation index at: https://documentation.idenfy.com/llms.txt
> Use this file to discover all available pages before exploring further.
# iOS SDK Quickstart
> Install the iDenfy iOS SDK via Swift Package Manager or CocoaPods and run your first identity verification session with iOS 13.0 support.
The minimum version of iOS supported by the SDK is 13.0.
During the review process of your app, Apple might ask you to describe NFC usage in your app, even if you don't have the [NFC feature](/sdks/ios/additional-features#nfc-support) enabled. To successfully pass the review, try sending them this [video](https://s3.eu-west-1.amazonaws.com/prod-ivs-sdk.builds/ios-tutorials/idenfy_nfc_for_apple_store.mp4), which shows NFC usage in the KYC flow. If Apple still does not confirm, contact us for further communication.
## iDenfy Identity Verification Flow
Below you can check a full regular flow.
This flow can be customized and success results can be omitted as well. We recommend omitting them using the [immediate redirect feature](#identity-verification-results-screen-changes).
## Getting Started
### Obtain a Session Token
The SDK requires a session token to start initialization. See the [session creation guide](/kyc/generate-token).
### Provide Permissions
Add `NSCameraUsageDescription` to your application's `Info.plist` file:
```xml theme={"system"}
NSCameraUsageDescriptionRequired for document and facial capture
```
### Add the SDK Dependency
We recommend using Swift Package Manager, since it is quicker to set up and causes fewer issues.
**1. Add a package**
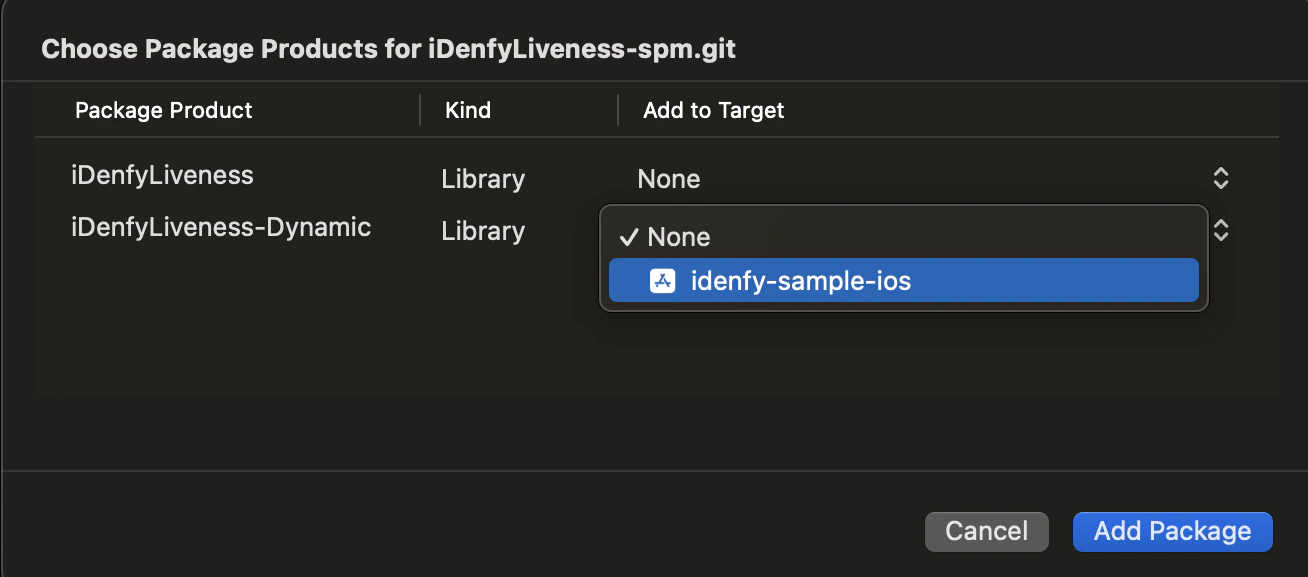
You can add it to your project with the following package repositories. You need to select **only one SDK option**.
Base iDenfySDK dependency:
* **iDenfySDK** - [https://github.com/idenfy/iDenfySDK-spm.git](https://github.com/idenfy/iDenfySDK-spm.git)
iDenfySDK with Advanced Liveness detection feature:
* **iDenfySDK/iDenfyLiveness** - [https://github.com/idenfy/iDenfyLiveness-spm.git](https://github.com/idenfy/iDenfyLiveness-spm.git)
iDenfySDK with Advanced Liveness detection and Document blur glare detection features:
* **iDenfySDK/iDenfyBlurGlareDetection** - [https://github.com/idenfy/iDenfyBlurGlareDetection-spm.git](https://github.com/idenfy/iDenfyBlurGlareDetection-spm.git)
iDenfySDK with Advanced Liveness detection, Document blur glare detection and NFC Reading features:
* **iDenfySDK/iDenfyNFCReading** - [https://github.com/idenfy/iDenfyNFCReading-spm.git](https://github.com/idenfy/iDenfyNFCReading-spm.git)
iDenfySDK with Advanced Liveness detection, Document blur glare detection, NFC Reading and Document Auto Capture features:
* **iDenfySDK/iDenfyRecognition** - [https://github.com/idenfy/iDenfyRecognition-spm.git](https://github.com/idenfy/iDenfyRecognition-spm.git)
We strongly recommend choosing an **exact version** of the latest SDK.
**2. Select the library**
Select **either** static or dynamic versions of the SDK and add the package.
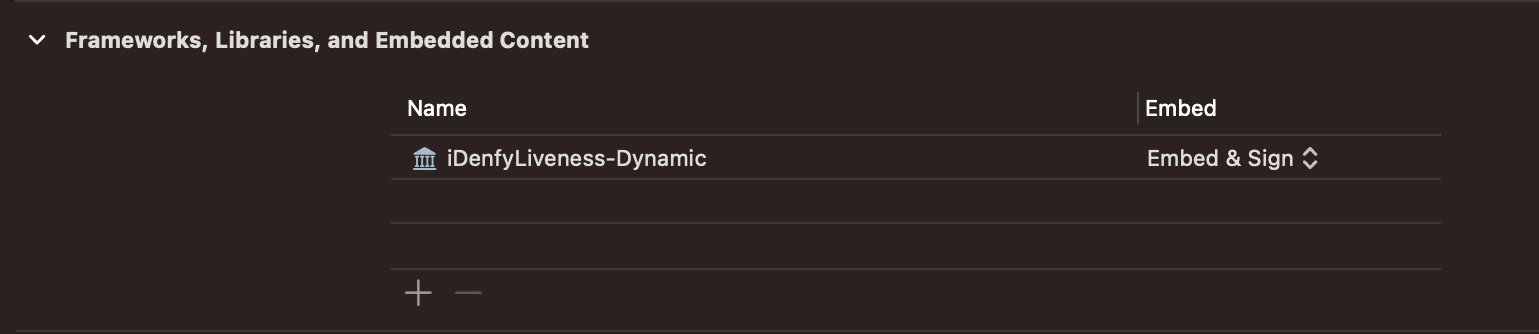
If you are using the dynamic framework, make sure you have embedded and signed it in your application.
To use the localized version of the liveness feature, add **FaceTec.strings** to your app module. Otherwise, the localization will not work.
iDenfy Assets can be found at the following [URL](https://s3-eu-west-1.amazonaws.com/prod-ivs-sdk.builds/ios-sdk/9.1.0/spm/IdenfyAssets/IdenfyAssets.zip).
Strings are located in **../IdenfyAssets/IdenfyStrings** folder.
**1. Add dependency**
Add the following line to your Podfile with the **latest version**. The latest version is accessible from the [changelog](/sdks/ios/migration-guide).
Base iDenfySDK dependency:
```ruby theme={"system"}
pod 'iDenfySDK', '9.1.0'
```
iDenfySDK with Advanced Liveness detection feature:
```ruby theme={"system"}
pod 'iDenfySDK/iDenfyLiveness', '9.1.0'
```
iDenfySDK with Advanced Liveness detection and Document blur glare detection features:
```ruby theme={"system"}
pod 'iDenfySDK/iDenfyBlurGlareDetection', '9.1.0'
```
iDenfySDK with Advanced Liveness detection, Document blur glare detection and NFC Reading features:
```ruby theme={"system"}
pod 'iDenfySDK/iDenfyNFCReading', '9.1.0'
```
iDenfySDK with Advanced Liveness detection, Document blur glare detection, NFC Reading and Document Auto Capture features:
```ruby theme={"system"}
pod 'iDenfySDK/iDenfyRecognition', '9.1.0'
```
If you are not overriding any custom views or applying customization, you can use the dynamic version. If you did make layout changes, do not use the dynamic version, since **runtime** crashes can occur.
```ruby theme={"system"}
pod 'iDenfySDK/iDenfyLiveness'
```
**2. Update pods**
Run `pod install` to install iDenfySDK or `pod update` to update the current iDenfySDK.
After installing the SDK you may face some **compile errors** related to CocoaPods. To solve them, read the [troubleshooting guide](#troubleshooting-compile-errors).
**1. Download iDenfySDK**
[Download](https://s3-eu-west-1.amazonaws.com/prod-ivs-sdk.builds/ios-sdk/9.1.0/iDenfySDKxcf.zip) the latest iDenfySDK build.
**2. Include required modules**
Copy all frameworks from the IdenfyLiveness folder into your app target folder.
To use the localized version of the liveness feature, add **FaceTec.strings** to your app module. Otherwise, the localization will not work.
Strings are located in **../iDenfySDK/IdenfyAssets/IdenfyStrings**.
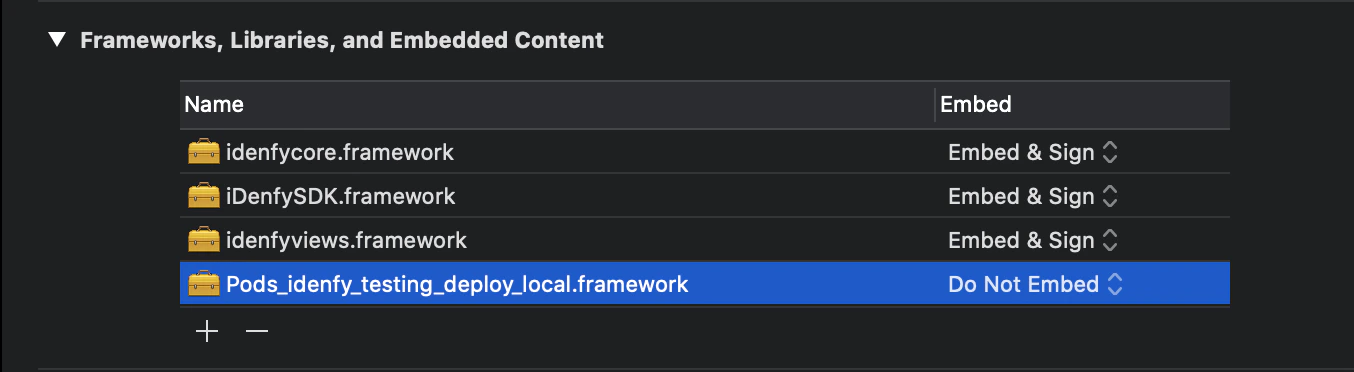
**3. Embed & Sign**
Embed and sign the included frameworks.
**4. Include internal dependencies**
iDenfySDK uses several internal dependencies. Your project should also include those dependencies using CocoaPods or any other preferred method.
If you face compile issues please read the [troubleshooting guide](#troubleshooting-compile-errors).
### Troubleshooting Compile Errors
If your application uses **Objective-C bridging headers** you might face the following compile error:
**using bridging headers with module interfaces is unsupported. Command CompileSwiftSources failed with a nonzero exit code**.
To solve this error, change the post\_install script:
```ruby theme={"system"}
post_install do |installer|
installer.pods_project.targets.each do |target|
if target.name == "lottie-ios"
target.build_configurations.each do |config|
config.build_settings['BUILD_LIBRARY_FOR_DISTRIBUTION'] = 'YES'
end
end
end
end
```
If your application has bitcode disabled and your build fails due to enabled bitcode on any of the pods, use:
```ruby theme={"system"}
post_install do |installer|
installer.pods_project.targets.each do |target|
target.build_configurations.each do |config|
config.build_settings['ENABLE_BITCODE'] = 'NO'
end
end
end
```
### Configure the SDK
Provide the following configuration:
```swift theme={"system"}
let idenfySettingsV2 = IdenfyBuilderV2()
.withAuthToken("AUTH_TOKEN")
.build()
let idenfyController = IdenfyController.shared
idenfyController.initializeIdenfySDKV2WithManual(idenfySettingsV2: idenfySettingsV2)
```
```Objective-C theme={"system"}
IdenfyBuilderV2 *idenfyBuilderV2 = [[IdenfyBuilderV2 alloc] init];
idenfyBuilderV2 = [idenfyBuilderV2 withAuthToken:authToken];
IdenfySettingsV2 *idenfySettingsV2 = [idenfyBuilderV2 build];
IdenfyController *idenfyController = [IdenfyController shared];
[idenfyController initializeIdenfySDKV2WithManualWithIdenfySettingsV2:idenfySettingsV2];
```
### Present the ViewController
**UIKit:**
```swift theme={"system"}
let idenfyVC = idenfyController.instantiateNavigationController()
self.present(idenfyVC, animated: true, completion: nil)
```
```Objective-C theme={"system"}
UINavigationController *idenfyVC = [idenfyController instantiateNavigationController];
[self presentViewController:idenfyVC animated:YES completion:nil];
```
**SwiftUI:**
To initialize the SDK in a SwiftUI project, create a `UIViewControllerRepresentable` and present it in your view:
```swift theme={"system"}
struct iDenfySDKUIViewController: UIViewControllerRepresentable {
let authToken: String
init(_ token: String) {
self.authToken = token
}
func makeUIViewController(context: Context) -> IdenfySDKNavigationController {
return initializeIdenfySDKDefault(authToken: authToken)
}
func updateUIViewController(_ viewController: IdenfySDKNavigationController, context: Context) {
//update Content
}
private func initializeIdenfySDKDefault(authToken: String) -> IdenfySDKNavigationController {
let idenfyUISettingsV2 = IdenfyUIBuilderV2()
.build()
let idenfySettingsV2 = IdenfyBuilderV2()
.withAuthToken(authToken)
.withUISettingsV2(idenfyUISettingsV2)
.build()
let idenfyController = IdenfyController.shared
idenfyController.initializeIdenfySDKV2WithManual(idenfySettingsV2: idenfySettingsV2)
handleSDKResults(idenfyController)
return idenfyController.instantiateNavigationController()
}
}
```
Full initialization code of iDenfySDK using SwiftUI is available in the [sample application](https://github.com/idenfy/iDenfyResources/blob/main/sdk/ios/tutorials/sample/iDenfySDKSampleSwiftUI.zip).
### Handle Verification Callbacks
The SDK provides the `idenfyIdentificationResult` callback class.
If your service uses only the [automatic (default) callback](/kyc/webhooks#default-callback), then you should only check `idenfyIdentificationResult.autoIdentificationStatus`.
#### With getIdenfyResultWithDismiss Method
```swift theme={"system"}
/// Returns user's verification result in the UIViewController dismiss completion webhook.
private func handleSDKResults(_ idenfyController: IdenfyController) {
idenfyController.getIdenfyResultWithDismiss(idenfyIdentificationResult: {
idenfyIdentificationResult
in
print("Auto: \(idenfyIdentificationResult.autoIdentificationStatus.rawValue), Manual: \(idenfyIdentificationResult.manualIdentificationStatus.rawValue)")
switch idenfyIdentificationResult.autoIdentificationStatus {
case .APPROVED:
// The user completed an identification flow and the identification status, provided by an automated platform, is APPROVED.
break
case .FAILED:
// The user completed an identification flow and the identification status, provided by an automated platform, is FAILED.
break
case .UNVERIFIED:
// The user did not complete an identification flow and the identification status, provided by an automated platform, is UNVERIFIED.
break
@unknown default:
break
}
switch idenfyIdentificationResult.manualIdentificationStatus {
case .APPROVED:
// The user completed an identification flow and was verified manually while waiting for the manual verification results in the iDenfy SDK. The identification status, provided by a manual review, is APPROVED.
break
case .FAILED:
// The user completed an identification flow and was verified manually while waiting for the manual verification results in the iDenfy SDK. The identification status, provided by a manual review, is FAILED.
break
case .WAITING:
// The user completed an identification flow and started waiting for the manual verification results in the iDenfy SDK. The user decided to stop waiting and clicked the "BACK TO ACCOUNT" button. The manual identification review is still ongoing.
break
case .INACTIVE:
// The user was only verified by an automated platform, not by a manual reviewer. The identification performed by the user can still be verified by the manual review if your system uses the manual verification service.
break
@unknown default:
break
}
})
}
```
## Callback Status Reference
### autoIdentificationStatus
| Name | Description |
| ------------ | ---------------------------------------------------------------------------------------------------------------------------- |
| `APPROVED` | The user completed a verification flow and the verification status, provided by an automated platform, is APPROVED. |
| `FAILED` | The user completed a verification flow and the verification status, provided by an automated platform, is FAILED. |
| `UNVERIFIED` | The user did not complete a verification flow and the verification status, provided by an automated platform, is UNVERIFIED. |
### manualIdentificationStatus
| Name | Description |
| ---------- | ------------------------------------------------------------------------------------------------------------------------------------------------------------------------------------------------------------------------------------------------- |
| `APPROVED` | The user completed a verification flow and was verified manually while waiting for the manual verification results in the iDenfy SDK. The verification status, provided by a manual review, is APPROVED. |
| `FAILED` | The user completed a verification flow and was verified manually while waiting for the manual verification results in the iDenfy SDK. The verification status, provided by a manual review, is FAILED. |
| `WAITING` | The user completed a verification flow and started waiting for the manual verification results in the iDenfy SDK. The user decided to stop waiting and clicked the "BACK TO ACCOUNT" button. The manual verification review is **still ongoing**. |
| `INACTIVE` | The user was only verified by an automated platform, not by a manual reviewer. The verification performed by the user can still be verified by the manual review if your system uses the manual verification service. |
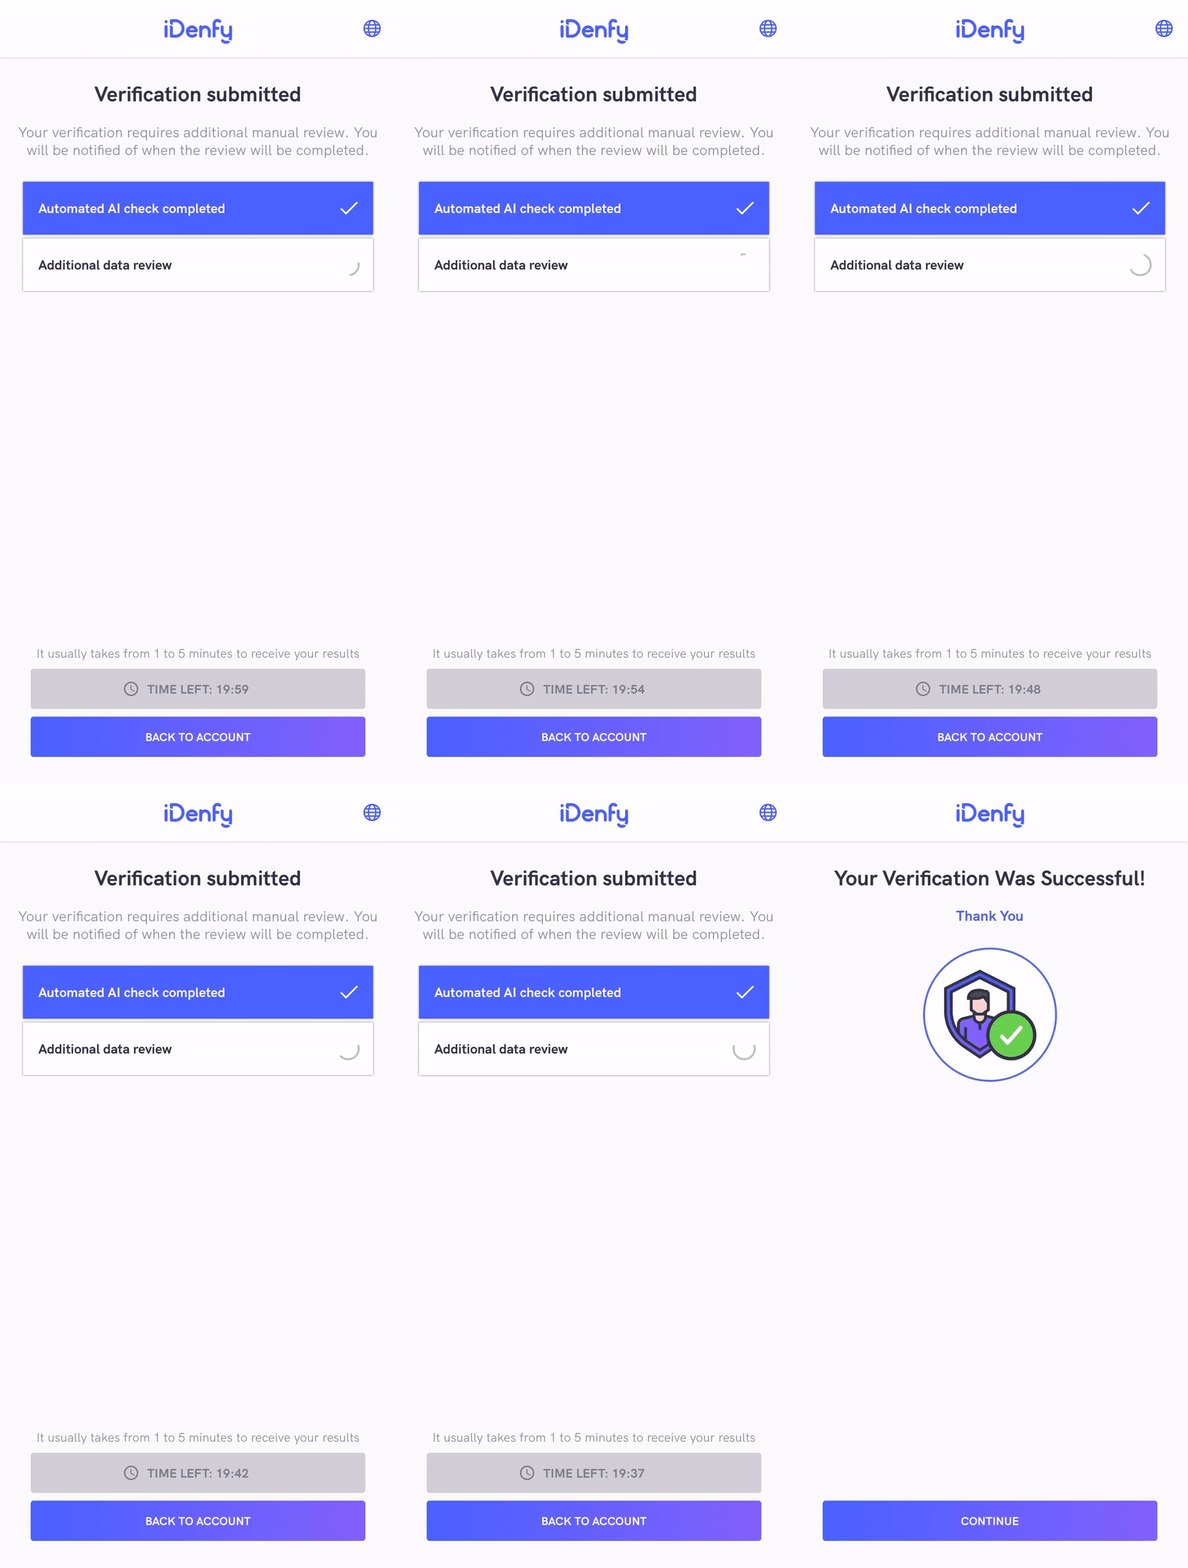
The manualIdentificationStatus always returns INACTIVE unless your system [implemented manual verification flow (step 11)](/kyc/webhooks#callbacks-with-auto-callback). The manual verification screen looks like this:
To disable it, refer to the [immediate redirect feature](/sdks/ios/customizing-flow#identity-verification-results-screen-changes).
These SDK statuses are the same as **iFrame** integration statuses. The only difference is that the SDK returns INACTIVE if the manual verification screen was not opened during the verification session, instead of returning null as the iFrame does.
Also, the iFrame does **not close automatically** since it can deliver results without closing itself.
After the SDK finishes and closes itself, you will also receive a [webhook callback](/kyc/webhooks#verification-result-webhook-callback) to your backend system.
It might be useful to **completely ignore the SDK status** and communicate between your app and your backend service about verification status.
## Samples
Our [UIKit sample](https://github.com/idenfy/iDenfyResources/blob/main/sdk/ios/tutorials/sample/idenfy_sample_ios.zip) and [SwiftUI sample](https://github.com/idenfy/iDenfyResources/blob/main/sdk/ios/tutorials/sample/iDenfySDKSampleSwiftUI.zip) applications demonstrate the integration of the iDenfy SDK.
## FAQ
**1. Is there a possibility to change the verification results view?**
Yes, you can achieve this by providing a [custom waiting view controller](/sdks/ios/ui-customization#customization-by-providing-a-customwaitingviewcontroller).
**2. How to change the position of the top titles?**
Any component and its properties can be changed by [supplying your implementation of UIView](/sdks/ios/ui-customization#customization-by-providing-supplying-your-own-implementations-of-uiviews-protocol).
**3. How do I report an issue within the SDK?**
Please report any issue via the [Jira customer portal](https://idenfy-ivs.atlassian.net/servicedesk/customer/portal/1). Attach the SDK and Xcode versions you are using, and describe the problem in as much detail as possible.
**4. When I override liveness fonts, the size does not change. Why is that?**
Liveness font size is dynamically determined according to the screen resolution, and it **cannot be manually changed**.
**5. What if Apple Review team denies our application because of iDenfy SDK?**
* Check the iDenfy [privacy policy](https://idenfy.com/privacy-policy/) for possible answers.
* If Apple Review team asks for a demo of NFC functionality, provide the following [video](https://s3.eu-west-1.amazonaws.com/prod-ivs-sdk.builds/ios-tutorials/idenfy_nfc_for_apple_store.mp4).
 **4. Include internal dependencies**
iDenfySDK uses several internal dependencies. Your project should also include those dependencies using CocoaPods or any other preferred method.
**4. Include internal dependencies**
iDenfySDK uses several internal dependencies. Your project should also include those dependencies using CocoaPods or any other preferred method.
 To solve this error, change the post\_install script:
```ruby theme={"system"}
post_install do |installer|
installer.pods_project.targets.each do |target|
if target.name == "lottie-ios"
target.build_configurations.each do |config|
config.build_settings['BUILD_LIBRARY_FOR_DISTRIBUTION'] = 'YES'
end
end
end
end
```
If your application has bitcode disabled and your build fails due to enabled bitcode on any of the pods, use:
```ruby theme={"system"}
post_install do |installer|
installer.pods_project.targets.each do |target|
target.build_configurations.each do |config|
config.build_settings['ENABLE_BITCODE'] = 'NO'
end
end
end
```
### Configure the SDK
Provide the following configuration:
To solve this error, change the post\_install script:
```ruby theme={"system"}
post_install do |installer|
installer.pods_project.targets.each do |target|
if target.name == "lottie-ios"
target.build_configurations.each do |config|
config.build_settings['BUILD_LIBRARY_FOR_DISTRIBUTION'] = 'YES'
end
end
end
end
```
If your application has bitcode disabled and your build fails due to enabled bitcode on any of the pods, use:
```ruby theme={"system"}
post_install do |installer|
installer.pods_project.targets.each do |target|
target.build_configurations.each do |config|
config.build_settings['ENABLE_BITCODE'] = 'NO'
end
end
end
```
### Configure the SDK
Provide the following configuration:
 To disable it, refer to the [immediate redirect feature](/sdks/ios/customizing-flow#identity-verification-results-screen-changes).