> ## Documentation Index
> Fetch the complete documentation index at: https://documentation.idenfy.com/llms.txt
> Use this file to discover all available pages before exploring further.
# iOS SDK UI Customization
> Customize iDenfy iOS SDK colors, fonts, and UI elements programmatically in Swift for a fully branded identity verification experience.
The iOS SDK provides various customization options with *programming code*.
## Getting Started
### Create IdenfyUISettingsV2
Create an instance of the `IdenfyUISettingsV2` class:
```swift theme={"system"}
let idenfyUISettings = IdenfyUIBuilderV2()
.build()
```
### Update IdenfySettingsV2
```swift theme={"system"}
let idenfySettings = IdenfyBuilderV2()
.withUISettings(idenfyUISettings)
...
.build()
```
### Which Approach Should You Use?
| Approach | Complexity | Best for |
| ---------------------------- | ---------- | -------------------------------------------------- |
| SDK-wide color changes | Low | Brand color changes only |
| idenfyviews module overrides | Medium | Tweaking colors, fonts, and styles per screen |
| Custom UIViews protocol | High | Full control over layout structure and constraints |
| Custom results view | Medium | Replacing the verification-results screen entirely |
## Customization Options
### Customization with IdenfyUISettingsV2
#### Camera OnBoarding View
```swift theme={"system"}
IdenfyUIBuilderV2()
/**
Camera OnBoarding View acts as additional step(single or multiple), which helps the user to familiarize themselves with the identification process
- Parameter idenfyOnBoardingViewType: sets camera onBoarding view type
*/
.withOnBoadringViewType(_ idenfyOnBoardingViewType: IdenfyOnBoardingViewTypeEnum)
...
```
The possible options of the Camera OnBoarding View:
| IdenfyOnBoardingViewTypeEnum | Description |
| ---------------------------- | ------------------------------------------------------------------------------------------------------------------------------------------------------ |
| `none` | OnBoarding view is skipped |
| `multipleStatic` | Shows an onBoarding view before EVERY step of the verification process with a static instruction list (This is a default setting starting 7.x version) |
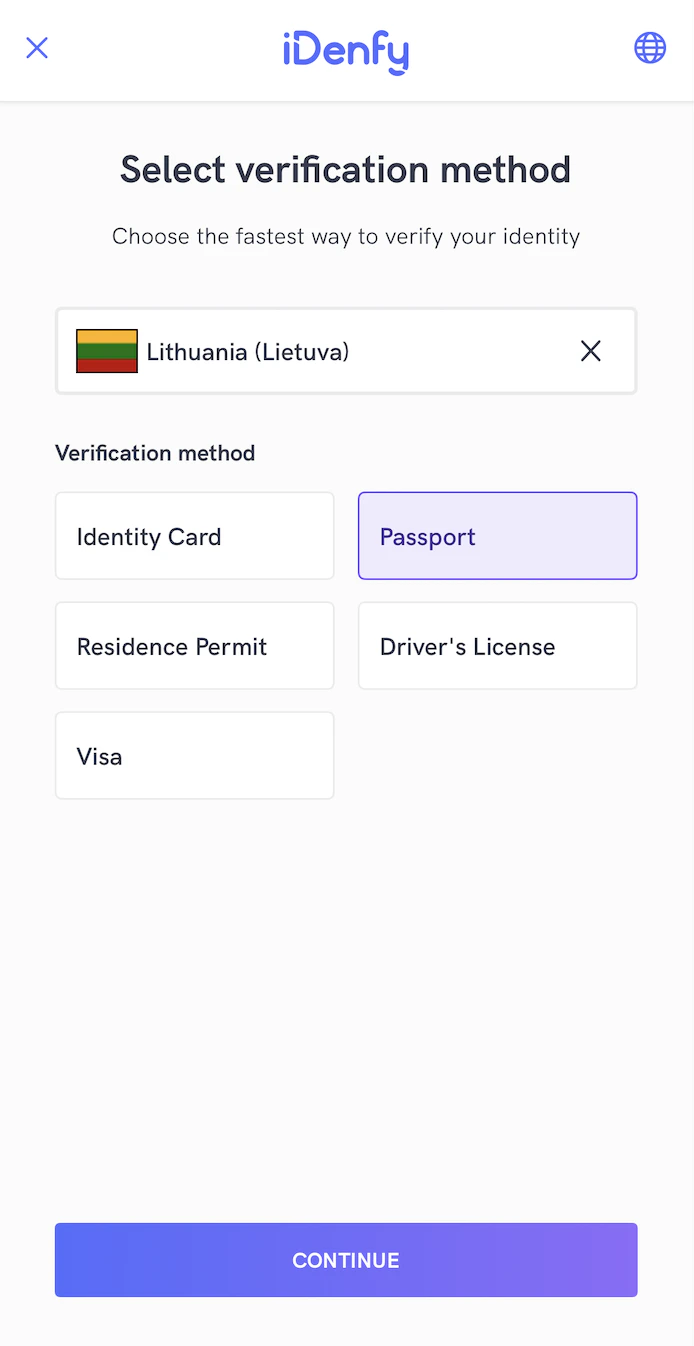
#### Joined Country and Document Selection
Since SDK version 9.0.0, this setting is enabled by default and the country and document selection views are joined into one.
```swift theme={"system"}
IdenfyUIBuilderV2()
/**
* An option to choose whether country and document selection views are joined or separate
- Parameter withCountryAndDocumentSelectionJoined sets the visibility of joined country and document selection view
*/
.withCountryAndDocumentSelectionJoined(_ withCountryAndDocumentSelectionJoined: Bool)
...
```
#### Language Selection
```swift theme={"system"}
IdenfyUIBuilderV2()
/**
Enables language selection window, which provides option to change locale
- Parameter isLanguageSelectionNeeded: changes visibility of locale selection
*/
.withLanguageSelection(_ isLanguageSelectionNeeded: Bool)
...
```
#### Bottom Sheet Dialogs
Since SDK version 9.1.0, this setting is enabled by default, it present dialogs as bottom sheets instead of centered alerts for iDenfy custom dialogs
```swift theme={"system"}
IdenfyUIBuilderV2()
/**
* An option to present dialogs as bottom sheets instead of centered alerts for iDenfy custom dialogs
- Parameter useBottomSheetDialogs sets whether bottom sheet dialogs are used instead of alert dialogs
*/
.withBottomSheetDialogs(_ useBottomSheetDialogs: Bool)
...
```
#### Document Camera Rectangle Visibility
Since some documents are non-regular size, you can hide the camera rectangle. This way the whole screen is dedicated to document capturing.
The rectangle can be hidden for **all** document types:
```swift theme={"system"}
IdenfyUIBuilderV2()
/**
* Camera rectangle will be hidden for ALL countries and document types
*/
.withDocumentCameraFrameVisibility(DocumentCameraFrameVisibility.hiddenForAllCountriesAndDocumentTypes)
...
```
Or for **specific countries and document types**:
```swift theme={"system"}
var countryDocumentMap: [String: [DocumentTypeEnum]] = [:]
countryDocumentMap["LT"] = [DocumentTypeEnum.PASSPORT]
...
let documentCameraFrameVisibility = DocumentCameraFrameVisibility.hiddenForSpecificCountriesAndDocumentTypes(countryDocumentMap: countryDocumentMap)
IdenfyUIBuilderV2()
/**
* Camera rectangle will be hidden ONLY for Lithuanian passport
*/
.withDocumentCameraFrameVisibility(documentCameraFrameVisibility)
...
```
#### iDenfy Toolbar
You can hide the iDenfy toolbar:
```swift theme={"system"}
IdenfyUIBuilderV2()
/**
* An option to hide idenfy toolbar
*/
.withIdenfyToolbarHidden()
...
```
### Customization by Changing Views from `idenfyviews` Module
All UI elements are located in the separate module `idenfyviews`. Classes are marked as public, so you can override them.
**1. Including idenfyviews:**
```swift theme={"system"}
import idenfyviews
```
**2. Applying customization:**
Take for example `IdenfyDocumentSelectionViewUISettingsV2` settings:
```swift theme={"system"}
@objc open class IdenfyDocumentSelectionViewUISettingsV2: NSObject {
// Idenfy Document Selection View Colors
@MainActor @objc public static var idenfyDocumentSelectionViewBackgroundColor = IdenfyCommonColors.idenfyBackgroundColorV2
@MainActor @objc public static var idenfyDocumentSelectionViewTitleTextColor = IdenfyCommonColors.idenfySecondColorV2
@MainActor @objc public static var idenfyDocumentSelectionViewDescriptionTextColor = IdenfyCommonColors.idenfySecondColorV2
@MainActor @objc public static var idenfyDocumentSelectionViewDocumentTableViewBorderColor = IdenfyCommonColors.idenfySecondColorV2.withAlphaComponent(0.06)
@MainActor @objc public static var idenfyDocumentSelectionViewDocumentTableViewBackgroundColor = IdenfyCommonColors.idenfyWhite
@MainActor @objc public static var idenfyDocumentSelectionViewDocumentTableViewCellBackgroundColor = IdenfyCommonColors.idenfyWhite
@MainActor @objc public static var idenfyDocumentSelectionViewDocumentTableViewCellBorderColor = IdenfyCommonColors.idenfySecondColorV2.withAlphaComponent(0.06)
@MainActor @objc public static var idenfyDocumentSelectionViewDocumentTableViewCellTitleTextColor = IdenfyCommonColors.idenfySecondColorV2
@MainActor @objc public static var idenfyDocumentSelectionViewDocumentTableViewCellHighlightedTextColor = IdenfyCommonColors.idenfyWhite
@MainActor @objc public static var idenfyDocumentSelectionViewDocumentTableViewCellHighlightedBackgroundColor = IdenfyCommonColors.idenfyMainColorV2
@MainActor @objc public static var idenfyDocumentSelectionViewContinueButtonDisabledTextColor = IdenfyCommonColors.idenfySecondColorV2.withAlphaComponent(0.5)
@MainActor @objc public static var idenfyDocumentSelectionViewContinueButtonDisabledBackgroundColor = IdenfyCommonColors.idenfySecondColorV2.withAlphaComponent(0.2)
@MainActor @objc public static var idenfyDocumentSelectionViewContinueButtonEnabledTextColor = IdenfyCommonColors.idenfyWhite
// Idenfy Document Selection View Fonts
@MainActor @objc public static var idenfyDocumentSelectionViewTitleFont = UIFont(name: ConstsIdenfyFonts.idenfyFontBoldV2, size: 22)
@MainActor @objc public static var idenfyDocumentSelectionViewDescriptionFont = UIFont(name: ConstsIdenfyFonts.idenfyFontRegularV2, size: 13)
@MainActor @objc public static var idenfyDocumentSelectionViewDocumentTypeFont = UIFont(name: ConstsIdenfyFonts.idenfyFontRegularV2, size: 13)
@MainActor @objc public static var idenfyDocumentSelectionViewDocumentTypeHighlightedFont = UIFont(name: ConstsIdenfyFonts.idenfyFontBoldV2, size: 13)
// Idenfy Document Selection View Style
@MainActor @objc public static var idenfyDocumentSelectionViewDocumentTableViewBorderWidth = CGFloat(2)
@MainActor @objc public static var idenfyDocumentSelectionViewDocumentTableViewCornerRadius = CGFloat(3)
@MainActor @objc public static var idenfyDocumentSelectionViewDocumentTableViewCellBorderWidth = CGFloat(2)
@MainActor @objc public static var idenfyDocumentSelectionViewDocumentTableViewCellHeight = CGFloat(56)
}
```
You can customize it as follows:
```swift theme={"system"}
IdenfyDocumentSelectionViewUISettingsV2.idenfyDocumentSelectionViewBackgroundColor = UIColor.red
IdenfyDocumentSelectionViewUISettingsV2.idenfyDocumentSelectionViewTitleTextColor = UIColor.red
```
Find UI Settings classes for all views in the [repository](https://github.com/idenfy/iDenfyResources/tree/main/sdk/ios/uicustomization).
#### Applying SDK-Wide Color Changes
If **color and asset changes** are the only requirement, they can be easily customized by changing the main colors.
| Color name | Description | Default color value |
| ------------------------- | --------------------------------------------------------------------------------- | ------------------- |
| `idenfyMainColorV2` | Defines the color of most single-colored assets and focused parts in the SDK. | #536DFE |
| `idenfyMainDarkerColorV2` | Defines the color of some focused parts in the SDK, similar to idenfyMainColorV2. | #5D7CE4 |
| `idenfyBackgroundColorV2` | Defines the background color. | #FBFBFB |
| `idenfySecondColorV2` | Defines the text color. | #F2353B4E |
Example:
```swift theme={"system"}
IdenfyCommonColors.idenfyMainColorV2 = UIColor.green
IdenfyCommonColors.idenfyMainDarkerColorV2 = UIColor.green
```
Colors are also applied to images that use a single color from *IdenfyImagesV2.xcassets*. If you override the provided images with icons using more than one color, you can disable the tint by setting color values to `nil`:
```swift theme={"system"}
IdenfyToolbarUISettingsV2.idenfyDefaultToolbarLogoIconTintColor = nil
IdenfyToolbarUISettingsV2.idenfyDefaultToolbarBackIconTintColor = nil
IdenfyToolbarUISettingsV2.idenfyLanguageSelectionToolbarLanguageSelectionIconTintColor = UIColor.yellow
IdenfyToolbarUISettingsV2.idenfyLanguageSelectionToolbarCloseIconTintColor = nil
IdenfyToolbarUISettingsV2.idenfyCameraPreviewSessionToolbarBackIconTintColor = nil
IdenfyIdentificationResultsViewUISettingsV2.idenfyIdentificationResultsDividerIconStatusErrorTintColor = nil
IdenfyIdentificationResultsViewUISettingsV2.idenfyIdentificationResultsDividerIconStatusLoadingTintColor = nil
```
#### Applying Custom Fonts
Custom fonts can be passed to the SDK (make sure the font files exist in your bundle):
```swift theme={"system"}
ConstsIdenfyFonts.customFontBoldFileName = "Inter-Bold.ttf"
ConstsIdenfyFonts.customFontSemiBoldFileName = "Inter-SemiBold.ttf"
ConstsIdenfyFonts.customFontRegularFileName = "Inter-Regular.ttf"
```
### Customization by Supplying Your Own Implementations of UIViews Protocol
For more advanced customization (fonts, constraints, layout structure, etc.), you can override the SDK layouts by providing your own implementations.
All views used in the SDK are located in the `idenfyviews` module and expose public protocols.
**1. Create an instance of IdenfyViewsV2**
Use `IdenfyViewsBuilderV2` to create an instance of `IdenfyViewsV2` with your custom views that conform to the protocols provided by the SDK:
```swift theme={"system"}
let idenfyViewsV2:IdenfyViewsV2 = IdenfyViewsBuilderV2()
.withSplashScreenV2View(SplashScreenV2View())
...
.build()
```
**2. Initialize iDenfySDK with an instance of IdenfyViewsV2**
```swift theme={"system"}
idenfyController.initializeIdenfySDKV2WithManual(idenfySettingsV2: idenfySettingsV2, idenfyViewsV2: idenfyViewsV2)
```
Find all iDenfy viewables and their implementations in the [sample application](https://github.com/idenfy/iDenfyResources/blob/main/sdk/ios/tutorials/sample/idenfy_sample_ios.zip).
If you need very custom issuing country or document selection screens or want to merge them into a single screen, it is always better to use the [skipping views customization](/sdks/ios/quickstart#skipping-parts-of-the-verification-flow) options.
If you need a very custom verification results screen, it is better to use the [CustomWaitingViewController](#customization-by-providing-a-customwaitingviewcontroller) solution.
### Customization by Providing a CustomWaitingViewController
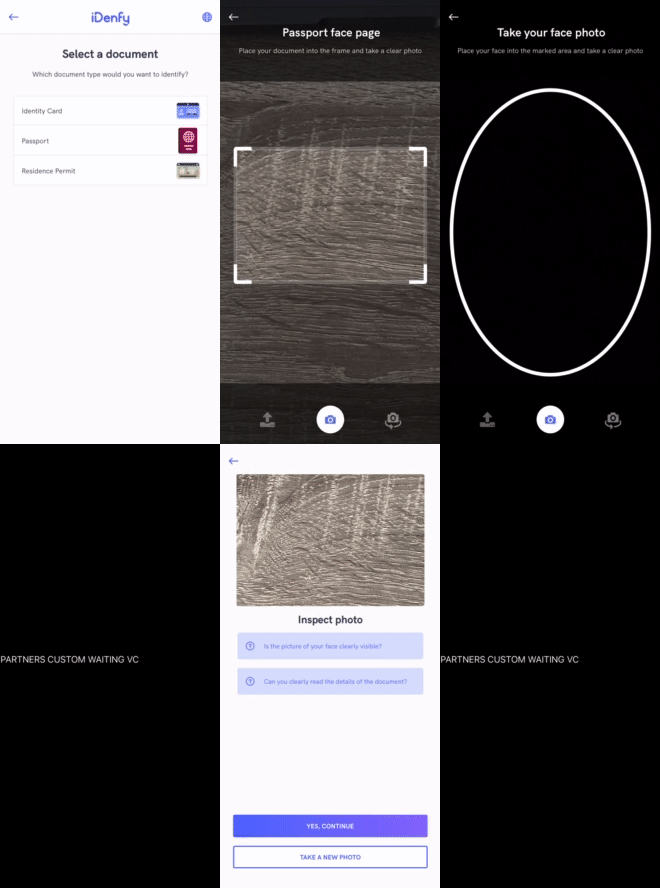
To fully customize your verification results waiting view, you can pass your own view controller.
After supplying your own implementation of the results ViewController, the SDK will not load its own ViewController and will navigate **directly to your own VC**.
You can then control when and after which additional steps you want to retry the verification session:
**1. Create a class that implements IdenfyInProcessIdentificationResultsDelegate**
Pass an instance of your created class to the `initializeWithCustomWaitingViewController()` method of `IdenfyController`:
```swift theme={"system"}
idenfyController.initializeWithCustomWaitingViewController(idenfySettingsV2: idenfySettingsV2, idenfyInProcessIdentificationResultsDelegate: idenfyInProcessIdentificationResultsDelegateImpl())
```
**2. Create an instance of your CustomWaitingViewController**
Return the created instance in the `onIdenfyFlowFinished()` method of your `IdenfyInProcessIdentificationResultsDelegate` implementation:
```swift theme={"system"}
/**
- Parameter idenfyIdentificationResultStatus: returns a current verification status. This status is updated until FINISHED is returned.
*/
func onIdenfyFlowFinished(idenfyFlowSettings _: IdenfyFlowSettings) -> CustomWaitingViewController {
return CustomWaitingViewController.ViewControllerProvided(vc: PartnersCustomWaitingViewController())
}
```
For details regarding the verification process, see `IdenfyFlowSettings`:
```swift theme={"system"}
/**
Has set of properties for providing information about user verification flow.
*/
public struct IdenfyFlowSettings {
/**
Provides an array of steps used during the verification process.
*/
public let identificationSteps: [Step]
}
```
**3. Call a static method of IdenfyController to continue the flow**
Your `IdenfyInProcessIdentificationResultsDelegate` implementation has an `onIdentificationStatusReceived()` method that returns an `IdenfyIdentificationResultStatus`. When `IdenfyIdentificationStatus` is **FINISHED**, call the static `continueFlow()` method of `IdenfyController`:
```swift theme={"system"}
/**
- Parameter idenfyIdentificationResultStatus: returns a current verification status. This status is updated until FINISHED is returned.
*/
func onIdentificationStatusReceived(idenfyIdentificationResultStatus: IdenfyIdentificationResultStatus) {
switch idenfyIdentificationResultStatus.idenfyProcessingResultState {
case .FINISHED(canRetry: _, retakeSteps: _):
IdenfyController.continueFlow()
break
case .PROCESSING:
break
}
}
```
`IdenfyIdentificationResultStatus` contains all information about the current state of verification results:
```swift theme={"system"}
public class IdenfyIdentificationResultStatus {
public let idenfyIdentificationStatus: IdenfyIdentificationStatus
public let idenfyProcessingResultState: IdenfyProcessingResultState
public init(idenfyIdentificationStatus: IdenfyIdentificationStatus, idenfyProcessingResultState: IdenfyProcessingResultState) {
self.idenfyIdentificationStatus = idenfyIdentificationStatus
self.idenfyProcessingResultState = idenfyProcessingResultState
}
}
public enum IdenfyProcessingResultState {
case PROCESSING
case FINISHED(canRetry: Bool, retakeSteps: RetakeSteps?)
}
public enum IdenfyIdentificationStatus: String, Codable {
case APPROVED
case DENIED
case SUSPECTED
case REVIEWING
case UNKNOWN
}
```
### Customization with IdenfyUISettingsV2
#### Adding Instructions in Camera Session
The SDK provides informative instructions during the verification session. They can help tackle common issues: bad lighting, wrong document side, etc. Instructions can be customized by changing all UI elements or even using your MP4 video files.
**Using IdenfyInstructionsEnum dialog:**
**Using IdenfyInstructionsEnum none:**
Enable instructions in IdenfyUISettingsV2:
```swift theme={"system"}
let idenfyUISettingsV2 = IdenfyUIBuilderV2()
.withInstructions(IdenfyInstructionsEnum.dialog)
.build()
```
## Liveness Customization
The SDK provides additional liveness customization.
### 1. Creating IdenfyLivenessUIHelper
```swift theme={"system"}
let idenfyLivenessUISettings = IdenfyLivenessUISettings()
```
### 2.1 Applying Regular Settings
If you only need color, text, or width customization, you can use properties from the `IdenfyLivenessUISettings` class:
```swift theme={"system"}
@objc public class IdenfyLivenessUISettings: NSObject {
// Used for different ui parts
public var idenfyLivenessPrimaryColor = UIColor.white
public var idenfyLivenessAccentColor = UIColor(red: 139 / 255.0, green: 199 / 255.0, blue: 224 / 255.0, alpha: 1.0)
public var idenfyLivenessTextColor = UIColor.black
// Liveness session feedback settings
public var livenessFeedbackBackgroundColor = UIColor(red: 139 / 255.0, green: 199 / 255.0, blue: 224 / 255.0, alpha: 1.0)
public var livenessFeedbackFont: UIFont = UIFont(name: ConstsIdenfyFonts.idenfyFontBoldV2, size: 18) ?? UIFont.boldSystemFont(ofSize: 18)
public var livenessFeedbackFontSizeMobile: CGFloat?
public var livenessFeedbackFontSizeTablet: CGFloat?
public var livenessFeedbackFontColor: UIColor?
// Liveness session frame settings
public var livenessFrameBackgroundColor: UIColor = UIColor.black.withAlphaComponent(0.72)
public var livenessFrameColor: UIColor?
public var livenessFrameWidth: Int32? = 0
//Liveness session cancel button settings
public var livenessCancelButtonImage = UIImage(named: "idenfy_ic_liveliness_camera_session_cancel_image", in: Bundle(identifier: "com.idenfy.idenfysdk"), compatibleWith: nil)
// Liveness session progress settings
public var livenessIdentificationOvalProgressColor1 = UIColor(red: 139 / 255.0, green: 199 / 255.0, blue: 224 / 255.0, alpha: 1.0)
public var livenessIdentificationProgressStrokeColor = UIColor(red: 139 / 255.0, green: 199 / 255.0, blue: 224 / 255.0, alpha: 1.0)
public var livenessIdentificationOvalProgressColor2 = UIColor(red: 139 / 255.0, green: 199 / 255.0, blue: 224 / 255.0, alpha: 1.0)
public var livenessIdentificationProgressStrokeWidth: Int32 = 4
public var livenessIdentificationStrokeWidth: Int32 = 3
public var livenessIdentificationProgressRadialOffset: Int32 = 6
// Liveness session overlay settings
public var livenessOverlayBrandingImage = UIImage(named: "idenfy_ic_liveliness_overlay_branding_image", in: Bundle(identifier: "com.idenfy.idenfysdk"), compatibleWith: nil)
// Liveness ready screen settings
public var livenessReadyScreenForegroundColor: UIColor?
public var livenessReadyScreenBackgroundColors: [UIColor]?
public var livenessReadyScreenTextBackgroundColor: UIColor?
public var livenessReadyScreenButtonBorderColor: UIColor?
public var livenessReadyScreenButtonBorderWidth: Int32? = 1
public var livenessReadyScreenButtonCornerRadius: Int32? = 4
public var livenessReadyScreenButtonBackgroundNormalColor: UIColor?
public var livenessReadyScreenButtonBackgroundHighlightedColor: UIColor?
public var livenessReadyScreenShowBrandingImage: Bool? = true
//Camera permissions screen
public var livenessCameraPermissionsScreenImage = UIImage(named: "idenfy_ic_liveliness_camera_permissions_screen_image", in: Bundle(identifier: "com.idenfy.idenfysdk"), compatibleWith: nil)
// Liveness result screen settings
public var livenessResultScreenForegroundColor: UIColor?
public var livenessResultScreenIndicatorColor: UIColor?
public var livenessResultScreenUploadProgressFillColor: UIColor?
public var livenessResultScreenUploadProgressTrackColor: UIColor?
public var livenessResultScreenShowUploadProgressBar: Bool? = true
public var livenessResultScreenResultAnimationSuccessBackgroundImage = UIImage(named: "idenfy_ic_liveliness_results_success_icon_background", in: Bundle(identifier: "com.idenfy.idenfysdk"), compatibleWith: nil)
public var livenessCustomUISettings: FaceTecCustomization?
// ID check customization
public var livenessIdCheckCustomization = LivenessIdCheckCustomization()
}
```
**LivenessIdCheckCustomization:**
```swift theme={"system"}
@objc public class LivenessIdCheckCustomization: NSObject {
public var buttonBackgroundNormalColor: UIColor?
public var buttonBackgroundHighlightColor: UIColor?
public var captureScreenTextBackgroundColor: UIColor?
public var reviewScreenTextBackgroundColor: UIColor?
public var captureFrameStrokeColor: UIColor?
}
```
### 2.2 Applying Full Customization
If you require more changes, you can directly set the **livenessCustomUISettings** property in `IdenfyLivenessUISettings` with your instance of the `FaceTecCustomization` class:
```swift theme={"system"}
idenfyLivenessUISettings.livenessCustomUISettings = FaceTecCustomization()
```
Full customization options are available [here](https://dev.facetec.com/ui-customization).
This will override all other set properties of the IdenfyLivenessUISettings class.
### 3. Updating IdenfyUISettings
```swift theme={"system"}
let idenfyUISettings = IdenfyUIBuilder()
.withLivenessUISettings(idenfyLivenessUISettings)
...
.build()
```
```swift theme={"system"}
let idenfyUISettingsV2 = IdenfyUIBuilderV2()
.withLivenessUISettings(idenfyLivenessUISettings)
...
.build()
```
 ```swift theme={"system"}
IdenfyUIBuilderV2()
/**
* An option to choose whether country and document selection views are joined or separate
- Parameter withCountryAndDocumentSelectionJoined sets the visibility of joined country and document selection view
*/
.withCountryAndDocumentSelectionJoined(_ withCountryAndDocumentSelectionJoined: Bool)
...
```
#### Language Selection
```swift theme={"system"}
IdenfyUIBuilderV2()
/**
Enables language selection window, which provides option to change locale
- Parameter isLanguageSelectionNeeded: changes visibility of locale selection
*/
.withLanguageSelection(_ isLanguageSelectionNeeded: Bool)
...
```
#### Bottom Sheet Dialogs
Since SDK version 9.1.0, this setting is enabled by default, it present dialogs as bottom sheets instead of centered alerts for iDenfy custom dialogs
```swift theme={"system"}
IdenfyUIBuilderV2()
/**
* An option to present dialogs as bottom sheets instead of centered alerts for iDenfy custom dialogs
- Parameter useBottomSheetDialogs sets whether bottom sheet dialogs are used instead of alert dialogs
*/
.withBottomSheetDialogs(_ useBottomSheetDialogs: Bool)
...
```
#### Document Camera Rectangle Visibility
Since some documents are non-regular size, you can hide the camera rectangle. This way the whole screen is dedicated to document capturing.
The rectangle can be hidden for **all** document types:
```swift theme={"system"}
IdenfyUIBuilderV2()
/**
* Camera rectangle will be hidden for ALL countries and document types
*/
.withDocumentCameraFrameVisibility(DocumentCameraFrameVisibility.hiddenForAllCountriesAndDocumentTypes)
...
```
Or for **specific countries and document types**:
```swift theme={"system"}
var countryDocumentMap: [String: [DocumentTypeEnum]] = [:]
countryDocumentMap["LT"] = [DocumentTypeEnum.PASSPORT]
...
let documentCameraFrameVisibility = DocumentCameraFrameVisibility.hiddenForSpecificCountriesAndDocumentTypes(countryDocumentMap: countryDocumentMap)
IdenfyUIBuilderV2()
/**
* Camera rectangle will be hidden ONLY for Lithuanian passport
*/
.withDocumentCameraFrameVisibility(documentCameraFrameVisibility)
...
```
#### iDenfy Toolbar
You can hide the iDenfy toolbar:
```swift theme={"system"}
IdenfyUIBuilderV2()
/**
* An option to hide idenfy toolbar
*/
.withIdenfyToolbarHidden()
...
```
### Customization by Changing Views from `idenfyviews` Module
All UI elements are located in the separate module `idenfyviews`. Classes are marked as public, so you can override them.
**1. Including idenfyviews:**
```swift theme={"system"}
import idenfyviews
```
**2. Applying customization:**
Take for example `IdenfyDocumentSelectionViewUISettingsV2` settings:
```swift theme={"system"}
@objc open class IdenfyDocumentSelectionViewUISettingsV2: NSObject {
// Idenfy Document Selection View Colors
@MainActor @objc public static var idenfyDocumentSelectionViewBackgroundColor = IdenfyCommonColors.idenfyBackgroundColorV2
@MainActor @objc public static var idenfyDocumentSelectionViewTitleTextColor = IdenfyCommonColors.idenfySecondColorV2
@MainActor @objc public static var idenfyDocumentSelectionViewDescriptionTextColor = IdenfyCommonColors.idenfySecondColorV2
@MainActor @objc public static var idenfyDocumentSelectionViewDocumentTableViewBorderColor = IdenfyCommonColors.idenfySecondColorV2.withAlphaComponent(0.06)
@MainActor @objc public static var idenfyDocumentSelectionViewDocumentTableViewBackgroundColor = IdenfyCommonColors.idenfyWhite
@MainActor @objc public static var idenfyDocumentSelectionViewDocumentTableViewCellBackgroundColor = IdenfyCommonColors.idenfyWhite
@MainActor @objc public static var idenfyDocumentSelectionViewDocumentTableViewCellBorderColor = IdenfyCommonColors.idenfySecondColorV2.withAlphaComponent(0.06)
@MainActor @objc public static var idenfyDocumentSelectionViewDocumentTableViewCellTitleTextColor = IdenfyCommonColors.idenfySecondColorV2
@MainActor @objc public static var idenfyDocumentSelectionViewDocumentTableViewCellHighlightedTextColor = IdenfyCommonColors.idenfyWhite
@MainActor @objc public static var idenfyDocumentSelectionViewDocumentTableViewCellHighlightedBackgroundColor = IdenfyCommonColors.idenfyMainColorV2
@MainActor @objc public static var idenfyDocumentSelectionViewContinueButtonDisabledTextColor = IdenfyCommonColors.idenfySecondColorV2.withAlphaComponent(0.5)
@MainActor @objc public static var idenfyDocumentSelectionViewContinueButtonDisabledBackgroundColor = IdenfyCommonColors.idenfySecondColorV2.withAlphaComponent(0.2)
@MainActor @objc public static var idenfyDocumentSelectionViewContinueButtonEnabledTextColor = IdenfyCommonColors.idenfyWhite
// Idenfy Document Selection View Fonts
@MainActor @objc public static var idenfyDocumentSelectionViewTitleFont = UIFont(name: ConstsIdenfyFonts.idenfyFontBoldV2, size: 22)
@MainActor @objc public static var idenfyDocumentSelectionViewDescriptionFont = UIFont(name: ConstsIdenfyFonts.idenfyFontRegularV2, size: 13)
@MainActor @objc public static var idenfyDocumentSelectionViewDocumentTypeFont = UIFont(name: ConstsIdenfyFonts.idenfyFontRegularV2, size: 13)
@MainActor @objc public static var idenfyDocumentSelectionViewDocumentTypeHighlightedFont = UIFont(name: ConstsIdenfyFonts.idenfyFontBoldV2, size: 13)
// Idenfy Document Selection View Style
@MainActor @objc public static var idenfyDocumentSelectionViewDocumentTableViewBorderWidth = CGFloat(2)
@MainActor @objc public static var idenfyDocumentSelectionViewDocumentTableViewCornerRadius = CGFloat(3)
@MainActor @objc public static var idenfyDocumentSelectionViewDocumentTableViewCellBorderWidth = CGFloat(2)
@MainActor @objc public static var idenfyDocumentSelectionViewDocumentTableViewCellHeight = CGFloat(56)
}
```
You can customize it as follows:
```swift theme={"system"}
IdenfyDocumentSelectionViewUISettingsV2.idenfyDocumentSelectionViewBackgroundColor = UIColor.red
IdenfyDocumentSelectionViewUISettingsV2.idenfyDocumentSelectionViewTitleTextColor = UIColor.red
```
```swift theme={"system"}
IdenfyUIBuilderV2()
/**
* An option to choose whether country and document selection views are joined or separate
- Parameter withCountryAndDocumentSelectionJoined sets the visibility of joined country and document selection view
*/
.withCountryAndDocumentSelectionJoined(_ withCountryAndDocumentSelectionJoined: Bool)
...
```
#### Language Selection
```swift theme={"system"}
IdenfyUIBuilderV2()
/**
Enables language selection window, which provides option to change locale
- Parameter isLanguageSelectionNeeded: changes visibility of locale selection
*/
.withLanguageSelection(_ isLanguageSelectionNeeded: Bool)
...
```
#### Bottom Sheet Dialogs
Since SDK version 9.1.0, this setting is enabled by default, it present dialogs as bottom sheets instead of centered alerts for iDenfy custom dialogs
```swift theme={"system"}
IdenfyUIBuilderV2()
/**
* An option to present dialogs as bottom sheets instead of centered alerts for iDenfy custom dialogs
- Parameter useBottomSheetDialogs sets whether bottom sheet dialogs are used instead of alert dialogs
*/
.withBottomSheetDialogs(_ useBottomSheetDialogs: Bool)
...
```
#### Document Camera Rectangle Visibility
Since some documents are non-regular size, you can hide the camera rectangle. This way the whole screen is dedicated to document capturing.
The rectangle can be hidden for **all** document types:
```swift theme={"system"}
IdenfyUIBuilderV2()
/**
* Camera rectangle will be hidden for ALL countries and document types
*/
.withDocumentCameraFrameVisibility(DocumentCameraFrameVisibility.hiddenForAllCountriesAndDocumentTypes)
...
```
Or for **specific countries and document types**:
```swift theme={"system"}
var countryDocumentMap: [String: [DocumentTypeEnum]] = [:]
countryDocumentMap["LT"] = [DocumentTypeEnum.PASSPORT]
...
let documentCameraFrameVisibility = DocumentCameraFrameVisibility.hiddenForSpecificCountriesAndDocumentTypes(countryDocumentMap: countryDocumentMap)
IdenfyUIBuilderV2()
/**
* Camera rectangle will be hidden ONLY for Lithuanian passport
*/
.withDocumentCameraFrameVisibility(documentCameraFrameVisibility)
...
```
#### iDenfy Toolbar
You can hide the iDenfy toolbar:
```swift theme={"system"}
IdenfyUIBuilderV2()
/**
* An option to hide idenfy toolbar
*/
.withIdenfyToolbarHidden()
...
```
### Customization by Changing Views from `idenfyviews` Module
All UI elements are located in the separate module `idenfyviews`. Classes are marked as public, so you can override them.
**1. Including idenfyviews:**
```swift theme={"system"}
import idenfyviews
```
**2. Applying customization:**
Take for example `IdenfyDocumentSelectionViewUISettingsV2` settings:
```swift theme={"system"}
@objc open class IdenfyDocumentSelectionViewUISettingsV2: NSObject {
// Idenfy Document Selection View Colors
@MainActor @objc public static var idenfyDocumentSelectionViewBackgroundColor = IdenfyCommonColors.idenfyBackgroundColorV2
@MainActor @objc public static var idenfyDocumentSelectionViewTitleTextColor = IdenfyCommonColors.idenfySecondColorV2
@MainActor @objc public static var idenfyDocumentSelectionViewDescriptionTextColor = IdenfyCommonColors.idenfySecondColorV2
@MainActor @objc public static var idenfyDocumentSelectionViewDocumentTableViewBorderColor = IdenfyCommonColors.idenfySecondColorV2.withAlphaComponent(0.06)
@MainActor @objc public static var idenfyDocumentSelectionViewDocumentTableViewBackgroundColor = IdenfyCommonColors.idenfyWhite
@MainActor @objc public static var idenfyDocumentSelectionViewDocumentTableViewCellBackgroundColor = IdenfyCommonColors.idenfyWhite
@MainActor @objc public static var idenfyDocumentSelectionViewDocumentTableViewCellBorderColor = IdenfyCommonColors.idenfySecondColorV2.withAlphaComponent(0.06)
@MainActor @objc public static var idenfyDocumentSelectionViewDocumentTableViewCellTitleTextColor = IdenfyCommonColors.idenfySecondColorV2
@MainActor @objc public static var idenfyDocumentSelectionViewDocumentTableViewCellHighlightedTextColor = IdenfyCommonColors.idenfyWhite
@MainActor @objc public static var idenfyDocumentSelectionViewDocumentTableViewCellHighlightedBackgroundColor = IdenfyCommonColors.idenfyMainColorV2
@MainActor @objc public static var idenfyDocumentSelectionViewContinueButtonDisabledTextColor = IdenfyCommonColors.idenfySecondColorV2.withAlphaComponent(0.5)
@MainActor @objc public static var idenfyDocumentSelectionViewContinueButtonDisabledBackgroundColor = IdenfyCommonColors.idenfySecondColorV2.withAlphaComponent(0.2)
@MainActor @objc public static var idenfyDocumentSelectionViewContinueButtonEnabledTextColor = IdenfyCommonColors.idenfyWhite
// Idenfy Document Selection View Fonts
@MainActor @objc public static var idenfyDocumentSelectionViewTitleFont = UIFont(name: ConstsIdenfyFonts.idenfyFontBoldV2, size: 22)
@MainActor @objc public static var idenfyDocumentSelectionViewDescriptionFont = UIFont(name: ConstsIdenfyFonts.idenfyFontRegularV2, size: 13)
@MainActor @objc public static var idenfyDocumentSelectionViewDocumentTypeFont = UIFont(name: ConstsIdenfyFonts.idenfyFontRegularV2, size: 13)
@MainActor @objc public static var idenfyDocumentSelectionViewDocumentTypeHighlightedFont = UIFont(name: ConstsIdenfyFonts.idenfyFontBoldV2, size: 13)
// Idenfy Document Selection View Style
@MainActor @objc public static var idenfyDocumentSelectionViewDocumentTableViewBorderWidth = CGFloat(2)
@MainActor @objc public static var idenfyDocumentSelectionViewDocumentTableViewCornerRadius = CGFloat(3)
@MainActor @objc public static var idenfyDocumentSelectionViewDocumentTableViewCellBorderWidth = CGFloat(2)
@MainActor @objc public static var idenfyDocumentSelectionViewDocumentTableViewCellHeight = CGFloat(56)
}
```
You can customize it as follows:
```swift theme={"system"}
IdenfyDocumentSelectionViewUISettingsV2.idenfyDocumentSelectionViewBackgroundColor = UIColor.red
IdenfyDocumentSelectionViewUISettingsV2.idenfyDocumentSelectionViewTitleTextColor = UIColor.red
```
 **1. Create a class that implements IdenfyInProcessIdentificationResultsDelegate**
Pass an instance of your created class to the `initializeWithCustomWaitingViewController()` method of `IdenfyController`:
```swift theme={"system"}
idenfyController.initializeWithCustomWaitingViewController(idenfySettingsV2: idenfySettingsV2, idenfyInProcessIdentificationResultsDelegate: idenfyInProcessIdentificationResultsDelegateImpl())
```
**2. Create an instance of your CustomWaitingViewController**
Return the created instance in the `onIdenfyFlowFinished()` method of your `IdenfyInProcessIdentificationResultsDelegate` implementation:
```swift theme={"system"}
/**
- Parameter idenfyIdentificationResultStatus: returns a current verification status. This status is updated until FINISHED is returned.
*/
func onIdenfyFlowFinished(idenfyFlowSettings _: IdenfyFlowSettings) -> CustomWaitingViewController {
return CustomWaitingViewController.ViewControllerProvided(vc: PartnersCustomWaitingViewController())
}
```
For details regarding the verification process, see `IdenfyFlowSettings`:
```swift theme={"system"}
/**
Has set of properties for providing information about user verification flow.
*/
public struct IdenfyFlowSettings {
/**
Provides an array of steps used during the verification process.
*/
public let identificationSteps: [Step]
}
```
**3. Call a static method of IdenfyController to continue the flow**
Your `IdenfyInProcessIdentificationResultsDelegate` implementation has an `onIdentificationStatusReceived()` method that returns an `IdenfyIdentificationResultStatus`. When `IdenfyIdentificationStatus` is **FINISHED**, call the static `continueFlow()` method of `IdenfyController`:
```swift theme={"system"}
/**
- Parameter idenfyIdentificationResultStatus: returns a current verification status. This status is updated until FINISHED is returned.
*/
func onIdentificationStatusReceived(idenfyIdentificationResultStatus: IdenfyIdentificationResultStatus) {
switch idenfyIdentificationResultStatus.idenfyProcessingResultState {
case .FINISHED(canRetry: _, retakeSteps: _):
IdenfyController.continueFlow()
break
case .PROCESSING:
break
}
}
```
`IdenfyIdentificationResultStatus` contains all information about the current state of verification results:
```swift theme={"system"}
public class IdenfyIdentificationResultStatus {
public let idenfyIdentificationStatus: IdenfyIdentificationStatus
public let idenfyProcessingResultState: IdenfyProcessingResultState
public init(idenfyIdentificationStatus: IdenfyIdentificationStatus, idenfyProcessingResultState: IdenfyProcessingResultState) {
self.idenfyIdentificationStatus = idenfyIdentificationStatus
self.idenfyProcessingResultState = idenfyProcessingResultState
}
}
public enum IdenfyProcessingResultState {
case PROCESSING
case FINISHED(canRetry: Bool, retakeSteps: RetakeSteps?)
}
public enum IdenfyIdentificationStatus: String, Codable {
case APPROVED
case DENIED
case SUSPECTED
case REVIEWING
case UNKNOWN
}
```
### Customization with IdenfyUISettingsV2
#### Adding Instructions in Camera Session
The SDK provides informative instructions during the verification session. They can help tackle common issues: bad lighting, wrong document side, etc. Instructions can be customized by changing all UI elements or even using your MP4 video files.
**Using IdenfyInstructionsEnum dialog:**
**Using IdenfyInstructionsEnum none:**
Enable instructions in IdenfyUISettingsV2:
```swift theme={"system"}
let idenfyUISettingsV2 = IdenfyUIBuilderV2()
.withInstructions(IdenfyInstructionsEnum.dialog)
.build()
```
## Liveness Customization
The SDK provides additional liveness customization.
### 1. Creating IdenfyLivenessUIHelper
```swift theme={"system"}
let idenfyLivenessUISettings = IdenfyLivenessUISettings()
```
### 2.1 Applying Regular Settings
If you only need color, text, or width customization, you can use properties from the `IdenfyLivenessUISettings` class:
```swift theme={"system"}
@objc public class IdenfyLivenessUISettings: NSObject {
// Used for different ui parts
public var idenfyLivenessPrimaryColor = UIColor.white
public var idenfyLivenessAccentColor = UIColor(red: 139 / 255.0, green: 199 / 255.0, blue: 224 / 255.0, alpha: 1.0)
public var idenfyLivenessTextColor = UIColor.black
// Liveness session feedback settings
public var livenessFeedbackBackgroundColor = UIColor(red: 139 / 255.0, green: 199 / 255.0, blue: 224 / 255.0, alpha: 1.0)
public var livenessFeedbackFont: UIFont = UIFont(name: ConstsIdenfyFonts.idenfyFontBoldV2, size: 18) ?? UIFont.boldSystemFont(ofSize: 18)
public var livenessFeedbackFontSizeMobile: CGFloat?
public var livenessFeedbackFontSizeTablet: CGFloat?
public var livenessFeedbackFontColor: UIColor?
// Liveness session frame settings
public var livenessFrameBackgroundColor: UIColor = UIColor.black.withAlphaComponent(0.72)
public var livenessFrameColor: UIColor?
public var livenessFrameWidth: Int32? = 0
//Liveness session cancel button settings
public var livenessCancelButtonImage = UIImage(named: "idenfy_ic_liveliness_camera_session_cancel_image", in: Bundle(identifier: "com.idenfy.idenfysdk"), compatibleWith: nil)
// Liveness session progress settings
public var livenessIdentificationOvalProgressColor1 = UIColor(red: 139 / 255.0, green: 199 / 255.0, blue: 224 / 255.0, alpha: 1.0)
public var livenessIdentificationProgressStrokeColor = UIColor(red: 139 / 255.0, green: 199 / 255.0, blue: 224 / 255.0, alpha: 1.0)
public var livenessIdentificationOvalProgressColor2 = UIColor(red: 139 / 255.0, green: 199 / 255.0, blue: 224 / 255.0, alpha: 1.0)
public var livenessIdentificationProgressStrokeWidth: Int32 = 4
public var livenessIdentificationStrokeWidth: Int32 = 3
public var livenessIdentificationProgressRadialOffset: Int32 = 6
// Liveness session overlay settings
public var livenessOverlayBrandingImage = UIImage(named: "idenfy_ic_liveliness_overlay_branding_image", in: Bundle(identifier: "com.idenfy.idenfysdk"), compatibleWith: nil)
// Liveness ready screen settings
public var livenessReadyScreenForegroundColor: UIColor?
public var livenessReadyScreenBackgroundColors: [UIColor]?
public var livenessReadyScreenTextBackgroundColor: UIColor?
public var livenessReadyScreenButtonBorderColor: UIColor?
public var livenessReadyScreenButtonBorderWidth: Int32? = 1
public var livenessReadyScreenButtonCornerRadius: Int32? = 4
public var livenessReadyScreenButtonBackgroundNormalColor: UIColor?
public var livenessReadyScreenButtonBackgroundHighlightedColor: UIColor?
public var livenessReadyScreenShowBrandingImage: Bool? = true
//Camera permissions screen
public var livenessCameraPermissionsScreenImage = UIImage(named: "idenfy_ic_liveliness_camera_permissions_screen_image", in: Bundle(identifier: "com.idenfy.idenfysdk"), compatibleWith: nil)
// Liveness result screen settings
public var livenessResultScreenForegroundColor: UIColor?
public var livenessResultScreenIndicatorColor: UIColor?
public var livenessResultScreenUploadProgressFillColor: UIColor?
public var livenessResultScreenUploadProgressTrackColor: UIColor?
public var livenessResultScreenShowUploadProgressBar: Bool? = true
public var livenessResultScreenResultAnimationSuccessBackgroundImage = UIImage(named: "idenfy_ic_liveliness_results_success_icon_background", in: Bundle(identifier: "com.idenfy.idenfysdk"), compatibleWith: nil)
public var livenessCustomUISettings: FaceTecCustomization?
// ID check customization
public var livenessIdCheckCustomization = LivenessIdCheckCustomization()
}
```
**LivenessIdCheckCustomization:**
```swift theme={"system"}
@objc public class LivenessIdCheckCustomization: NSObject {
public var buttonBackgroundNormalColor: UIColor?
public var buttonBackgroundHighlightColor: UIColor?
public var captureScreenTextBackgroundColor: UIColor?
public var reviewScreenTextBackgroundColor: UIColor?
public var captureFrameStrokeColor: UIColor?
}
```
### 2.2 Applying Full Customization
If you require more changes, you can directly set the **livenessCustomUISettings** property in `IdenfyLivenessUISettings` with your instance of the `FaceTecCustomization` class:
```swift theme={"system"}
idenfyLivenessUISettings.livenessCustomUISettings = FaceTecCustomization()
```
Full customization options are available [here](https://dev.facetec.com/ui-customization).
**1. Create a class that implements IdenfyInProcessIdentificationResultsDelegate**
Pass an instance of your created class to the `initializeWithCustomWaitingViewController()` method of `IdenfyController`:
```swift theme={"system"}
idenfyController.initializeWithCustomWaitingViewController(idenfySettingsV2: idenfySettingsV2, idenfyInProcessIdentificationResultsDelegate: idenfyInProcessIdentificationResultsDelegateImpl())
```
**2. Create an instance of your CustomWaitingViewController**
Return the created instance in the `onIdenfyFlowFinished()` method of your `IdenfyInProcessIdentificationResultsDelegate` implementation:
```swift theme={"system"}
/**
- Parameter idenfyIdentificationResultStatus: returns a current verification status. This status is updated until FINISHED is returned.
*/
func onIdenfyFlowFinished(idenfyFlowSettings _: IdenfyFlowSettings) -> CustomWaitingViewController {
return CustomWaitingViewController.ViewControllerProvided(vc: PartnersCustomWaitingViewController())
}
```
For details regarding the verification process, see `IdenfyFlowSettings`:
```swift theme={"system"}
/**
Has set of properties for providing information about user verification flow.
*/
public struct IdenfyFlowSettings {
/**
Provides an array of steps used during the verification process.
*/
public let identificationSteps: [Step]
}
```
**3. Call a static method of IdenfyController to continue the flow**
Your `IdenfyInProcessIdentificationResultsDelegate` implementation has an `onIdentificationStatusReceived()` method that returns an `IdenfyIdentificationResultStatus`. When `IdenfyIdentificationStatus` is **FINISHED**, call the static `continueFlow()` method of `IdenfyController`:
```swift theme={"system"}
/**
- Parameter idenfyIdentificationResultStatus: returns a current verification status. This status is updated until FINISHED is returned.
*/
func onIdentificationStatusReceived(idenfyIdentificationResultStatus: IdenfyIdentificationResultStatus) {
switch idenfyIdentificationResultStatus.idenfyProcessingResultState {
case .FINISHED(canRetry: _, retakeSteps: _):
IdenfyController.continueFlow()
break
case .PROCESSING:
break
}
}
```
`IdenfyIdentificationResultStatus` contains all information about the current state of verification results:
```swift theme={"system"}
public class IdenfyIdentificationResultStatus {
public let idenfyIdentificationStatus: IdenfyIdentificationStatus
public let idenfyProcessingResultState: IdenfyProcessingResultState
public init(idenfyIdentificationStatus: IdenfyIdentificationStatus, idenfyProcessingResultState: IdenfyProcessingResultState) {
self.idenfyIdentificationStatus = idenfyIdentificationStatus
self.idenfyProcessingResultState = idenfyProcessingResultState
}
}
public enum IdenfyProcessingResultState {
case PROCESSING
case FINISHED(canRetry: Bool, retakeSteps: RetakeSteps?)
}
public enum IdenfyIdentificationStatus: String, Codable {
case APPROVED
case DENIED
case SUSPECTED
case REVIEWING
case UNKNOWN
}
```
### Customization with IdenfyUISettingsV2
#### Adding Instructions in Camera Session
The SDK provides informative instructions during the verification session. They can help tackle common issues: bad lighting, wrong document side, etc. Instructions can be customized by changing all UI elements or even using your MP4 video files.
**Using IdenfyInstructionsEnum dialog:**
**Using IdenfyInstructionsEnum none:**
Enable instructions in IdenfyUISettingsV2:
```swift theme={"system"}
let idenfyUISettingsV2 = IdenfyUIBuilderV2()
.withInstructions(IdenfyInstructionsEnum.dialog)
.build()
```
## Liveness Customization
The SDK provides additional liveness customization.
### 1. Creating IdenfyLivenessUIHelper
```swift theme={"system"}
let idenfyLivenessUISettings = IdenfyLivenessUISettings()
```
### 2.1 Applying Regular Settings
If you only need color, text, or width customization, you can use properties from the `IdenfyLivenessUISettings` class:
```swift theme={"system"}
@objc public class IdenfyLivenessUISettings: NSObject {
// Used for different ui parts
public var idenfyLivenessPrimaryColor = UIColor.white
public var idenfyLivenessAccentColor = UIColor(red: 139 / 255.0, green: 199 / 255.0, blue: 224 / 255.0, alpha: 1.0)
public var idenfyLivenessTextColor = UIColor.black
// Liveness session feedback settings
public var livenessFeedbackBackgroundColor = UIColor(red: 139 / 255.0, green: 199 / 255.0, blue: 224 / 255.0, alpha: 1.0)
public var livenessFeedbackFont: UIFont = UIFont(name: ConstsIdenfyFonts.idenfyFontBoldV2, size: 18) ?? UIFont.boldSystemFont(ofSize: 18)
public var livenessFeedbackFontSizeMobile: CGFloat?
public var livenessFeedbackFontSizeTablet: CGFloat?
public var livenessFeedbackFontColor: UIColor?
// Liveness session frame settings
public var livenessFrameBackgroundColor: UIColor = UIColor.black.withAlphaComponent(0.72)
public var livenessFrameColor: UIColor?
public var livenessFrameWidth: Int32? = 0
//Liveness session cancel button settings
public var livenessCancelButtonImage = UIImage(named: "idenfy_ic_liveliness_camera_session_cancel_image", in: Bundle(identifier: "com.idenfy.idenfysdk"), compatibleWith: nil)
// Liveness session progress settings
public var livenessIdentificationOvalProgressColor1 = UIColor(red: 139 / 255.0, green: 199 / 255.0, blue: 224 / 255.0, alpha: 1.0)
public var livenessIdentificationProgressStrokeColor = UIColor(red: 139 / 255.0, green: 199 / 255.0, blue: 224 / 255.0, alpha: 1.0)
public var livenessIdentificationOvalProgressColor2 = UIColor(red: 139 / 255.0, green: 199 / 255.0, blue: 224 / 255.0, alpha: 1.0)
public var livenessIdentificationProgressStrokeWidth: Int32 = 4
public var livenessIdentificationStrokeWidth: Int32 = 3
public var livenessIdentificationProgressRadialOffset: Int32 = 6
// Liveness session overlay settings
public var livenessOverlayBrandingImage = UIImage(named: "idenfy_ic_liveliness_overlay_branding_image", in: Bundle(identifier: "com.idenfy.idenfysdk"), compatibleWith: nil)
// Liveness ready screen settings
public var livenessReadyScreenForegroundColor: UIColor?
public var livenessReadyScreenBackgroundColors: [UIColor]?
public var livenessReadyScreenTextBackgroundColor: UIColor?
public var livenessReadyScreenButtonBorderColor: UIColor?
public var livenessReadyScreenButtonBorderWidth: Int32? = 1
public var livenessReadyScreenButtonCornerRadius: Int32? = 4
public var livenessReadyScreenButtonBackgroundNormalColor: UIColor?
public var livenessReadyScreenButtonBackgroundHighlightedColor: UIColor?
public var livenessReadyScreenShowBrandingImage: Bool? = true
//Camera permissions screen
public var livenessCameraPermissionsScreenImage = UIImage(named: "idenfy_ic_liveliness_camera_permissions_screen_image", in: Bundle(identifier: "com.idenfy.idenfysdk"), compatibleWith: nil)
// Liveness result screen settings
public var livenessResultScreenForegroundColor: UIColor?
public var livenessResultScreenIndicatorColor: UIColor?
public var livenessResultScreenUploadProgressFillColor: UIColor?
public var livenessResultScreenUploadProgressTrackColor: UIColor?
public var livenessResultScreenShowUploadProgressBar: Bool? = true
public var livenessResultScreenResultAnimationSuccessBackgroundImage = UIImage(named: "idenfy_ic_liveliness_results_success_icon_background", in: Bundle(identifier: "com.idenfy.idenfysdk"), compatibleWith: nil)
public var livenessCustomUISettings: FaceTecCustomization?
// ID check customization
public var livenessIdCheckCustomization = LivenessIdCheckCustomization()
}
```
**LivenessIdCheckCustomization:**
```swift theme={"system"}
@objc public class LivenessIdCheckCustomization: NSObject {
public var buttonBackgroundNormalColor: UIColor?
public var buttonBackgroundHighlightColor: UIColor?
public var captureScreenTextBackgroundColor: UIColor?
public var reviewScreenTextBackgroundColor: UIColor?
public var captureFrameStrokeColor: UIColor?
}
```
### 2.2 Applying Full Customization
If you require more changes, you can directly set the **livenessCustomUISettings** property in `IdenfyLivenessUISettings` with your instance of the `FaceTecCustomization` class:
```swift theme={"system"}
idenfyLivenessUISettings.livenessCustomUISettings = FaceTecCustomization()
```
Full customization options are available [here](https://dev.facetec.com/ui-customization).