Android SDK
The SDK supports API Level 24 and above.
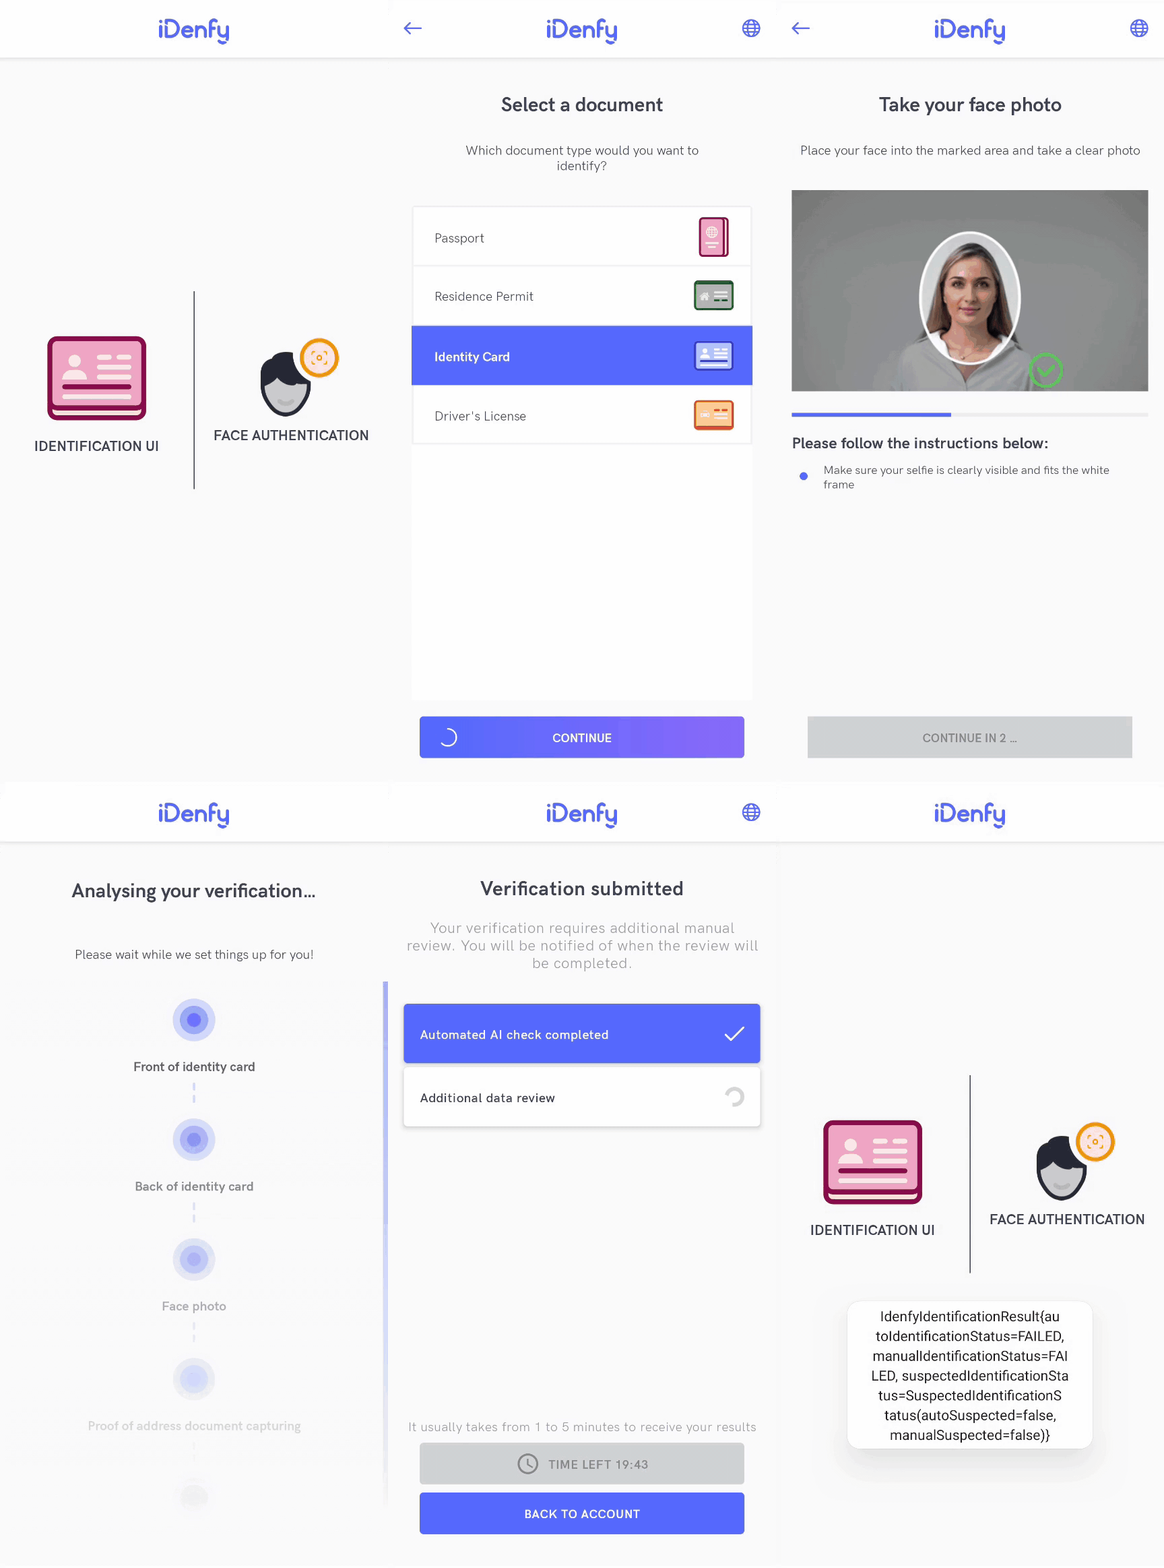
iDenfy identity verification flow
Below you can check a full regular flow.
This flow can be customized and success results can be omitted as well. We recommend omitting them using our immediate redirect feature.
Getting started
1. Obtaining verification token
The SDK requires verification token for starting initialization. Look at verification token generation guide.
2. Adding the SDK dependency
In the root level's (project module) Gradle add the following implementation:
repositories {
    maven { url 'https://developer.huawei.com/repo/' }
    maven { url 'https://jitpack.io' }
}
In the app level's Gradle add following implementation with the latest version. The latest version is accessible from the changelog.
repositories {
    dependencies {
      implementation 'com.github.idenfy:sdk-api:8.6.3'
    }
}
If you are not overriding any custom views or applying customization, you can use the dynamic version. If you did make layout changes, don't use dynamic version, since runtime crashes can occur. If you understand the disadvantages and still want to use the latest version integrate the SDK in the following way:
repositories {
    dependencies {
      implementation 'com.github.idenfy:sdk-api:+'
    }
}
3. Android studio configuration
Our SDK uses Java 11. Double check the version if it was not already provided:
    compileOptions {
        targetCompatibility 11
        sourceCompatibility 11
    }
    kotlinOptions {
        jvmTarget = "11"
    }
Also make sure that you have these lines in gradle.properties file:
android.useAndroidX=true
android.enableJetifier=true
4. Configuring SDK
It is required to provide following configuration:
val idenfySettingsV2 = IdenfySettingsV2.IdenfyBuilderV2()
                .withAuthToken("AUTH_TOKEN")
                .build()
5. Presenting Activity
An instance of IdenfyController is required for starting a verification flow.
IdenfyController.getInstance().initializeIdenfySDKV2WithManual(
    this,
    identificationResultsCallback,
    idenfySettingsV2
)
6. Receiving callbacks from SDK
Verification results callback is returned using Activity Result Contract, that is passed during initialization of the SDK.
The SDK provides the following callback class idenfyIdentificationResult.
If your service uses only the automatic (default) callback, then you should only check the idenfyIdentificationResult.autoIdentificationStatus.
Since version 7.1.0, we have added a SUSPECTED response. You can read about it here and decide for yourself if you would like for it to impact your UI.
    var identificationResultsCallback = registerForActivityResult(
    ActivityResultContracts.StartActivityForResult()
) { result: ActivityResult ->
    val resultCode = result.resultCode
    val data = result.data

    if (resultCode == IdenfyController.IDENFY_IDENTIFICATION_RESULT_CODE) {
        val idenfyIdentificationResult: IdenfyIdentificationResult = data!!.getParcelableExtra(
            IdenfyController.IDENFY_IDENTIFICATION_RESULT
        )!!
        when (idenfyIdentificationResult.manualIdentificationStatus) {
            ManualIdentificationStatus.APPROVED -> {
                //The user completed a verification flow, was verified manually and the verification status, provided by a manual reviewer, is APPROVED.
            }
            ManualIdentificationStatus.FAILED -> {
                //The user completed a verification flow, was verified manually and the verification status, provided by a manual reviewer, is FAILED.
            }
            ManualIdentificationStatus.WAITING -> {
                //The user was only verified by an automated platform, not by a manual reviewer.
            }
            ManualIdentificationStatus.INACTIVE -> {
                //The user was only verified by an automated platform and still waiting for manual reviewing.
            }
        }
        when (idenfyIdentificationResult.autoIdentificationStatus) {
            AutoIdentificationStatus.APPROVED -> {
                //The user completed a verification flow and the verification status, provided by an automated platform, is APPROVED.
            }
            AutoIdentificationStatus.FAILED -> {
                //The user completed a verification flow and the verification status, provided by an automated platform, is FAILED.
            }
            AutoIdentificationStatus.UNVERIFIED -> {
                //The user did not complete a verification flow and the verification status, provided by an automated platform, is UNVERIFIED.
            }
        }
        Toast.makeText(
            this@MainActivity,
            "Auto - ${idenfyIdentificationResult.autoIdentificationStatus} \n" +
                    "Manual - ${idenfyIdentificationResult.manualIdentificationStatus} \n",
            Toast.LENGTH_LONG
        ).show()
    }
}
Kotlin
Information about the IdenfyIdentificationResult autoIdentificationStatus statuses:
| Name | Description |
|---|---|
APPROVED | The user completed a verification flow and the verification status, provided by an automated platform, is APPROVED. |
FAILED | The user completed a verification flow and the verification status, provided by an automated platform, is FAILED. |
UNVERIFIED | The user did not complete a verification flow and the verification status, provided by an automated platform, is UNVERIFIED. |
Information about the IdenfyIdentificationResult manualIdentificationStatus statuses:
| Name | Description |
|---|---|
APPROVED | The user completed a verification flow and was verified manually while waiting for the manual verification results in the iDenfy SDK. The verification status, provided by a manual review, is APPROVED. |
FAILED | The user completed a verification flow and was verified manually while waiting for the manual verification results in the iDenfy SDK. The verification status, provided by a manual review, is FAILED. |
WAITING | The user completed a verification flow and started waiting for the manual verification results in the iDenfy SDK. Then he/she decided to stop waiting and pressed a "BACK TO ACCOUNT" button. The manual verification review is still ongoing. |
INACTIVE | The user was only verified by an automated platform, not by a manual reviewer. The verification performed by the user can still be verified by the manual review if your system uses the manual verification service. |
The manualIdentificationStatus status always returns INACTIVE status, unless your system implemented manual verification flow (11 step). This is how our own manual verification screen looks like:
Manual verification screen
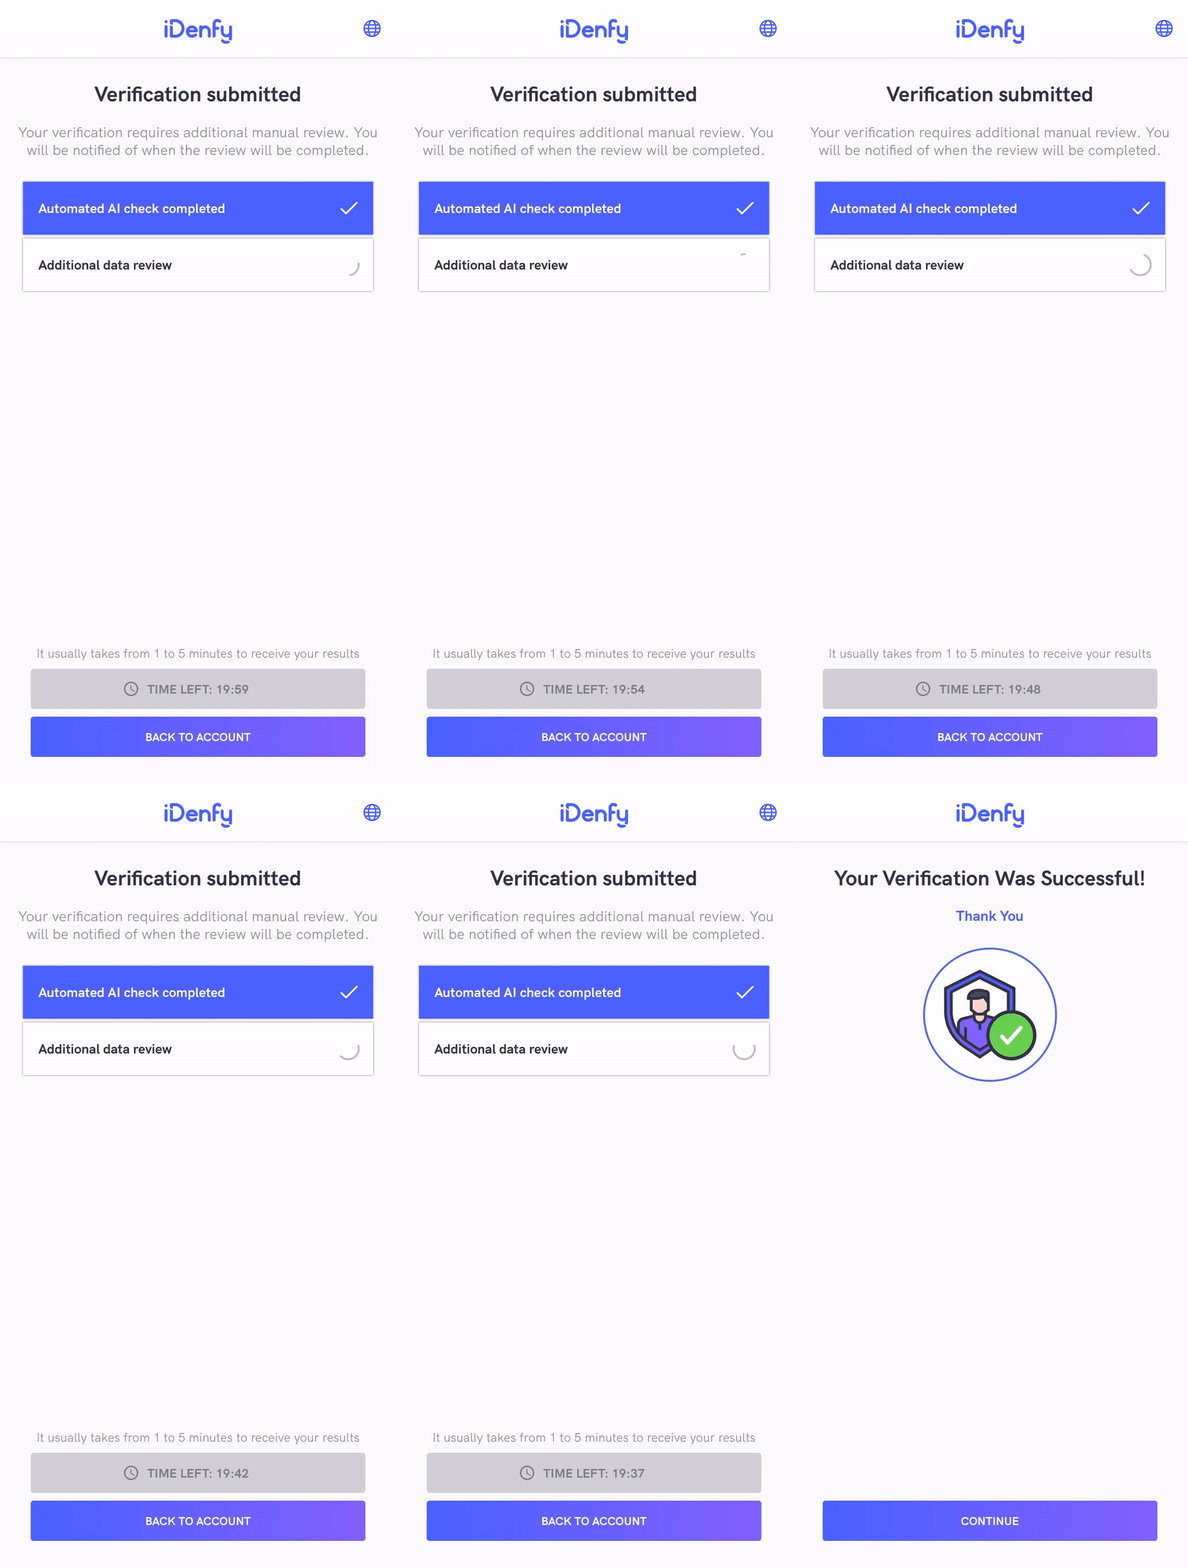
In order to disable it, refer to the immediate redirect feature.
These SDK statuses are the same as iFrame integration statuses. There is just a single difference that the SDK returns INACTIVE if the manual verification screen was not opened during the verification session instead of returning null, as iFrame does. Also, iFrame does not close automatically since it can deliver results without actually closing itself.
After SDK finishes and closes itself, you will also receive webhook callback to your backend system.
It might be useful to completely ignore the SDK status and communicate between your app and your backend service about verification status.
Logging & troubleshooting
The SDK provides a possibility to log users and SDK common actions (lifecycles events, navigation, camera changes). This can be useful for understanding specific scenarios or troubleshooting potential issues. To enable logging you need to provide your implementation of the IdenfyLoggingHandlerUseCase class. You can implement it like this:
Kotlin
  val consoleLogging = ConsoleLoggingImpl()
  IdenfyController.getInstance().idenfyLoggingHandler = IdenfyLoggingHandlerUseCaseImpl(consoleLogging)
  class ConsoleLoggingImpl {
    fun log(event: String, message: String, token: String) {
        Log.d("fromIdenfySDK-$event", message)
    }
}
 class IdenfyLoggingHandlerUseCaseImpl(private var consoleLoggingImpl: ConsoleLoggingImpl):IdenfyLoggingHandlerUseCase {
    override fun logEvent(event: String, message: String, token: String) {
        consoleLoggingImpl.log(event, message, token)
    }
}
As you can see we made it very flexible, therefore you only need to provide a concrete implementation of the IdenfyLoggingHandlerUseCase interface. If you also want to see the Okhttp requests/responses and payload in the Logcat, you should initialize iDenfySDK with IdenfySDKLoggingEnum.FULL, like this:
val idenfySettingsV2 = IdenfySettingsV2.IdenfyBuilderV2()
                .withAuthToken(authToken)
                .withLogging(IdenfySDKLoggingEnum.FULL)
                .build()
User events webhooks (optional)
SDK provides webhooks about events occurring throughout the verification process. Results will be delivered while the verification process is occurring and the application is presenting views of the SDK.
1. Declare a class for receiving events
Declare a class that implements IdenfyUserFlowHandler to call your backend service, log events, or apply changes.
class IdenfyUserFlowCallbacksHandler : IdenfyUserFlowHandler {
    /**
     * @param documentType Selected document type
     */
    override fun onDocumentSelected(documentType: String) {
        Log.d("onDocumentSelected", documentType)
    }

    /**
     * @param issuingCountryCode Selected issuingCountryCode
     */
    override fun onCountrySelected(issuingCountryCode: String) {
        Log.d("onCountrySelected", issuingCountryCode)
    }

    /**
     * @param photosUploaded indicated that photos have been uploaded
     */
    override fun onPhotosUploaded(photosUploaded: Boolean) {
        Log.d("onPhotosUploaded", photosUploaded.toString())
    }

    /**
     * @param processingStarted indicates that processing has started
     */
    override fun onProcessingStarted(processingStarted: Boolean) {
        Log.d("onProcessingStarted", processingStarted.toString())
    }
}
2. Configure application class
Set IdenfyUserFlowController to reference idenfyUserFlowCallbacksHandler in the application class.
class IdenfyApplication : MultiDexApplication() {
    override fun onCreate() {
        super.onCreate()
        val idenfyUserFlowCallbacksHandler =
            IdenfyUserFlowCallbacksHandler()
        IdenfyUserFlowController.setIdenfyUserFlowHandler(idenfyUserFlowCallbacksHandler)
    }
}
it is required to set webhooks handler in the application class to ensure that listener will be set again after the application process has stopped.
Customizing SDK flow (optional)
The SDK provides various options for modifying verification flow.
SSL pinning support
By default, the SDK does not utilize SSL pinning as suggested by the AWS services. If you however need this option, you can enable SSL pinning. Our SSL pinning implementation does follow the AWS recommendations and we utilize pinning for the Root certificates. They are valid for more than 5+ years.
However, during this timeframe, major changes can occur and we might be forced to change SSL pinning. Such changes will be notified at least 1 month prior.
This is why we strongly encourage you to enable this feature only if you are planning to actively update the SDK.
Kotlin
    val idenfySettingsV2 = IdenfyBuilderV2()
        .withAuthToken(authToken)
        .withSSLPinning(true)
        ...
        .build()
    ...
NFC support
The SDK provides NFC enhanced identity verification.

For more integration details and potential advantages contact our technical team via Dashboard.
After NFC is enabled for your client settings, in the app level's Gradle add an additional sdk-nfcreading module with the same version as the sdk-api module.
repositories {
    dependencies {
      implementation 'com.github.idenfy:sdk-api:8.6.3'
      implementation 'com.github.idenfy:sdk-nfcreading:8.6.3'
    }
}
NFC required
If the NFC required feature is enabled, the device which does not possess the verification will immediately fail verification. This is a security feature, which ensures that a person does not change a device just to perform verification.
To enable verifications for all devices, your app can easily handle this scenario. You will need to follow the following steps:
- Create two different accounts: with NFC enabled and without.
- Check if the device supports NFC, before generating a verification token.
- If the device supports the NFC, you generate a verification token with the account's credentials, which has the NFC feature enabled. If NFC is not enabled, you should use another account's credentials.
NFC optional
If the NFC optional feature is enabled, the user is asked to perform documet NFC reading ONLY if the device and selected document type support NFC chip reading. Otherwise, a regular identifiy verification will be performed.
Localization
By default SDK provides the following translations:
- English (en) GB
- Polish (pl) PL
- Russian (ru) RU
- Lithuanian (lt) LT
- German (de) DE
- French (fr) FR
- Italian (it) IT
- Latvian (lv) LV
- Romanian (ro) RO
- Swedish (sv) SV
- Spanish (es) ES
- Estonian (et) ET
- Czech (cs) CS
- Bulgarian (bg) BG
- Dutch (nl) NL
- Ukrainian (uk) UK
- Portuguese (pt) PT
- Vietnamese (vi) VI
- Slovak (sk) SK
- Indonesian (id) ID
- Thai (th) TH
- Hindi (hi) HI
- Hungarian (hu) HU
- Danish (da) DA
- Greek (el) EL
- Croatian (hr) HR
- Norwegian (no) NO
- Serbian (sr) SR
- Finnish (fi) FI
- Turkish (tr) TR
- Chinese (zh) ZH
All keys are located here. You can supply partial translations, meaning if you don't include a translation to a particular key, then our SDK will use default keys. To see changes add particular xml to your app target or copy only specific keys in your strings.xml and changes will take effect.
Forcing specific language
The default language of SDK is selected by the language configurations of the device. In order to force particular locale, several methods can be used:
IdenfySettings
    IdenfySettingsV2.IdenfyBuilderV2()
    .withSelectedLocale(IdenfyLocaleEnum.EN)
    ...
Along with the token generation
If no locale is forced, the SDK will fallback to device's selected language
Skipping parts of verification flow
The SDK provides a set of tools to omit some views, which could be created in your application yourself offering a fine-grained approach. For example, you would like to implement document selection and the document's issuing country selection in the same view instead of having 2 separate.
All customization options listed below can be combined, e.g. you can skip both document selection, confirmation screen, and document issuing country selection.
Contact our tech support for enabling any of these features to your account settings, since these settings are configured from the backend, not the SDK. Contact support team via Dashboard using your account.
* Skip document's issuing country selection screen.
1. Generate a verification token with the provided document issuing country.
Take a look at verification token generation documentation.
Example of a JSON request body:
{
   "clientId":"TEST_CLIENT_ID",
   "country": "lt"
}
* Skip documents selection screen.
1. Generate a verification token with the provided document type.
Take a look at verification token generation documentation.
Example of a JSON request body:
{
   "clientId":"TEST_CLIENT_ID",
   "documents": ["PASSPORT"]
}
* Skip document onboarding screen.
After this feature is enabled, the onboarding screen will be skipped, e.g. user can select a document from the documents list and will be immediately redirected to the camera screen.
Blur and glare flow changes
If your account has enabled blur or glare detection, the SDK will include blur and glare checks to the photo validation, an unsuccessful result will be shown immediately after each step.
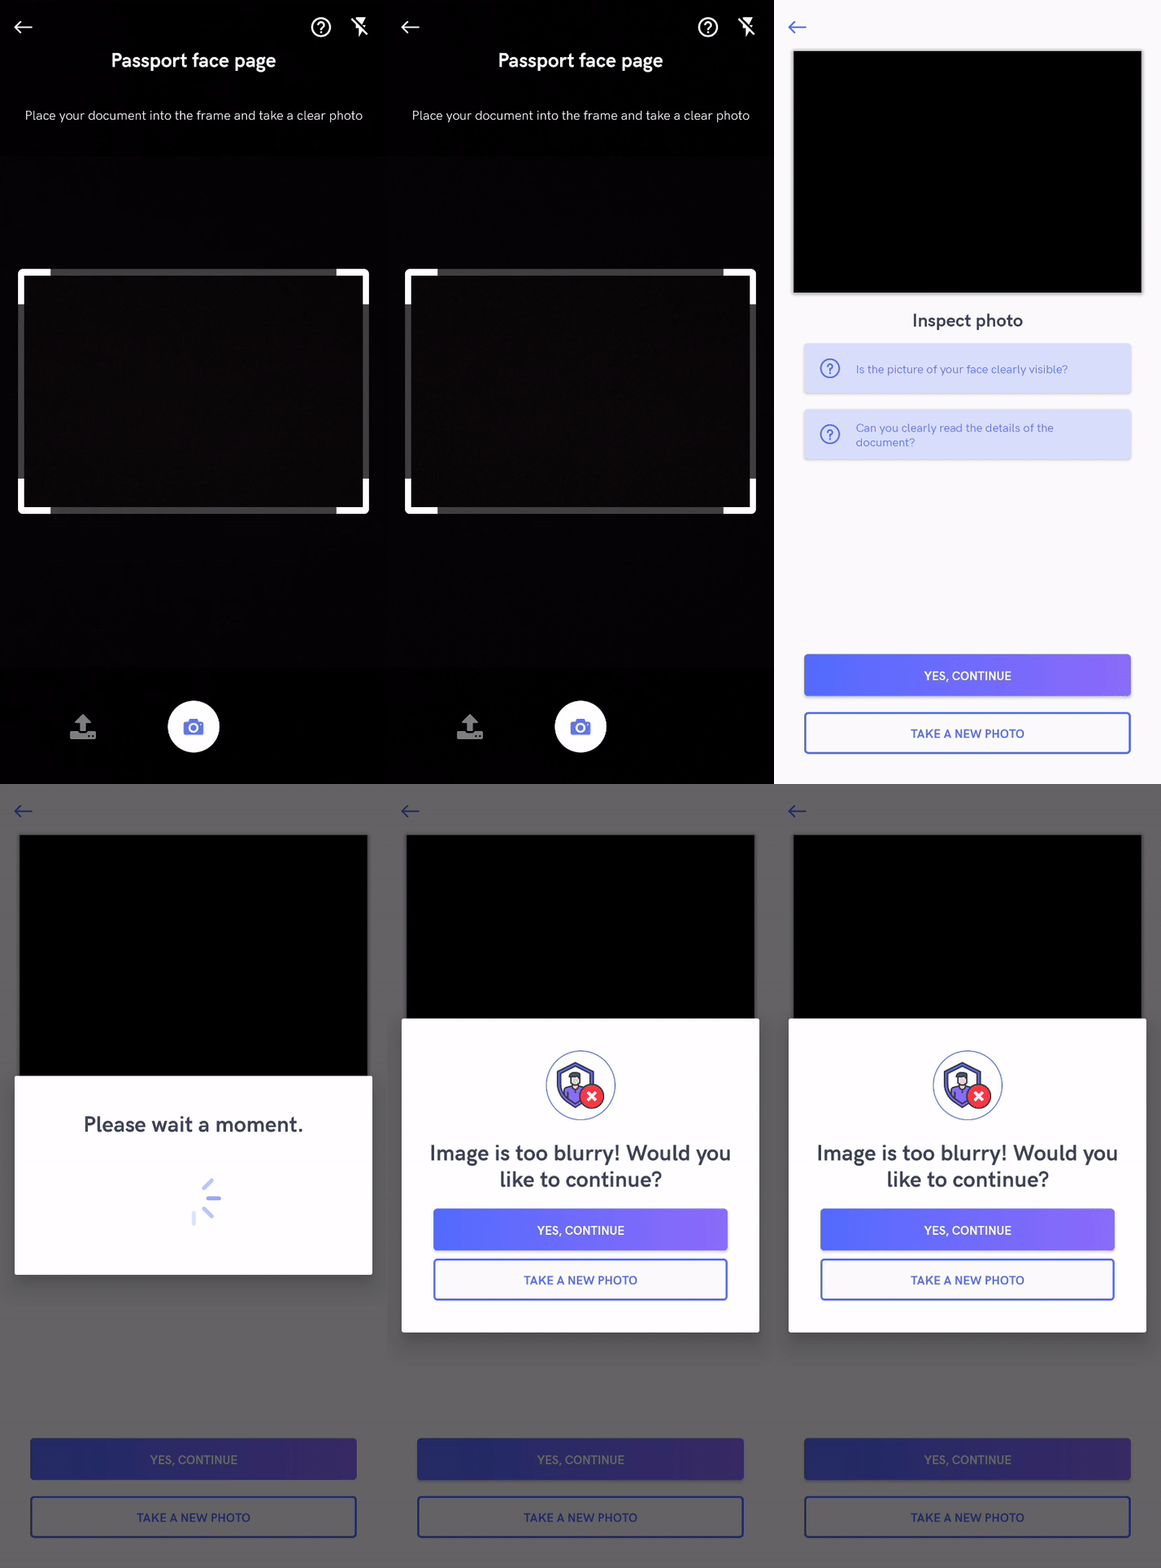
For enabling blur and glare detection contact tech support via our dashboard
Passive liveness check
If your account has enabled passive liveness check, the SDK will include liveness check to photo validation, an unsuccessful result will be shown immediately after each step.
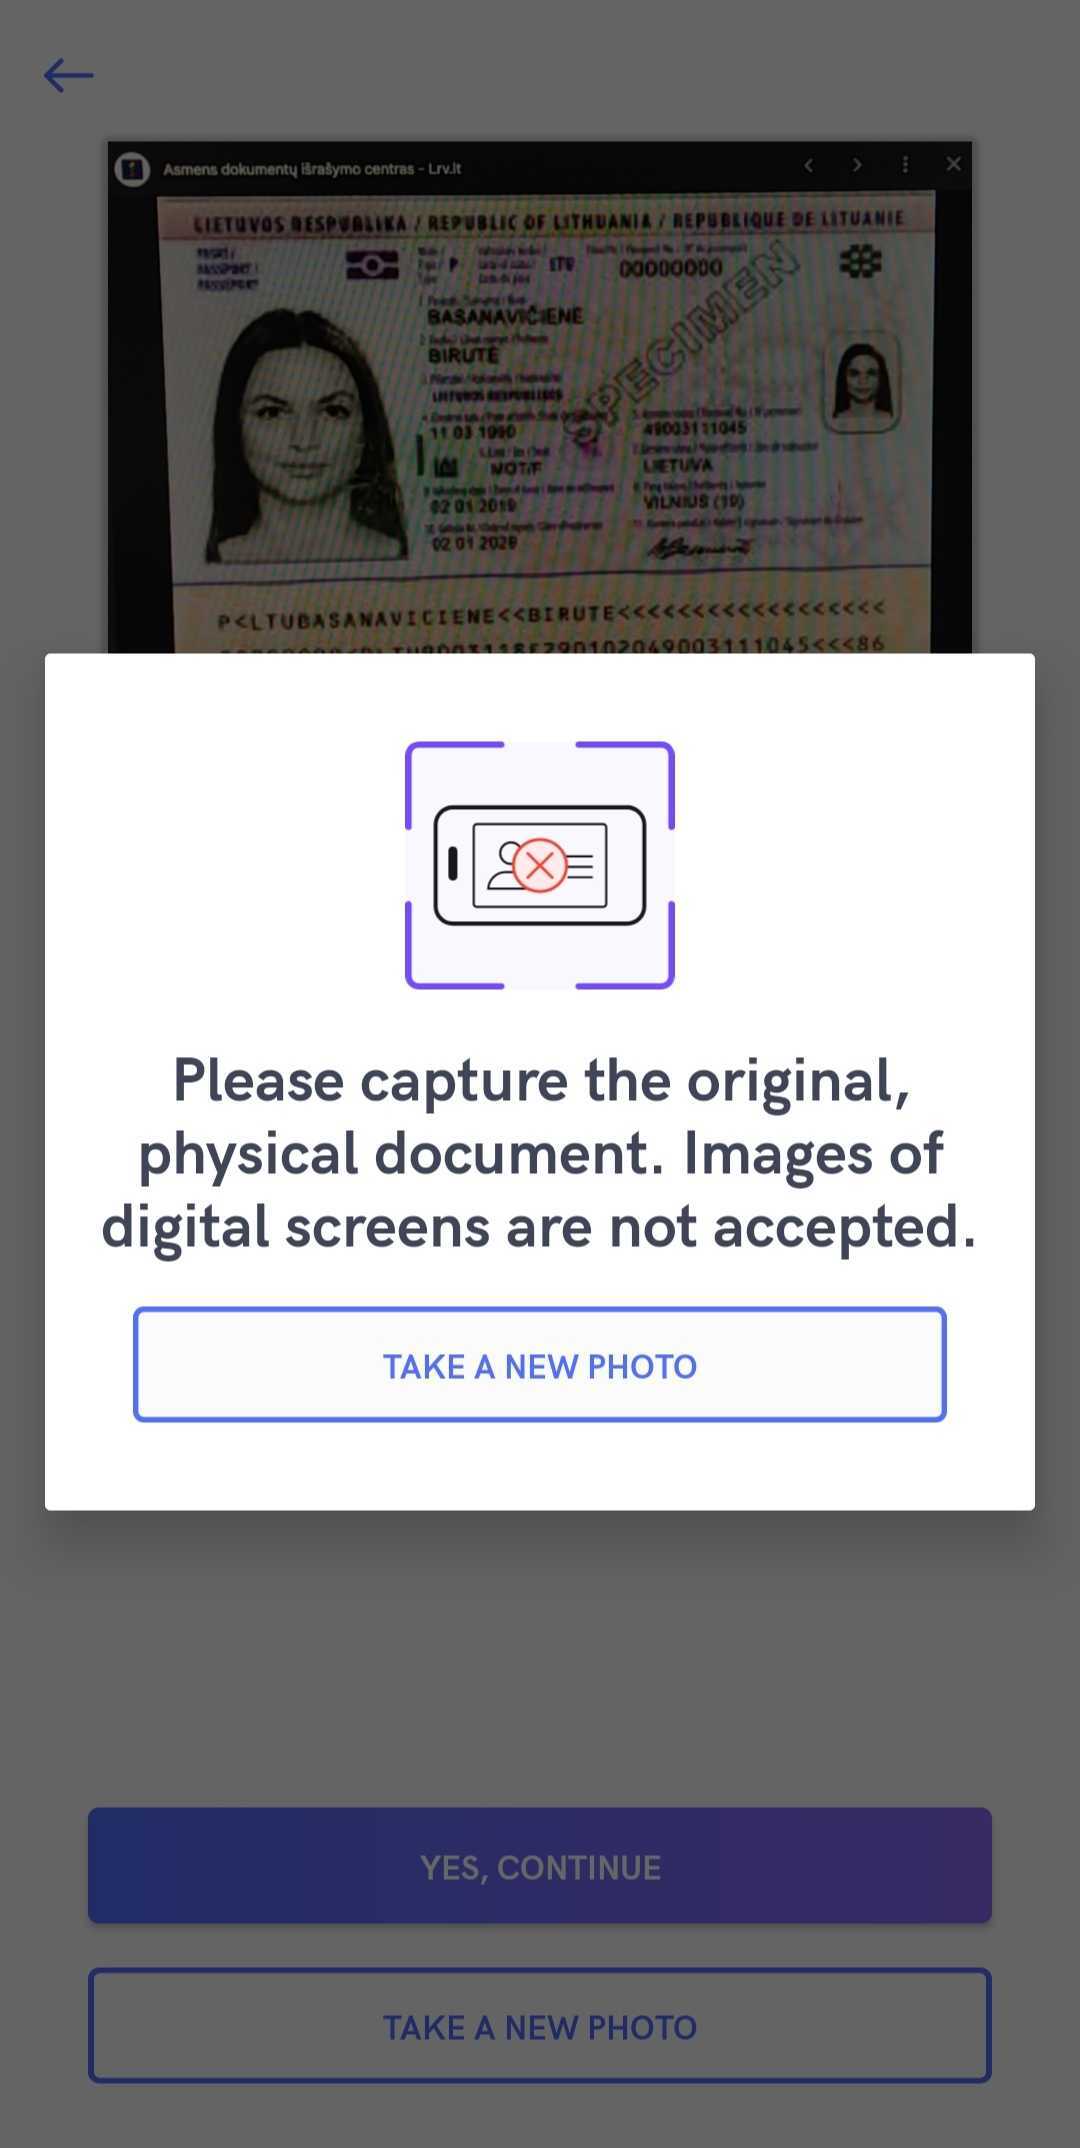
For enabling passive liveness check contact tech support via our dashboard
Identity verification results screen changes
If you have implemented manual verification flow (11 step) it might be wise to disable Manual results view, DENIED and APPROVED views for better UI/UX.
Since you most likely will display a loading screen or indicate the user about ongoing manual verification check after he completes the verification flow.
This is why SDK finishes during the loading screen, without showing actual status and empowers you to customize it in your preferred way.
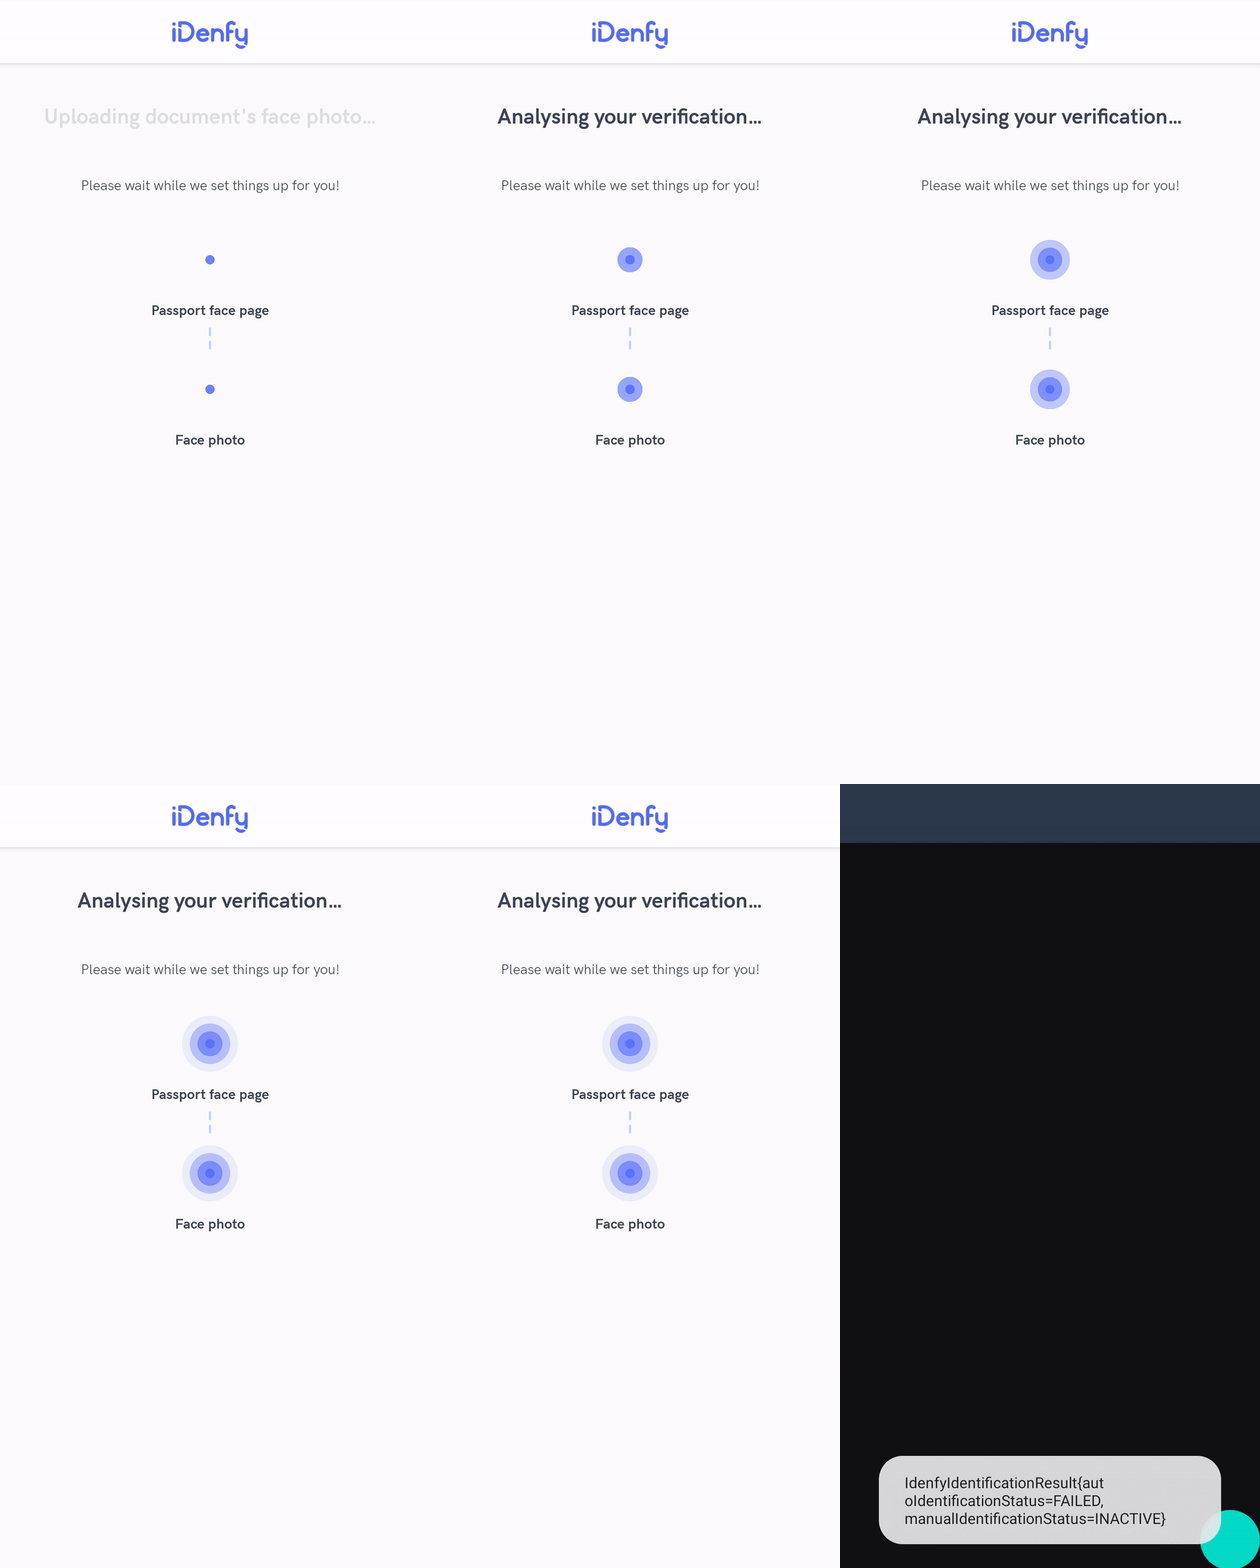
To disable those views, the immediate redirect feature can be applied. After enabling immediate redirect the following results will take place:
APPROVED screen will not be visible
If verification was approved, the user will not see a successful screen. SDK will be closed while displaying a loading screen. That way you can show a success screen yourself at a particular time.
DENIED screen will not be visible
The denied screen will not be visible. SDK will be closed while displaying a loading screen. That way you can display an error screen yourself at a particular time.
Manual verification screen will not be visible.
The manual verification screen is visible here.
For enabling immediate redirect contact technical support via Jira customer portal
Also, if you would like to change the results view to your own custom view and control the flow yourself, you can read here.
Bank Verification Feature
This feature is used to confirm the authenticity of a customer's bank account during the account verification process. This step requires customers to provide personal information, ensuring the financial institution interacts with a legitimate individual rather than someone using forged documents or stolen data.
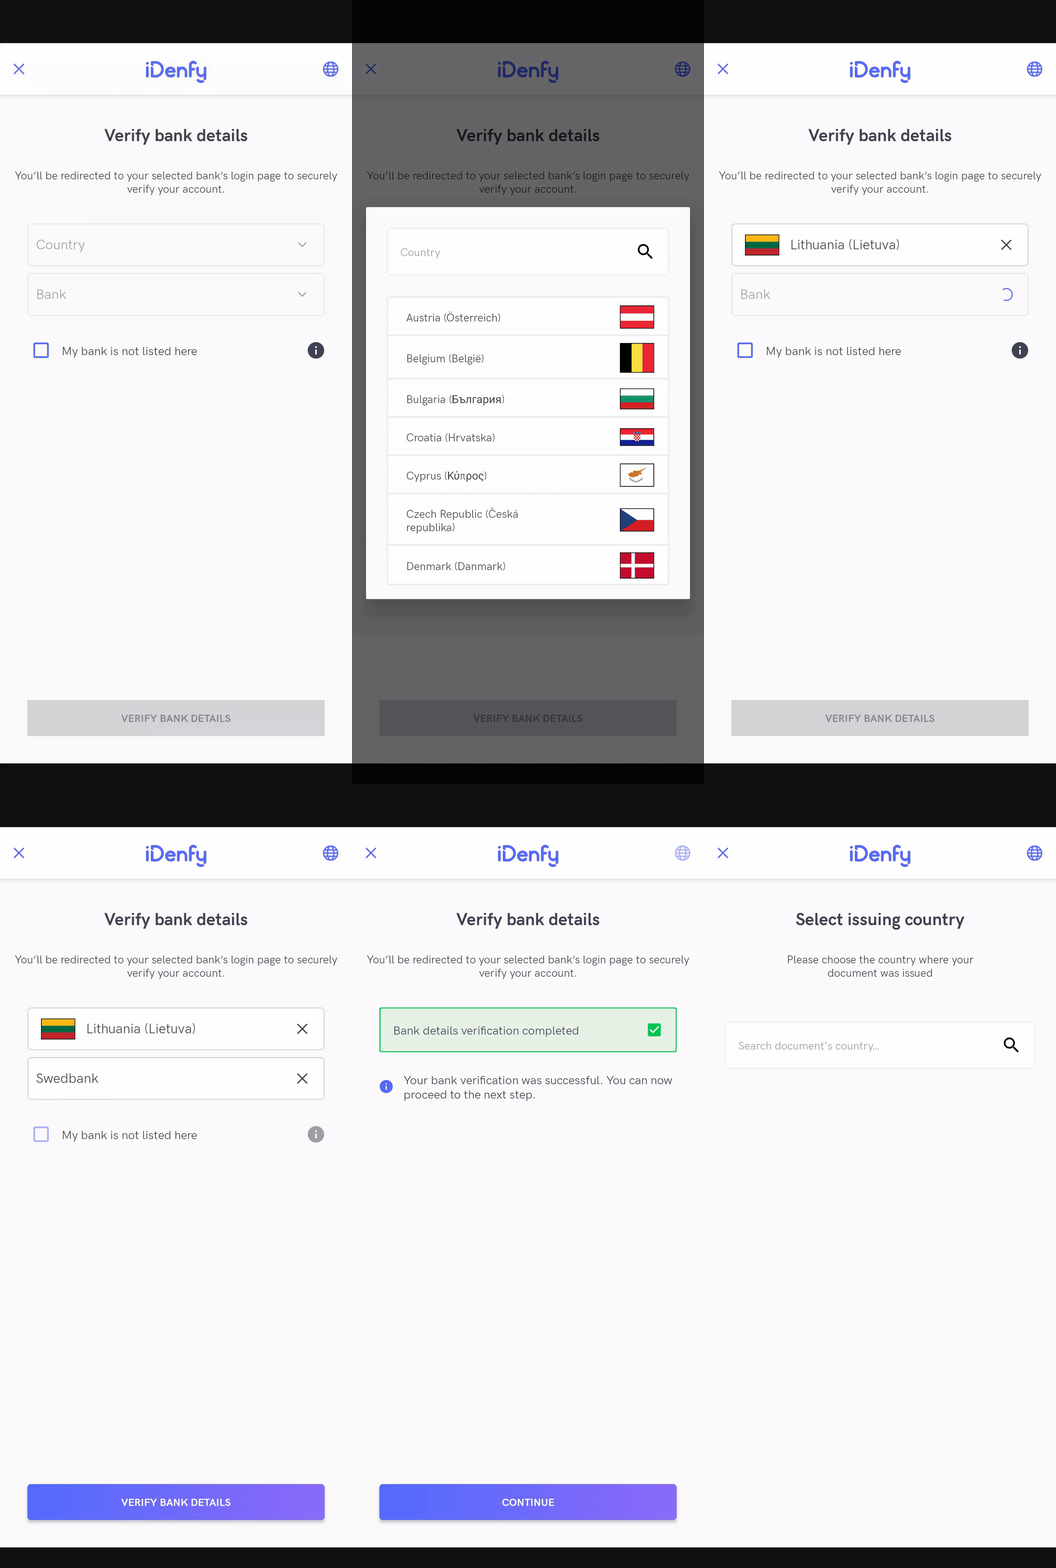
For enabling Bank Verification feature, contact technical support via Jira customer portal
Custom KYC Questionnaire
This features allows you to create a custom questionnaire users must fill in at the beginning of every identity verification process. The questionnaire can contain required or optional questions and variety of question types.
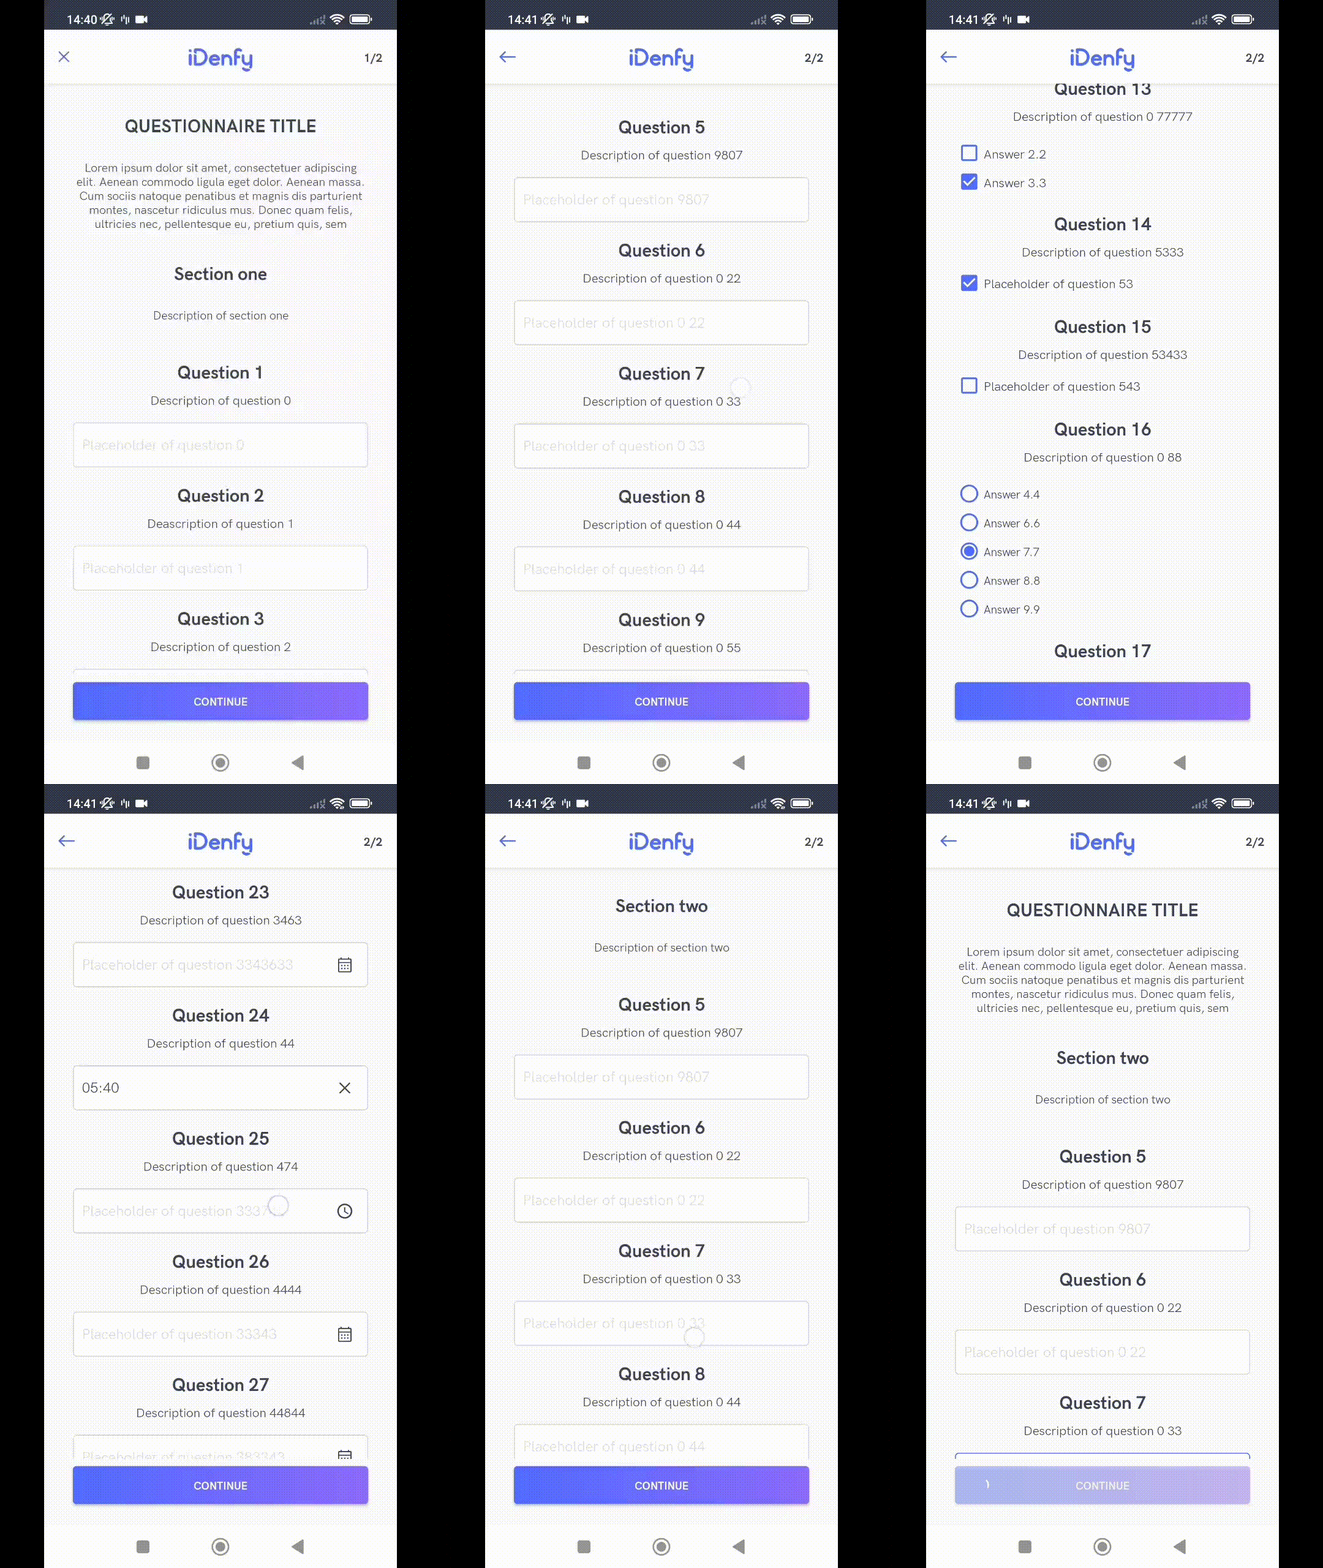
For enabling custom KYC questionnaire feature, contact technical support via Jira customer portal
Custom KYC Questionnaire conditions
Questionnaire can be created using conditions, according to answers of previous questions:
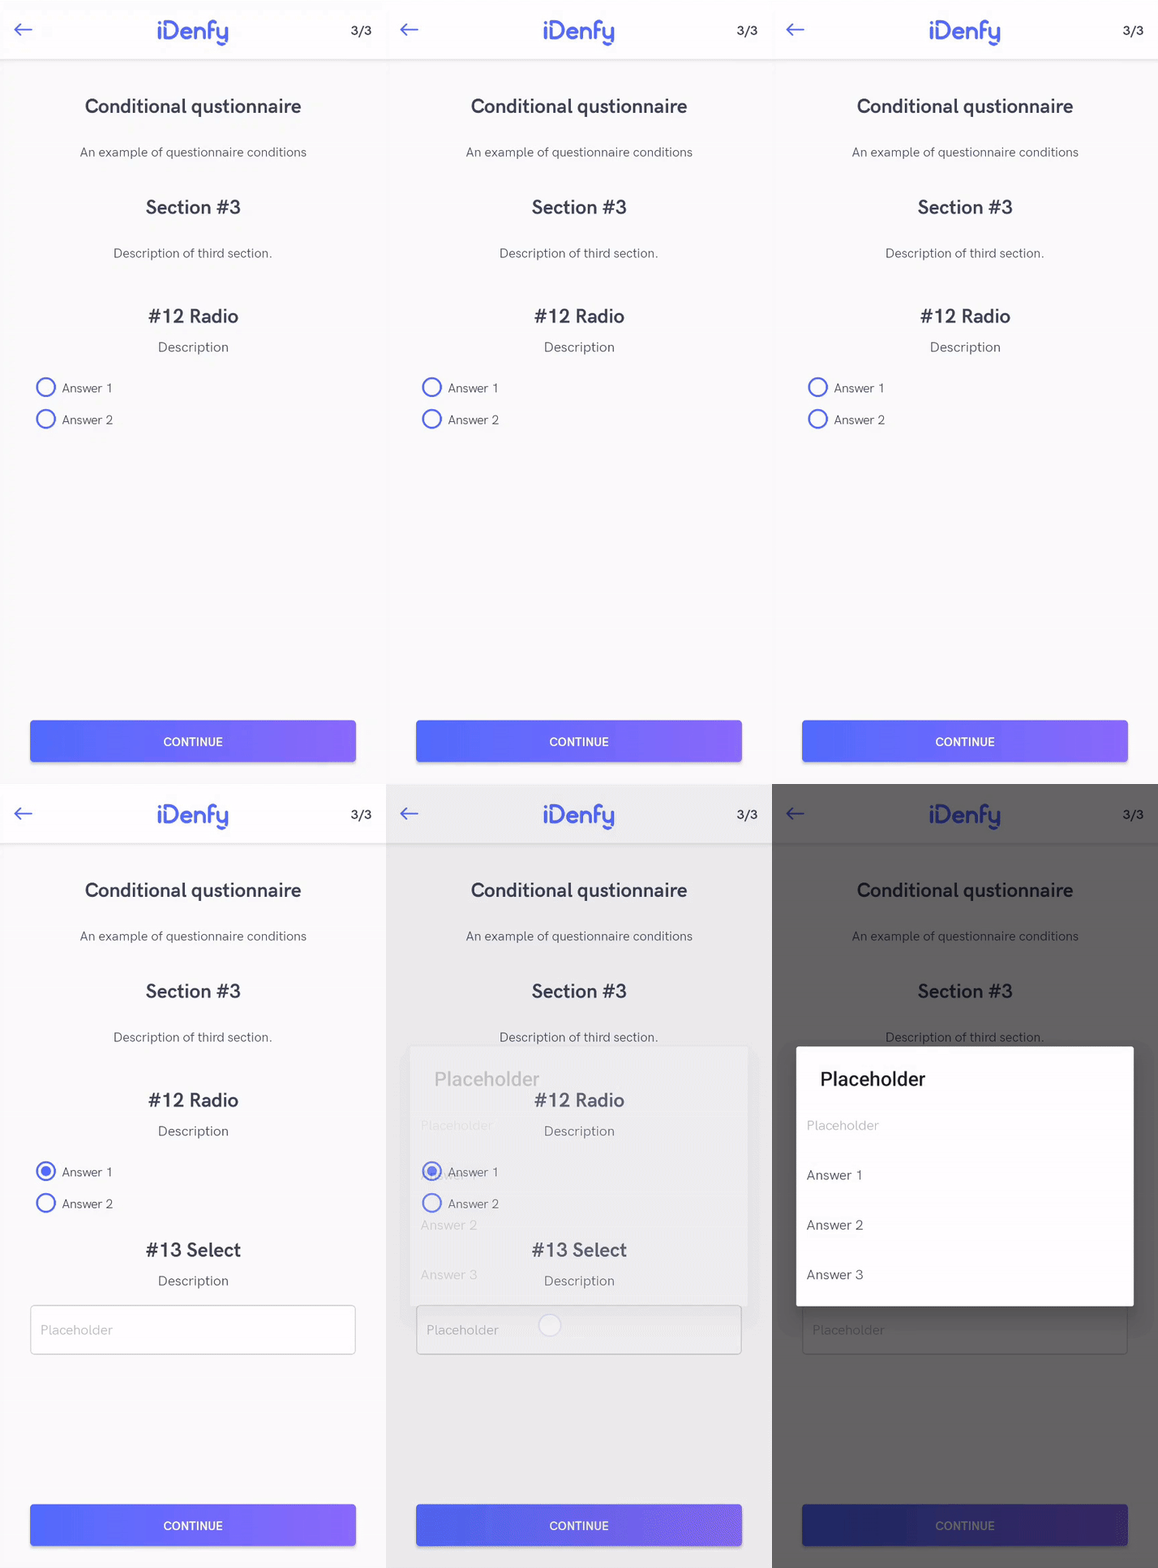
Custom Privacy Policy
This features allows you to create a custom privacy policy users must agree to at the beginning of every identity verification process. The privacy policy is presented as an HTML and can be fully customised.
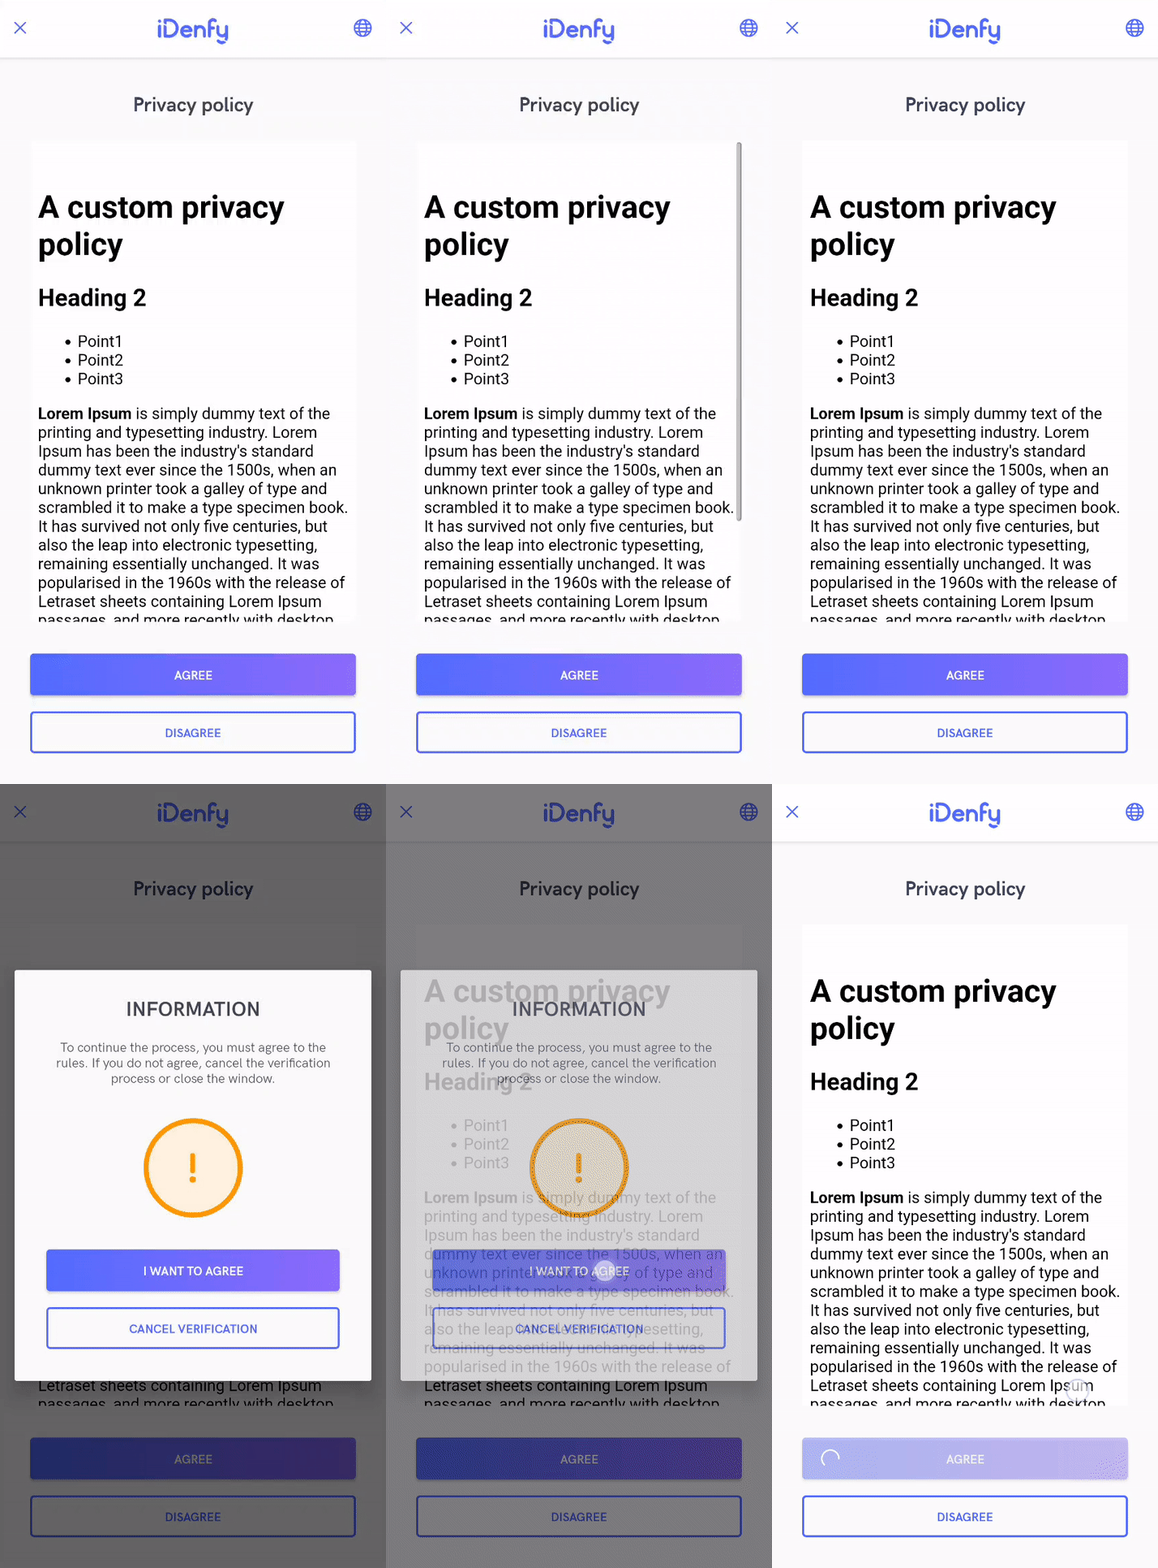
For enabling custom privacy policy feature, contact technical support via Jira customer portal
UI customization (optional)
Please take a look at the UI customization page.
Samples
SDK Integration tutorials
Our sample application demonstrates the integration of iDenfy SDK. For more information visit SDK integration tutorials.
Additional features
Realtime document blur glare detection
This feature provides real-time document blur glare detection. Users will be informed by a warning alert when blur or glare is detected in the camera feed. As well as additional warning in the photo result view.
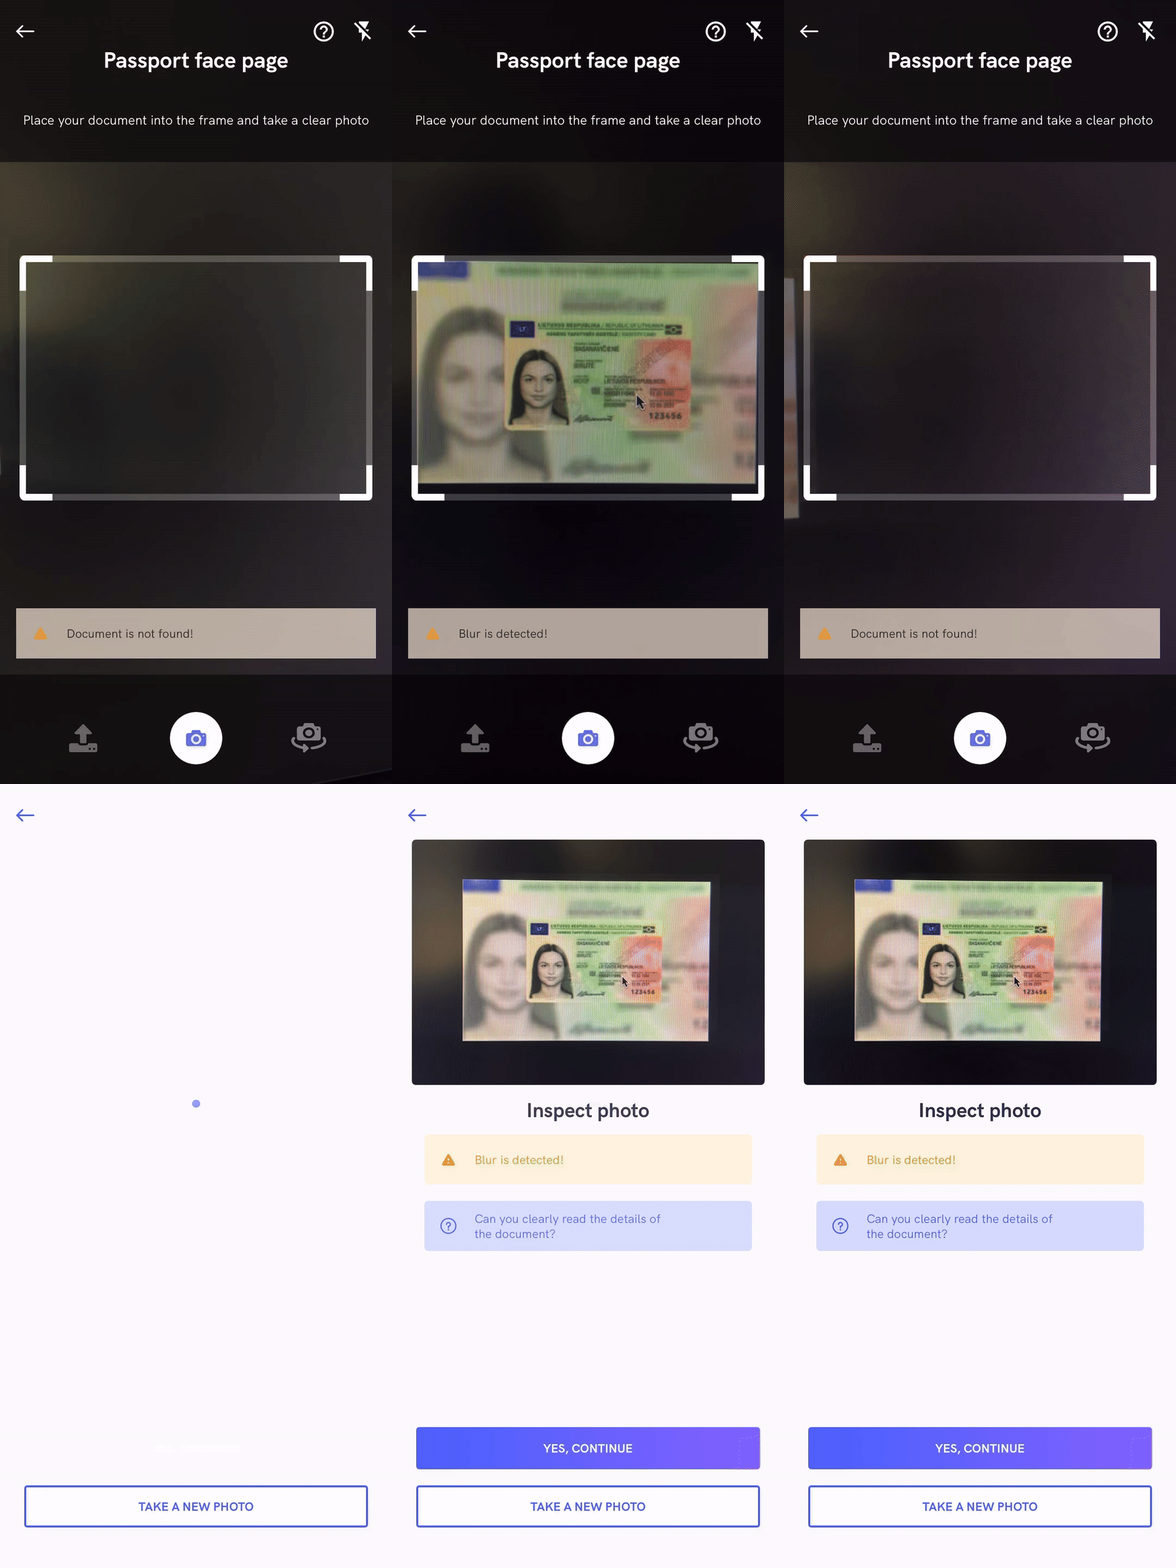 :
:
1. Adding the document recognition dependency
In the app level's Gradle add an additional sdk-blurglaredetection module with the same version as the sdk-api module.
repositories {
    dependencies {
      implementation 'com.github.idenfy:sdk-api:8.6.3'
      implementation 'com.github.idenfy:sdk-blurglaredetection:8.6.3'
    }
}
Contact our tech support via Jira customer portal for enabling this feature
Document Recognition
This feature provides real-time document recognition. Documents, shown in FRONT and BACK steps, will be automatically detected and captured. It allows us to take a better picture of the document.
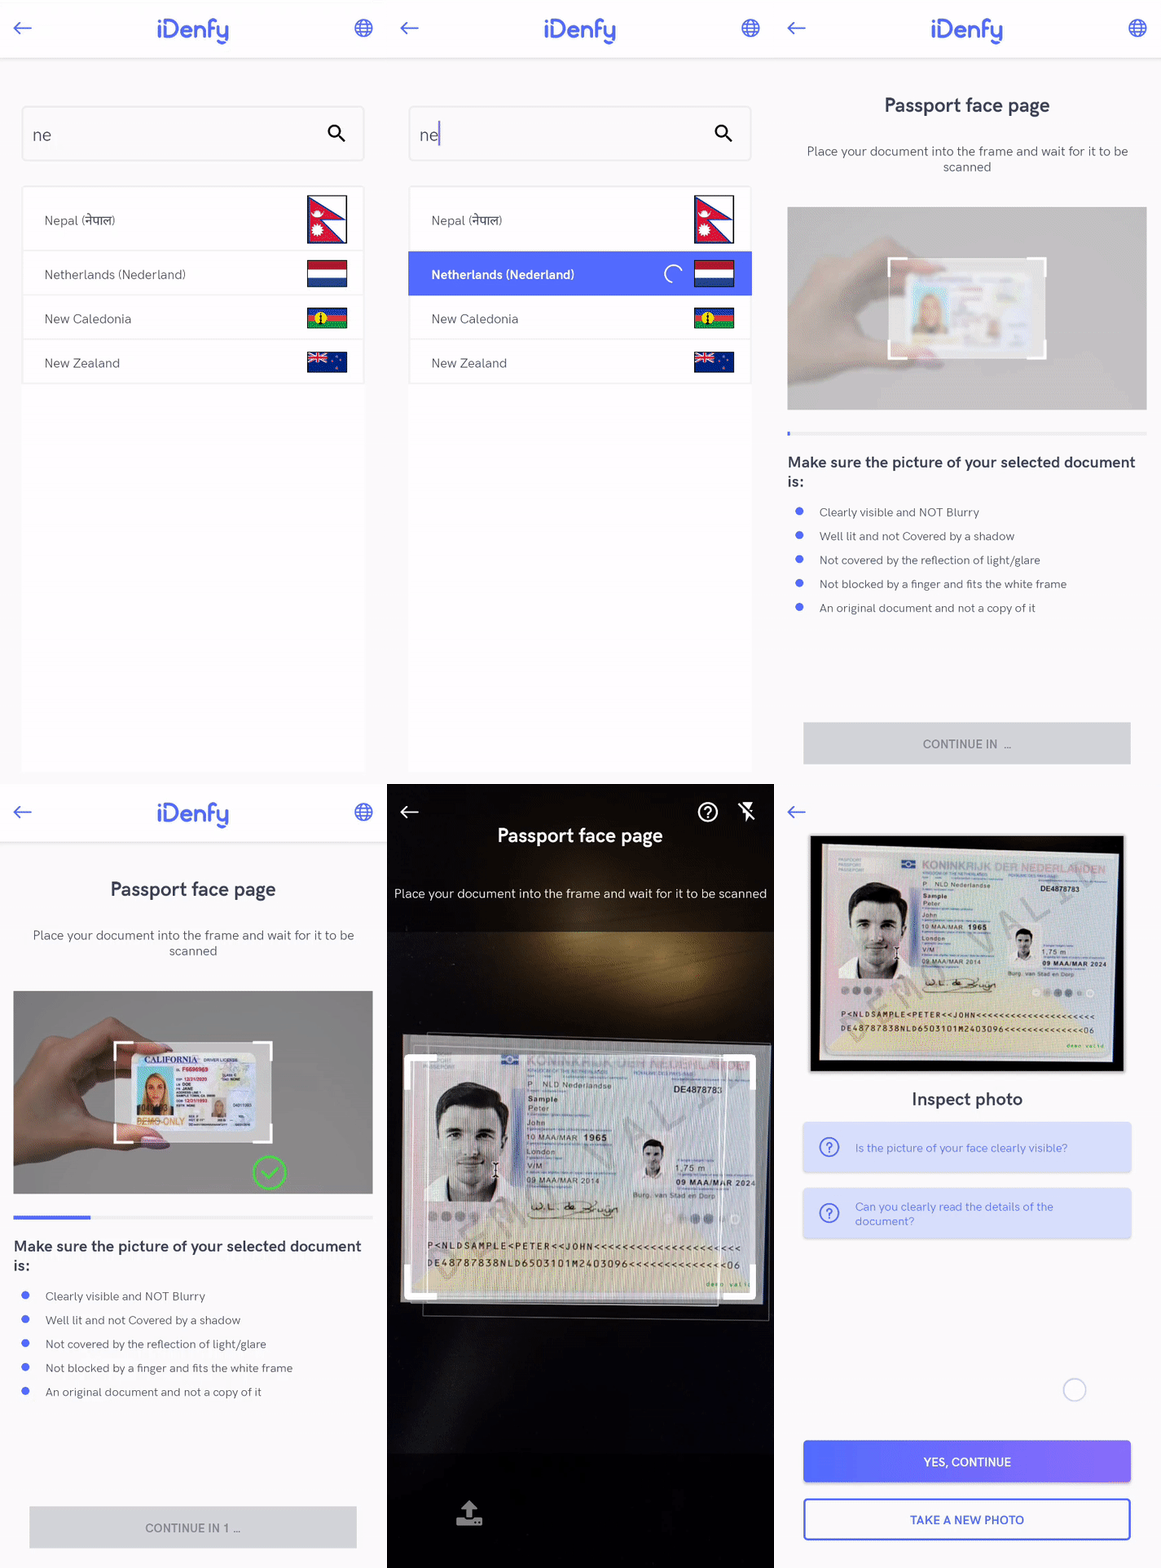
To seek a better result, documents, that are not fully visible or do not match selected country and document type, will NOT be recognized and captured. As a result, the final verification status will be more accurate.
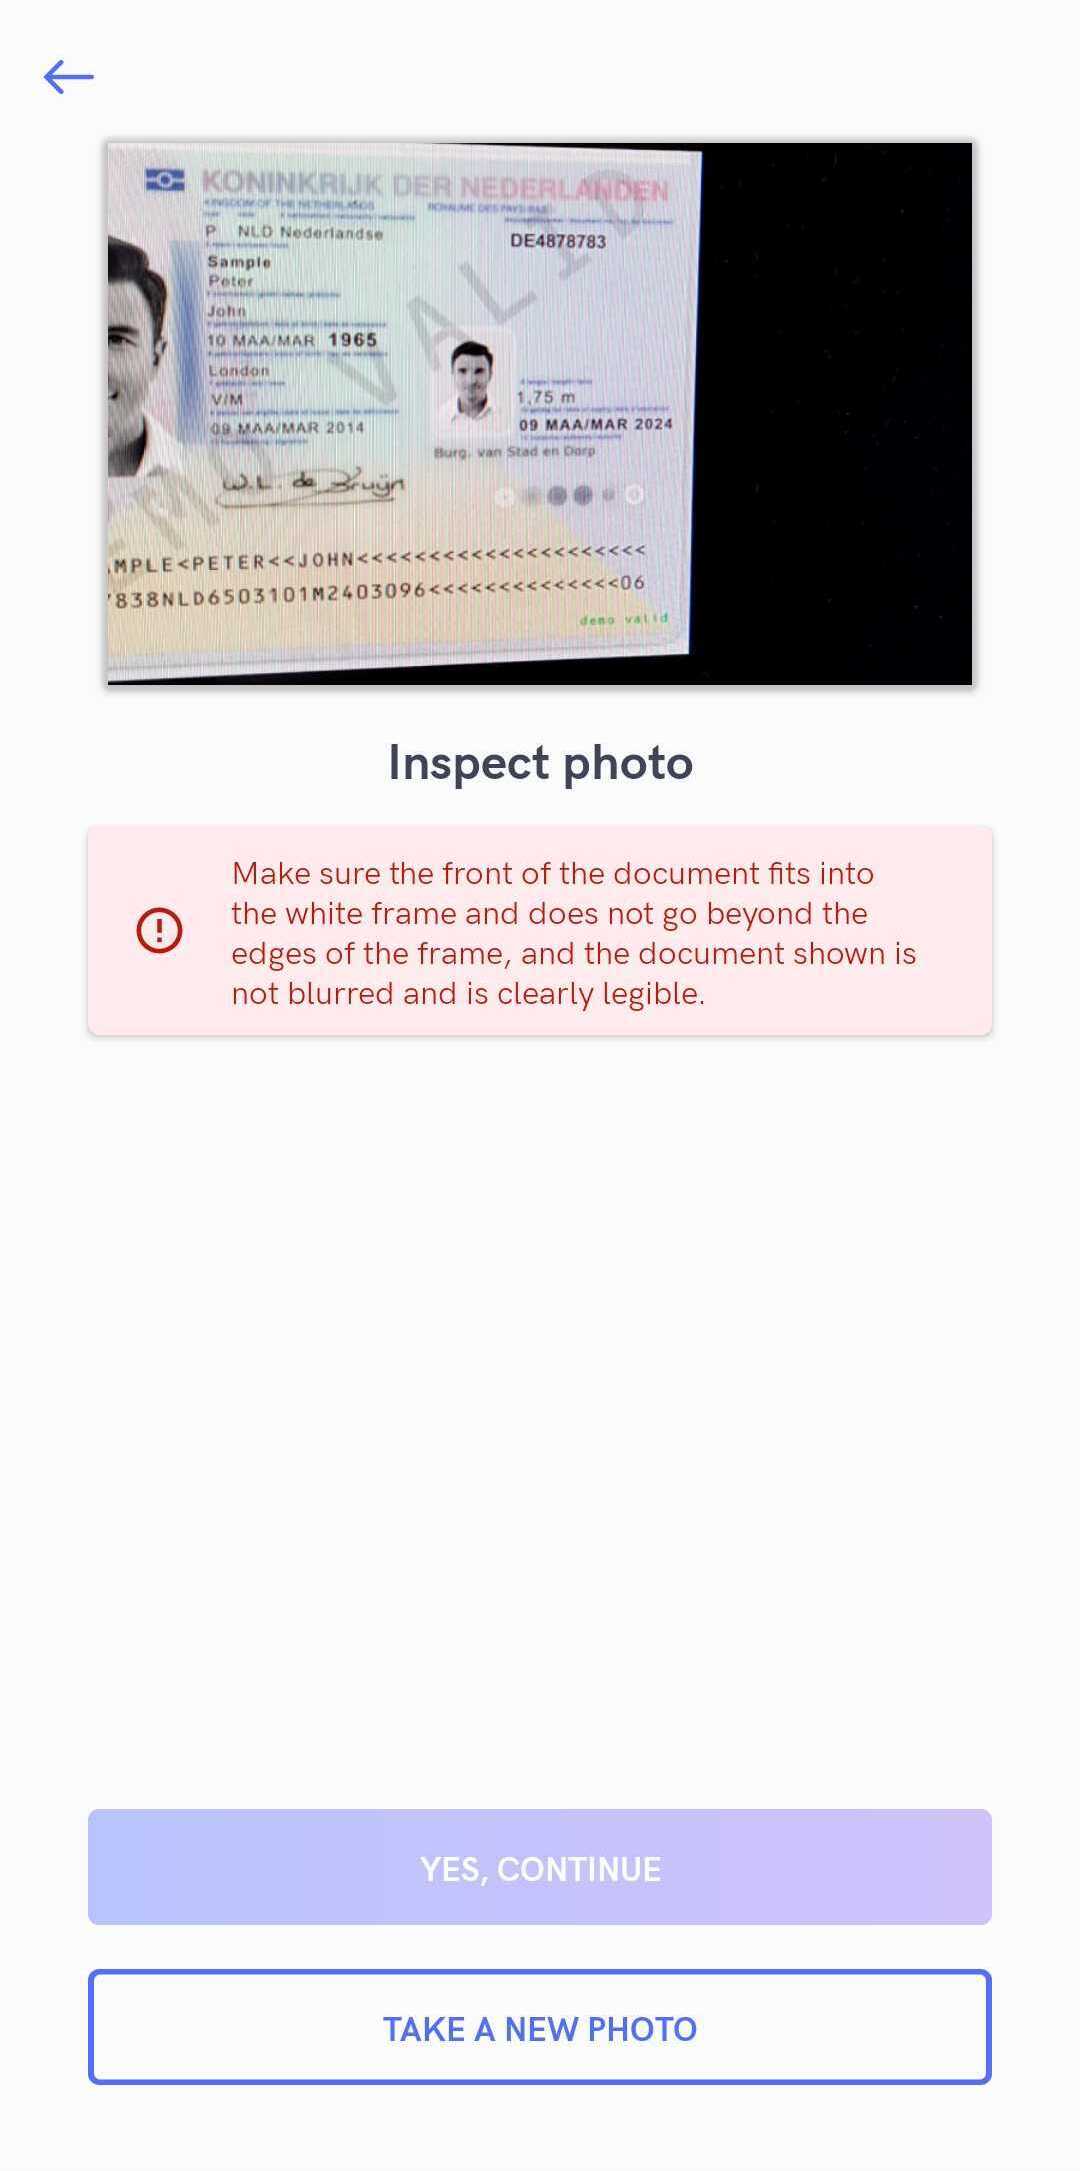
If a document cannot be recognized in a certain period of time (10 seconds), SDK will fallback to regular photo capturing.

This feature is still in an early stage. Therefore, minors bugs might occur.
1. Adding the document recognition dependency
In the app level's Gradle add an additional sdk-docrecognition module with the same version as the sdk-api module.
repositories {
    dependencies {
      implementation 'com.github.idenfy:sdk-api:8.6.3'
      implementation 'com.github.idenfy:sdk-docrecognition:8.6.3'
    }
}
For enabling Document Recognition feature, please contact technical support via Jira customer portal
Face detection
While taking a regular face photo, face detection feature can be enabled, which requires users to place their face into the marked area before taking a photo.
For better success rate, faces, that are far away from the camera won't be able to pass as well.
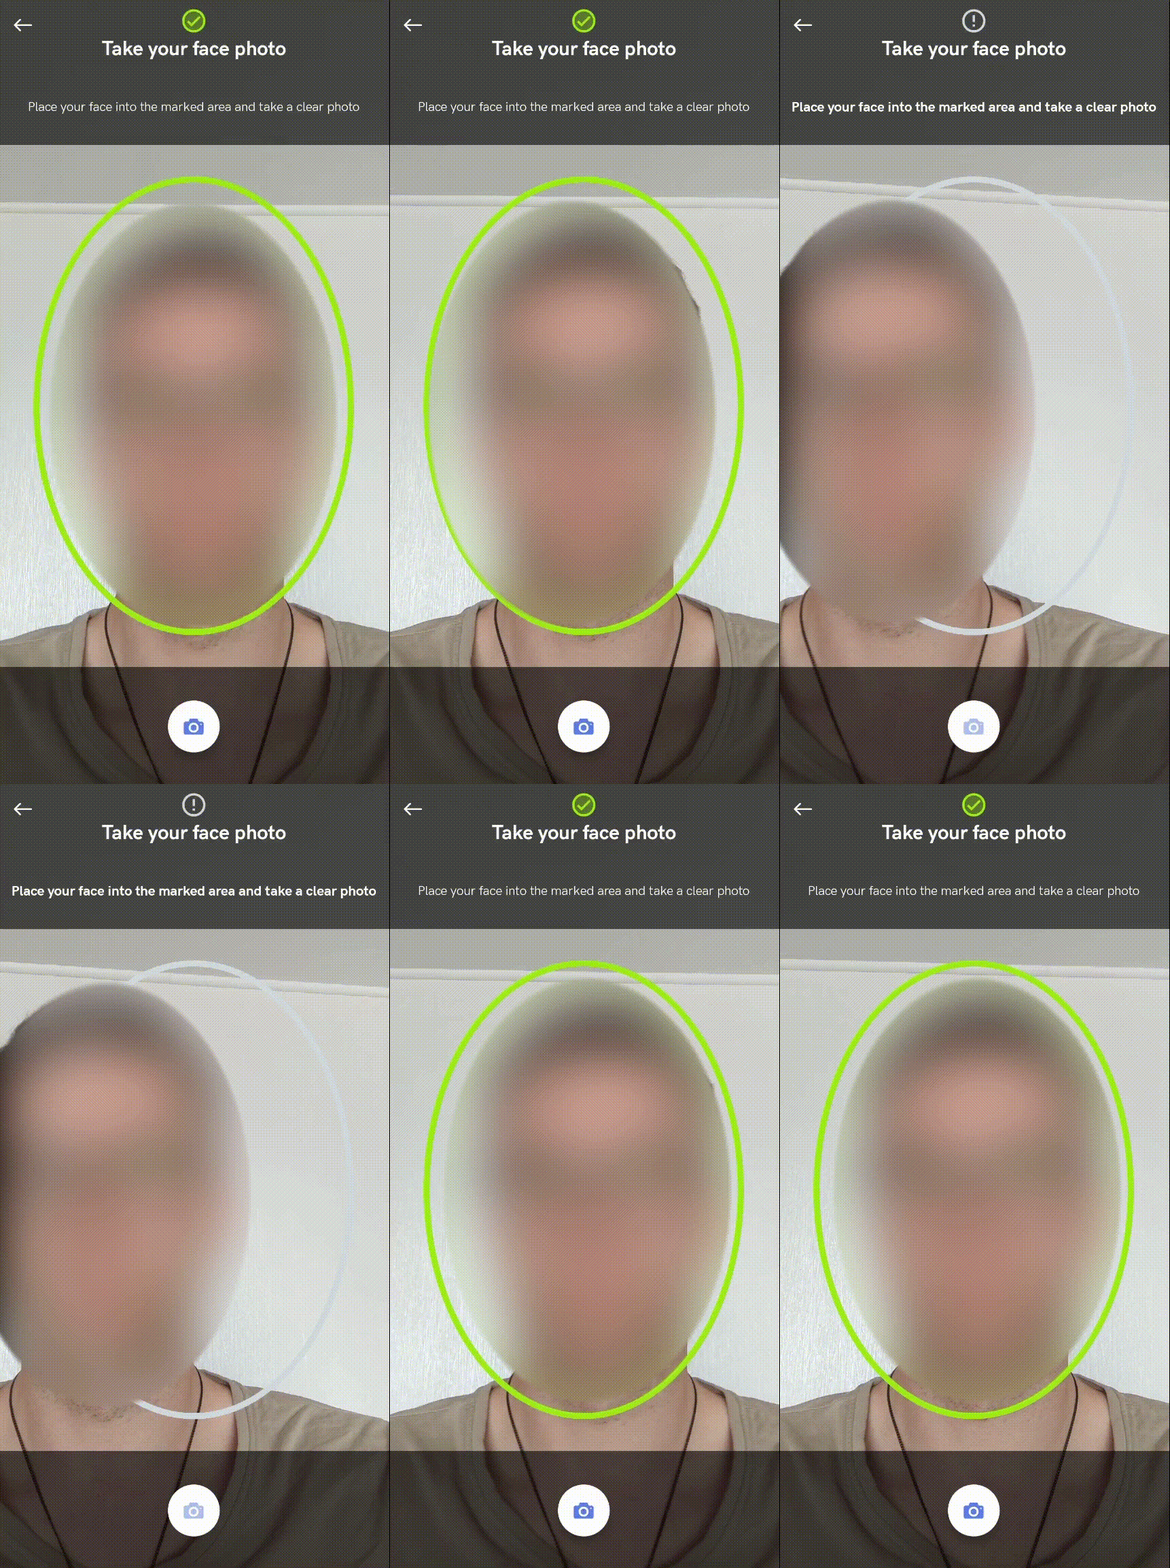
Contact our tech support via Jira customer portal for enabling this feature. Note that face detection will apply to both KYC verification and face authentication flows.
Face auto capture
While taking a regular face photo, face auto capture feature can be enabled, which requires users only to place their face into the marked area and face photo will be automatically captured.
For better success rate, faces, that are too close or far away from the camera won't be able to pass as well.
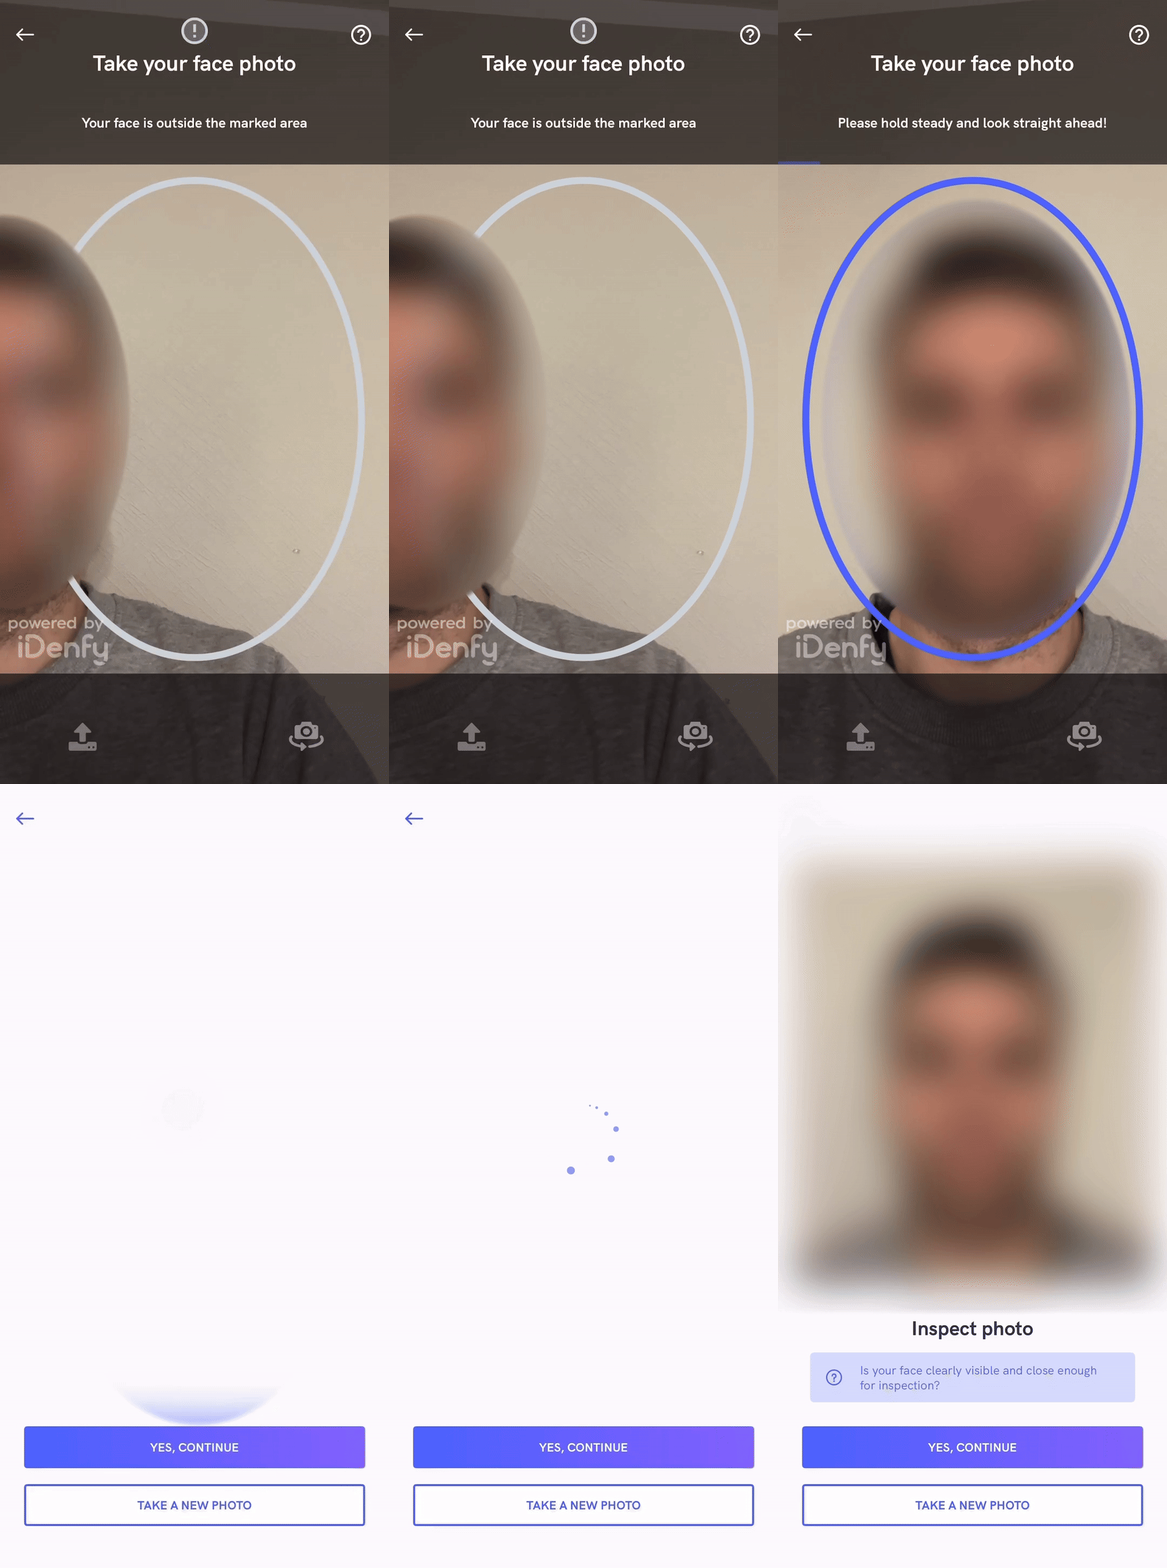
Contact our tech support via Jira customer portal for enabling this feature
Advanced Liveness detection

SDK provides an advanced liveness recognition feature.
The liveness feature is not optimized for tablets. As a result, verification performed via tablet will be automatically classified as denied.
The new major liveness version is released every 6-12 months. Your app must update the liveness module after every major release. If SDK is not updated, it can lead to the runtime crashes.
Contact support for enabling liveness feature.
Virtual camera detection
SDK provided a possibility to check whether a face photo was taken using a virtual camera. Such verifications will result with a FAILED status.
Contact support for enabling virtual camera detection feature.
FAQ
1. Is there a possibility to change verification results view?
- Yes, it can be achieved by providing a custom verification results view
2. How to change the position of the top titles?
- Any component and it's properties can be changed either by overriding the XML layout or providing a custom jetpack compose view
3. How do I report an issue within the SDK?
- Please report any issue via Jira customer portal]. Please attach versions of SDK, Gradle you are using, describe the problem as much detailed as possible.
4. When I override liveness fonts, the size does not change. Why is that?
- Liveness font size is dynamically determined according to the screen resolution, and it cannot be manually changed.
Additional SDK information
SDK size impact on applications
- sdk-api module increases ~20 MB of APK size and ~40 MB of an installed App
- sdk-api and sdk-blurglaredetection modules increase ~22 MB of APK size and ~45 MB of an installed App
- sdk-api and sdk-nfcreading modules increase ~23 MB of APK size and ~48 MB of an installed App
- sdk-api and sdk-docrecognition modules increase ~29 MB of APK size and ~74 MB of an installed App
- sdk-api, sdk-nfcreading, sdk-docrecognition modules increase ~31 MB of APK size and ~80 MB of an installed App
SDK and not platform-specific choices
Here will be listed all unique choices, which are not that present in other SDK/platforms in general.
Internet disconnect
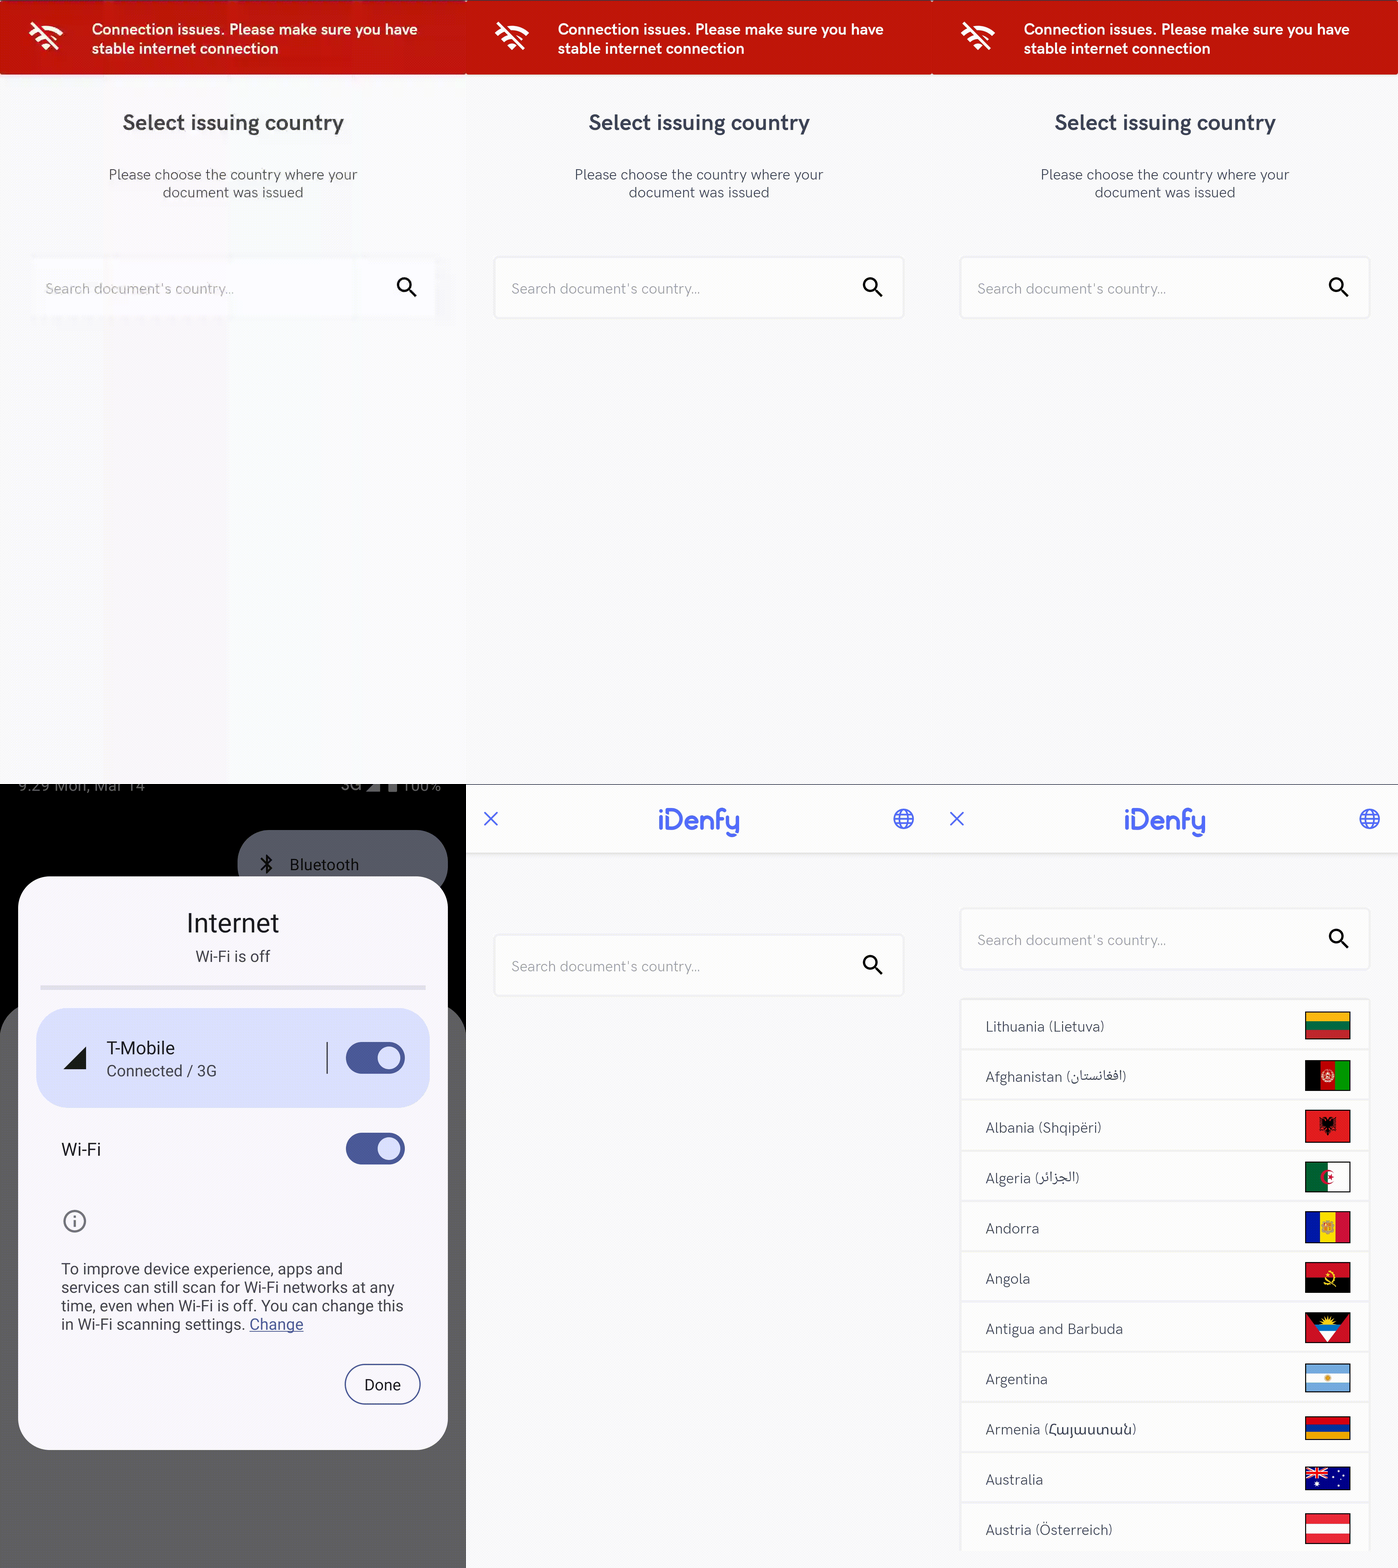
Since it is one of the requirements to have a KYC session uninterruptible, we changed the user's flow. Read the information below.
If the network disappears for more than 5 seconds when the user is still in the camera windows, a user is returned to the KYC initial screen.
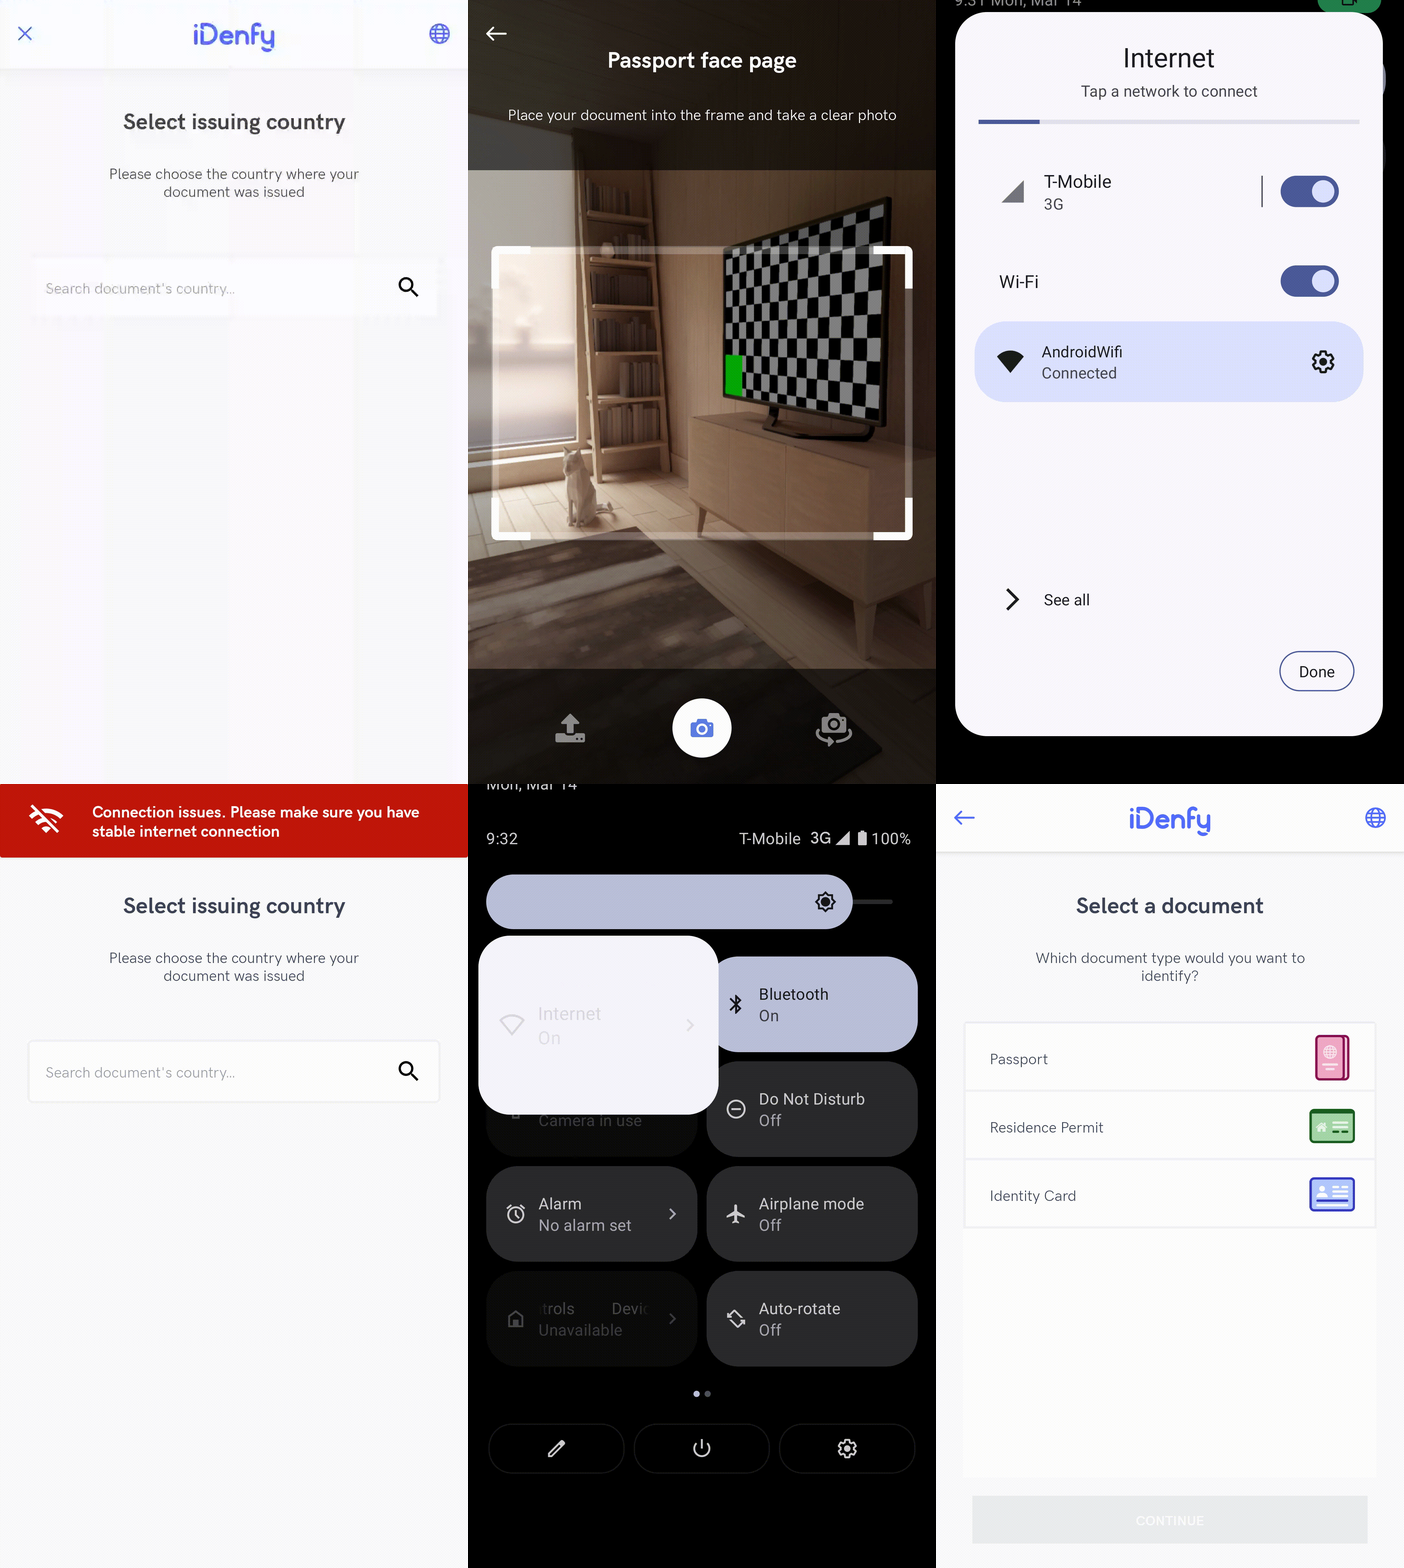
If the network disappears for more than 5 seconds when the user is in any other window, a user's actions and clicks are blocked, until connection appears.
I hope it makes sense :) Requirements are challenging to follow, but iDenfy is doing its best!