Overview
The iDenfy Shopify app embeds identity verification directly into your store. Decide when customers verify (4 flows), who is asked (conditional triggers), and what happens after (order holds, auto-refunds, emails) — all from the Shopify Admin.Install from the App Store
One-click install with automatic permission setup.
Pick a verification flow
Account, cart, checkout, or post-purchase.
Layer conditional triggers
Cart value, region, risk score, products, collections.
Automate order state
Hold, release, and refund orders based on KYC.
How It Works
The Shopify app combines a Shopify Admin app (built on Remix + Polaris), a Theme App Extension (Liquid), and a Checkout/Customer Account UI extension (React). When a verification trigger fires, the storefront fetches a one-timeauthToken from iDenfy, opens iDenfy’s hosted UI, and writes the result back onto the Shopify customer and order via metafields, tags, and notes.
You don’t need to manage any of the moving parts — the app handles tokens, webhooks, geolocation, holds, and refunds. This section is here so you know what to look for when something doesn’t behave as expected.
Quick Start
Requirements
- Active iDenfy production environment (see pricing)
- iDenfy API key and secret (Dashboard → Settings → API Keys)
- A Shopify store on any plan that supports apps and theme editing
1
Install the iDenfy app
Install from the Shopify App Store and approve the requested permissions (customers, orders, products, collections, fulfillment).On first install the app pulls your existing collections, products, and customers into its database so they can be used in trigger rules.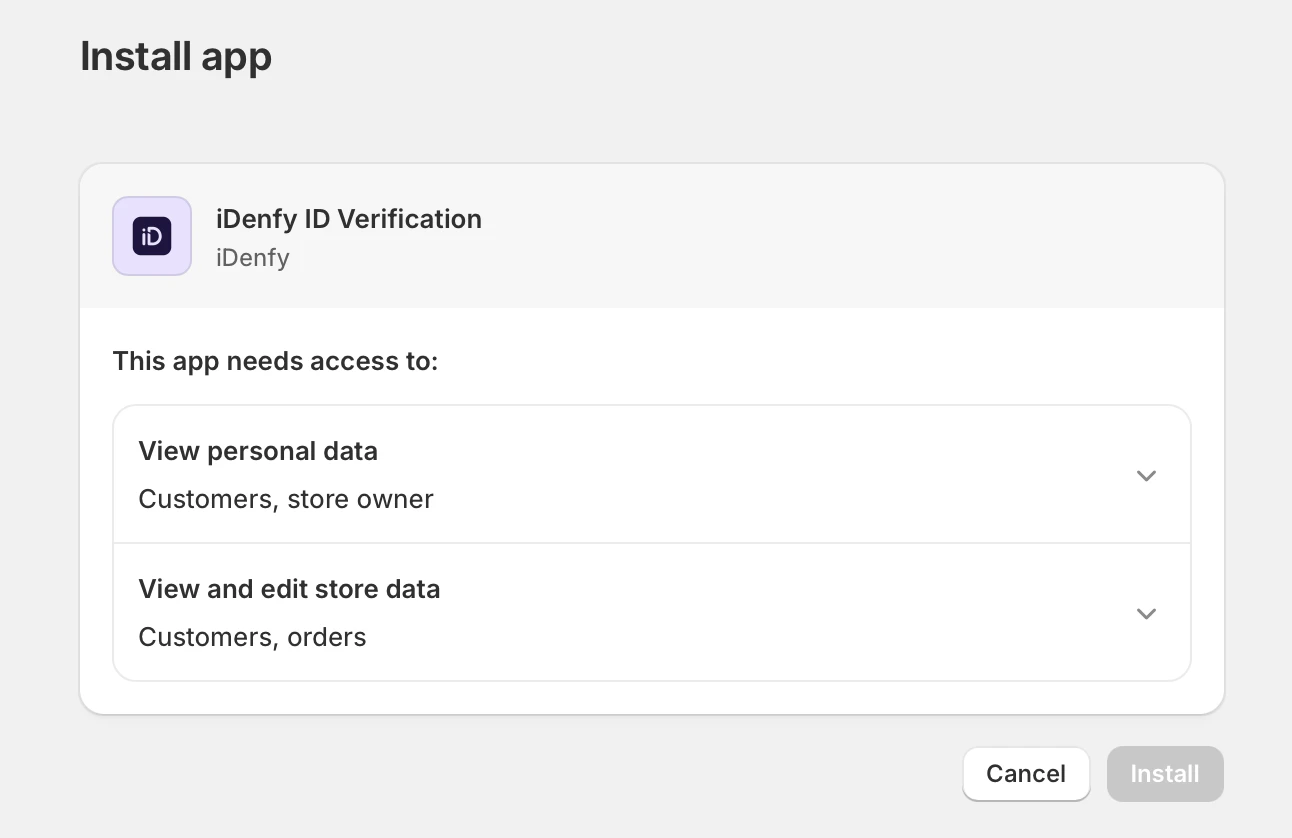
2
Connect your iDenfy account
Open the iDenfy Admin page inside Shopify and connect using one of two methods: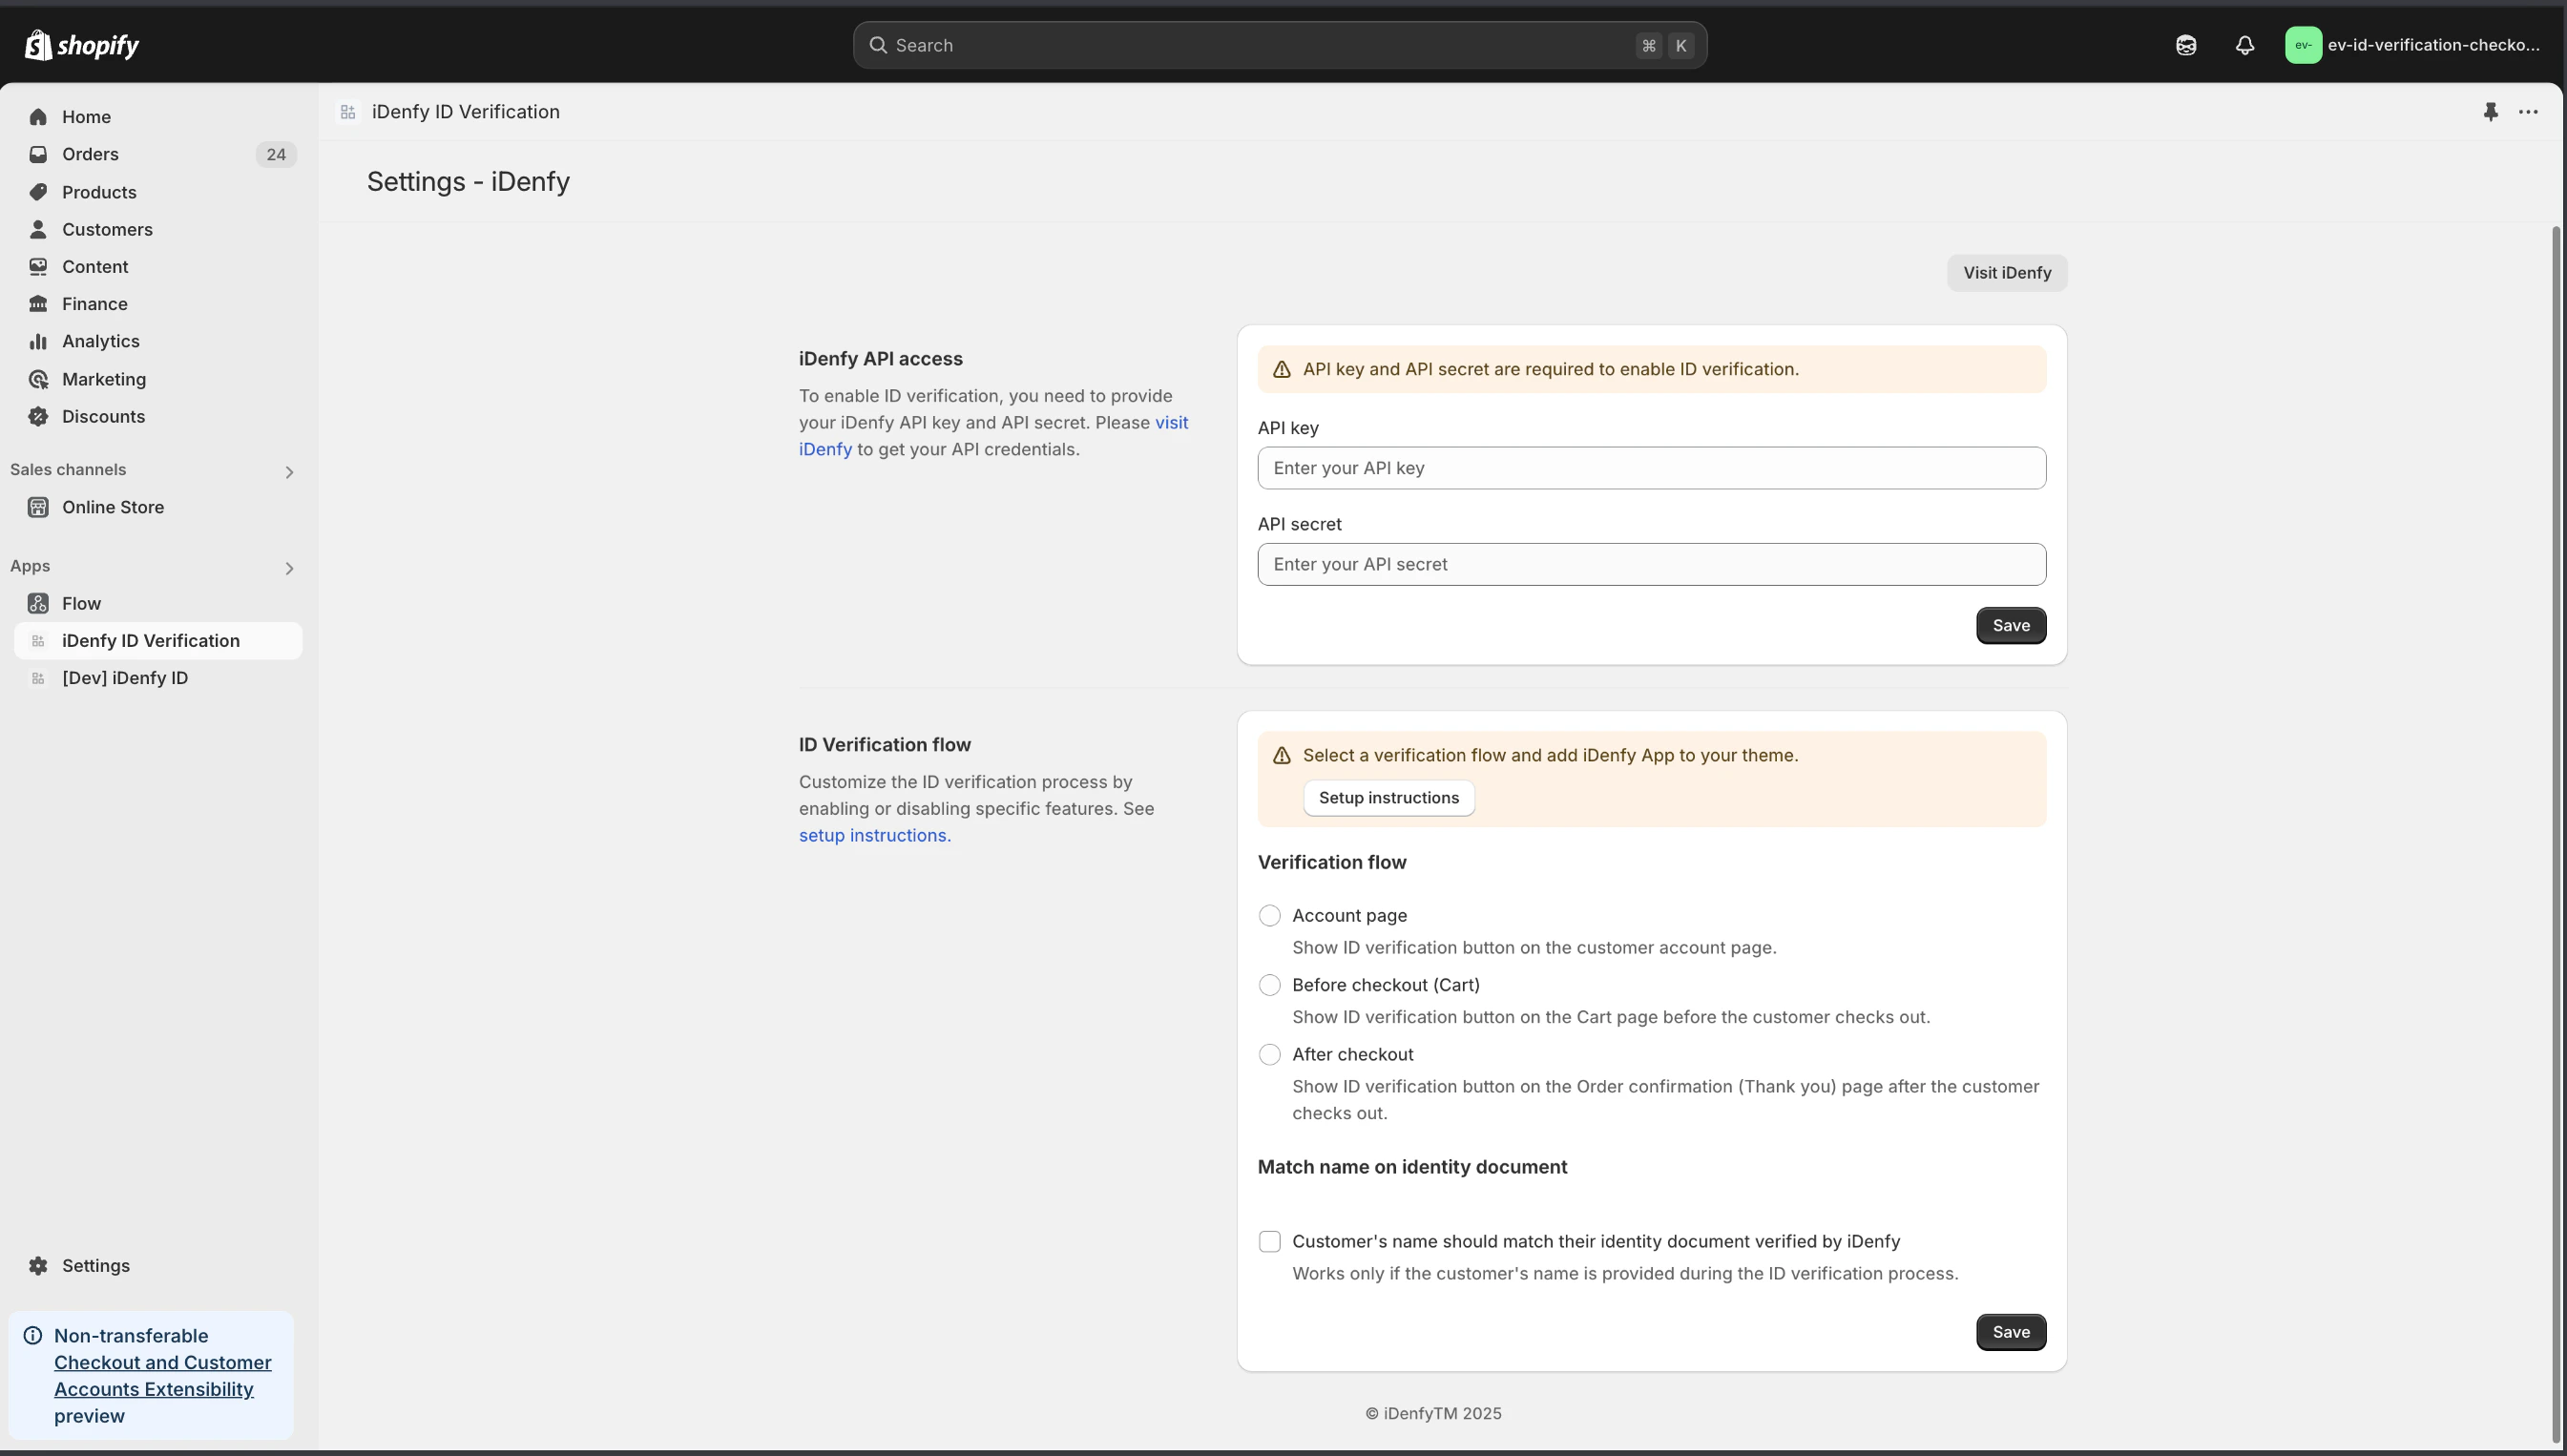
- iDenfy login (recommended)
- Manual API key
Sign in with your iDenfy credentials — the API key is fetched automatically and rotated by iDenfy.
3
Choose a verification flow
Pick exactly one flow — see Verification Flows below for the trade-offs. Your choice is also written to a shop metafield so theme extensions can read it at runtime.
4
Configure the iDenfy webhook
On the iDenfy Dashboard → Webhooks, add an ID verification auto finish webhook.
- Receiver:
https://shopify.idenfy.com/api/sdk/verification/webhook - Signing key: the same API key you connected with above
5
Enable the matching extension in your theme
Open Online Store → Themes → Customize and enable the extension that matches your chosen flow. See Theme & UI Setup.
Verification Flows
You pick one flow per store. Each flow controls where the verify button appears and when the customer is asked.Account page flow
Account page flow
The verification button is shown on the customer account page. The checkout button is hidden site-wide until the customer is verified. If they are already verified, a success badge is shown.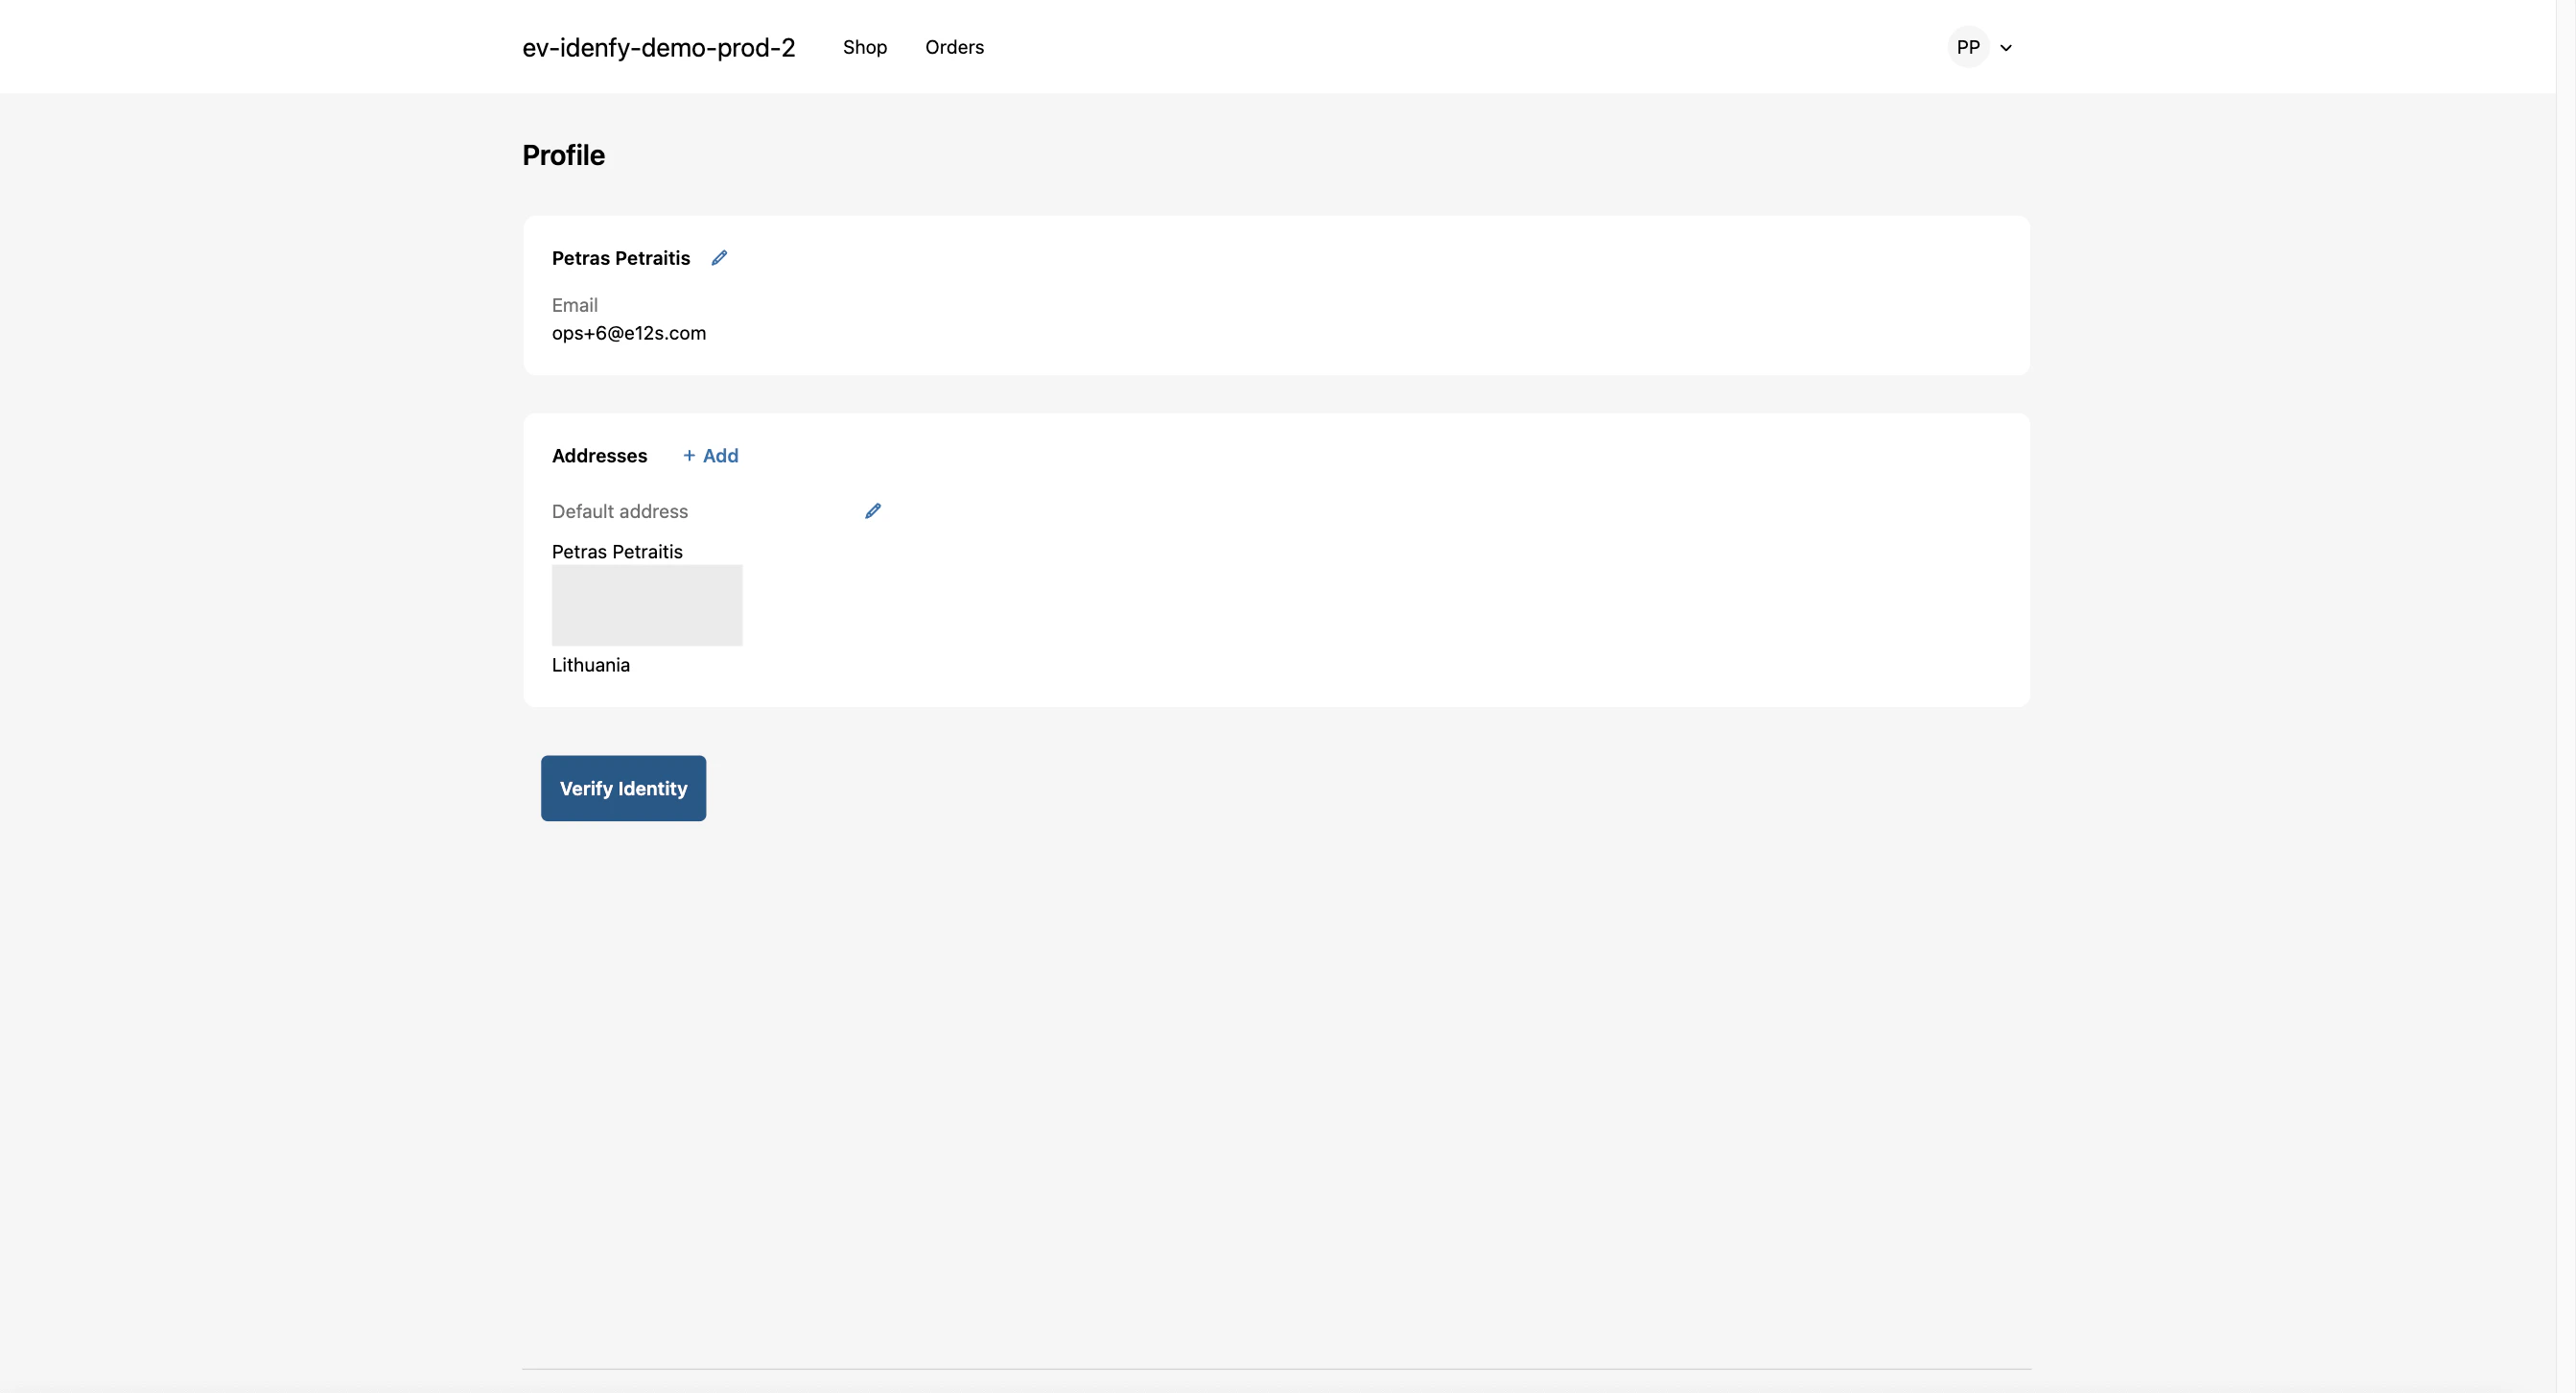
Before checkout flow
Before checkout flow
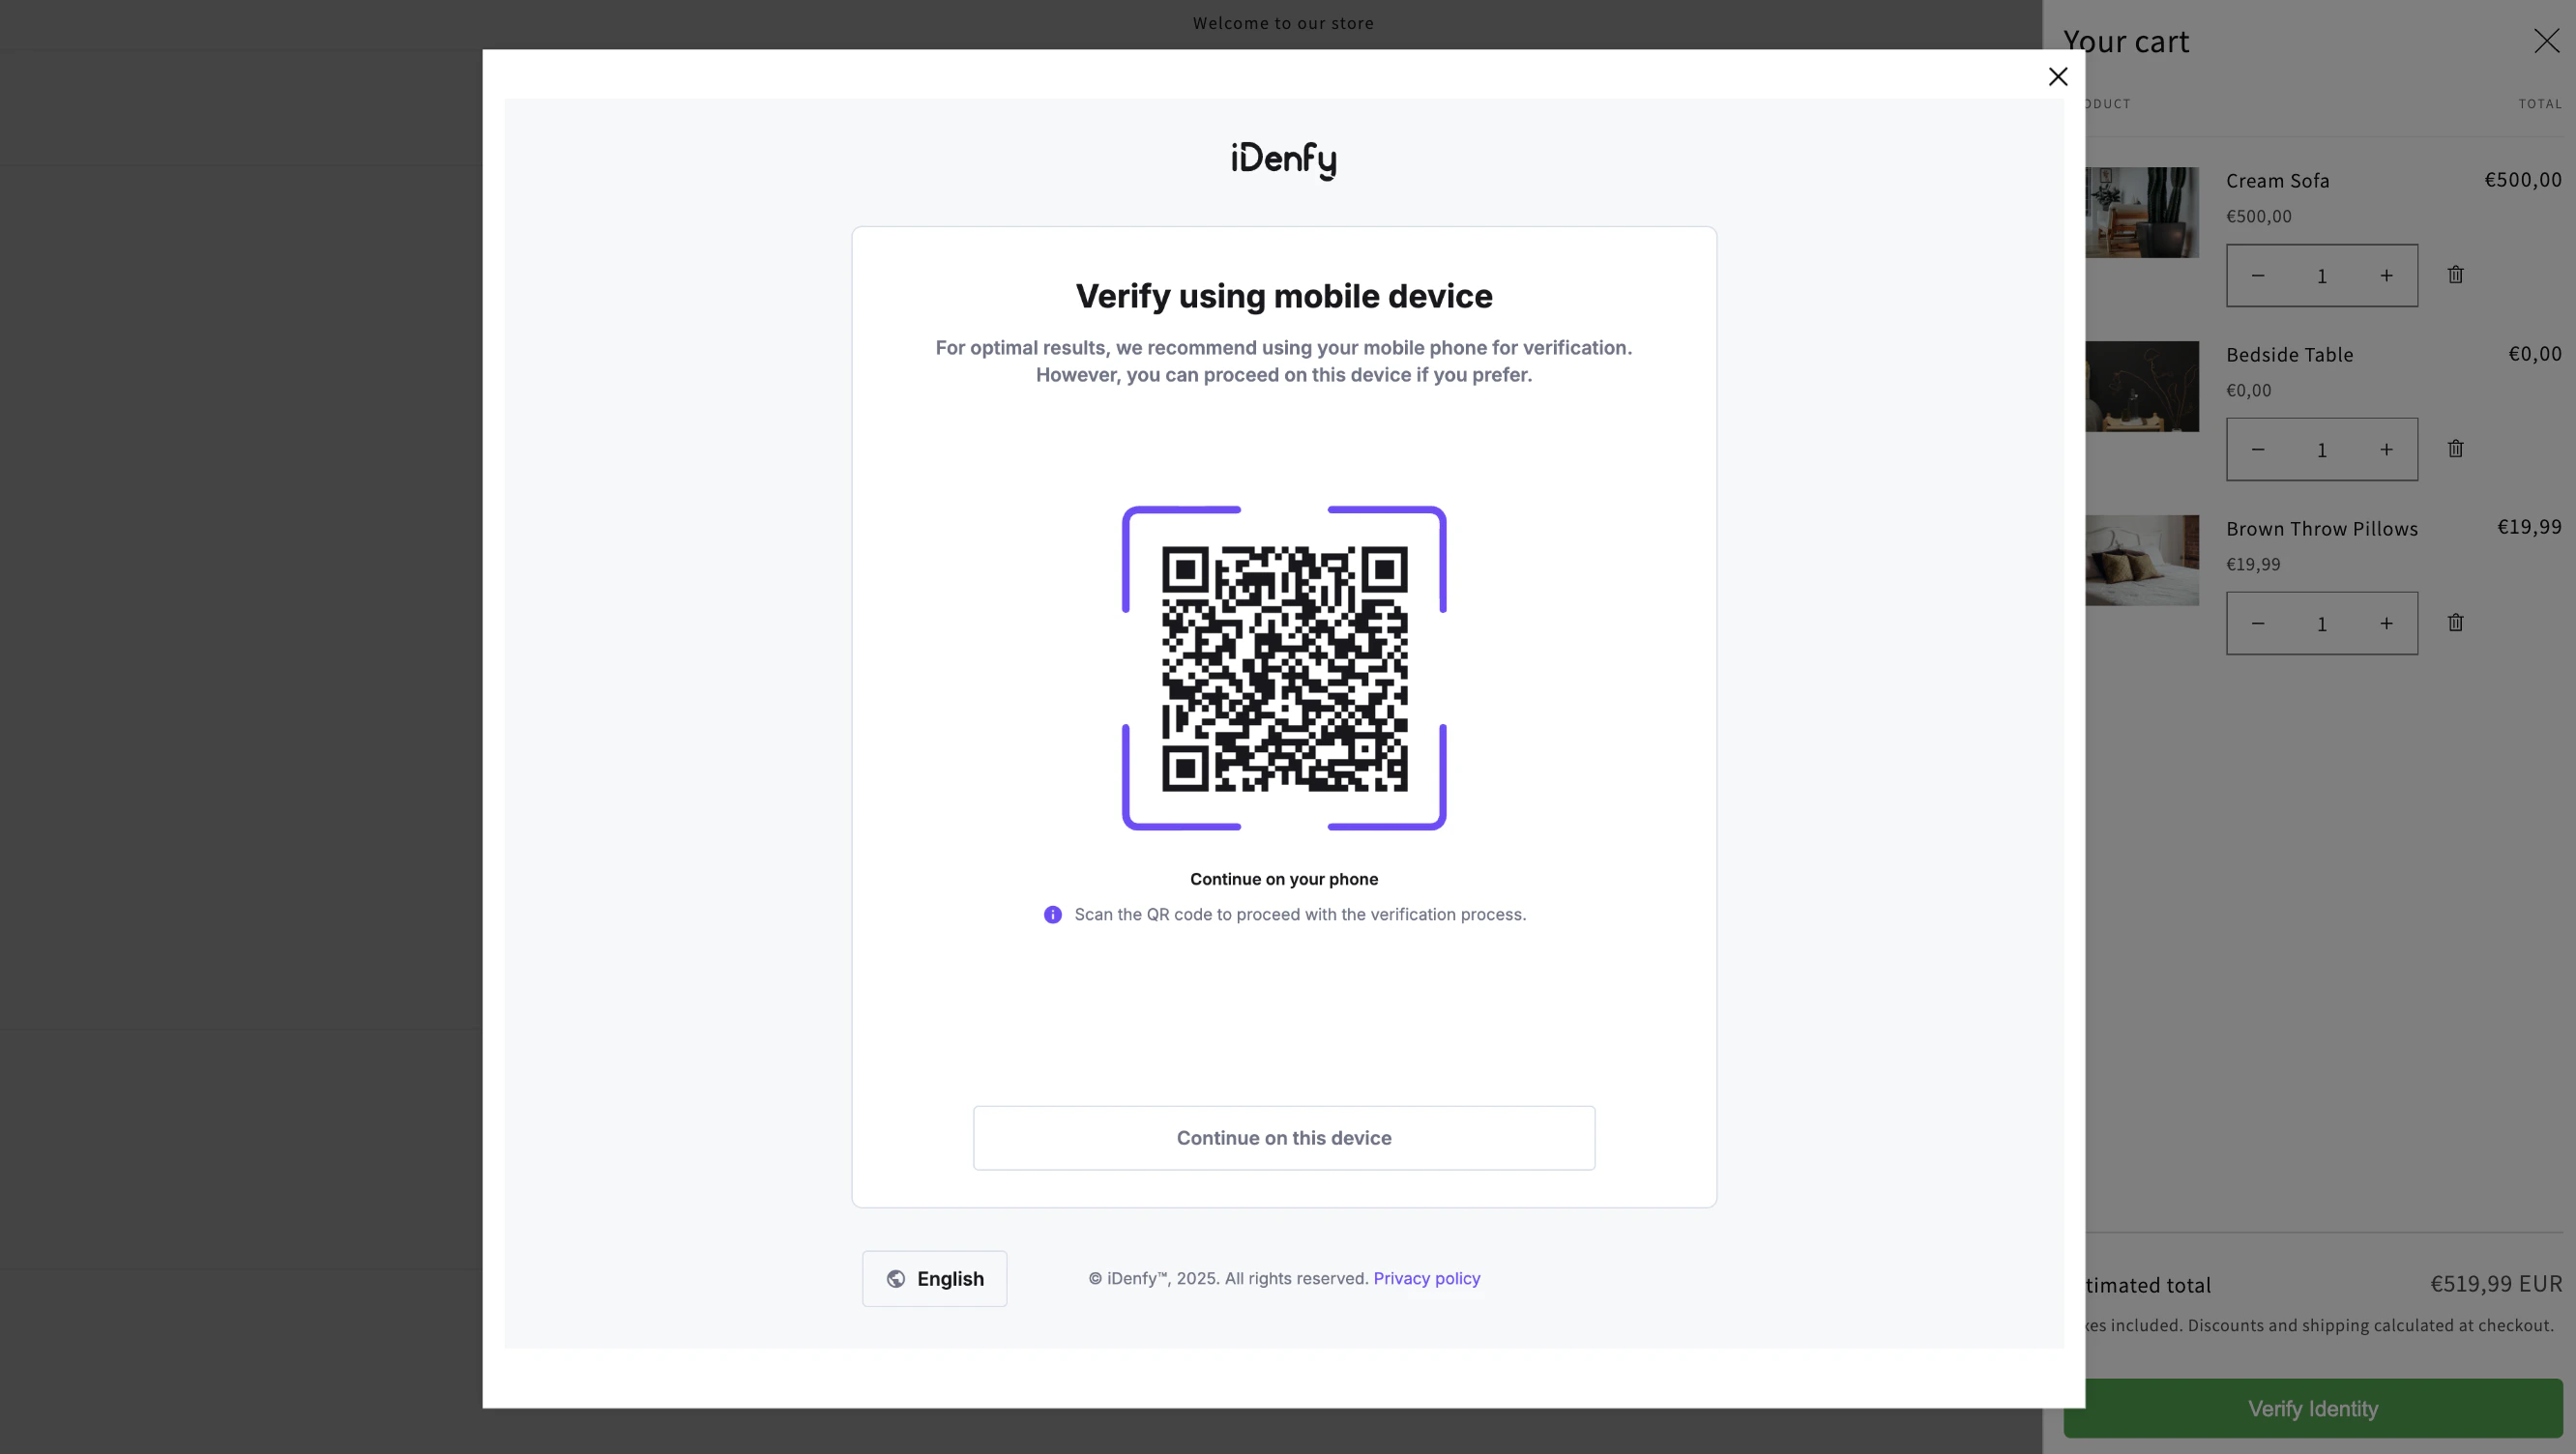
The verification button replaces the cart and checkout buttons whenever the cart matches a trigger rule. The check re-runs whenever the cart contents change.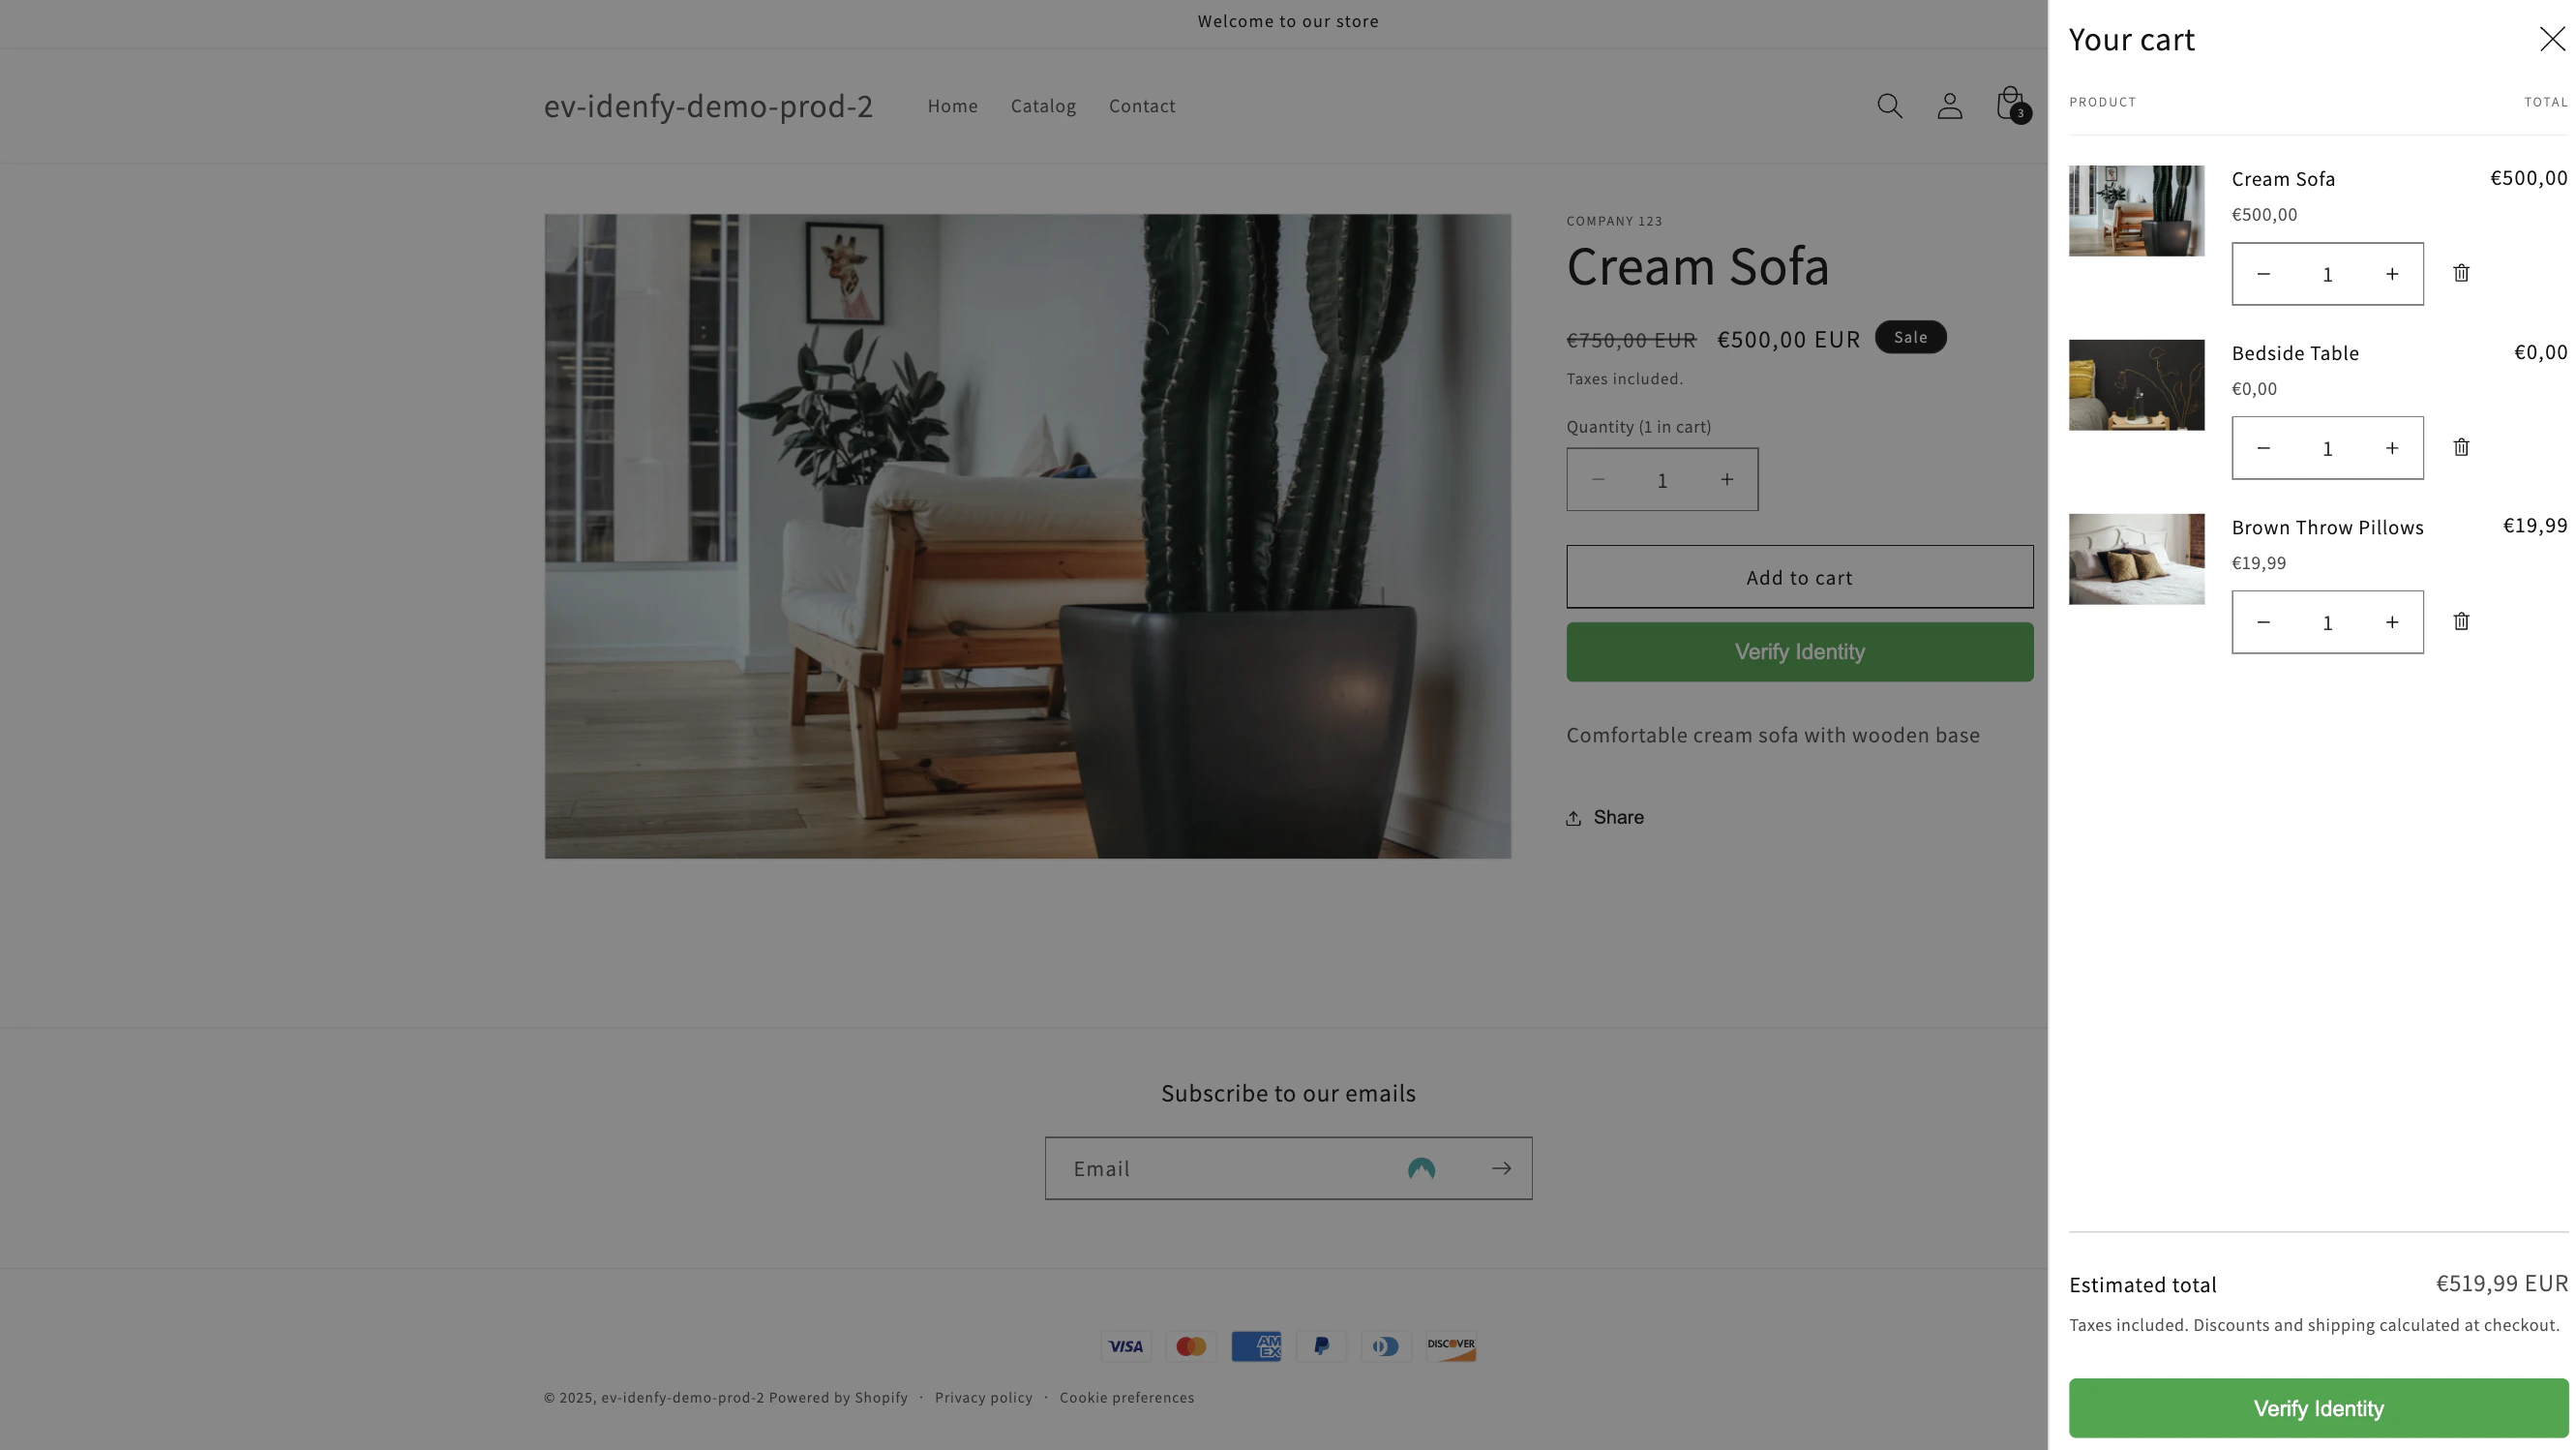
During checkout flow
During checkout flow
The verification button appears on the checkout page itself via a Checkout UI extension. Checkout progress is blocked until verification succeeds.
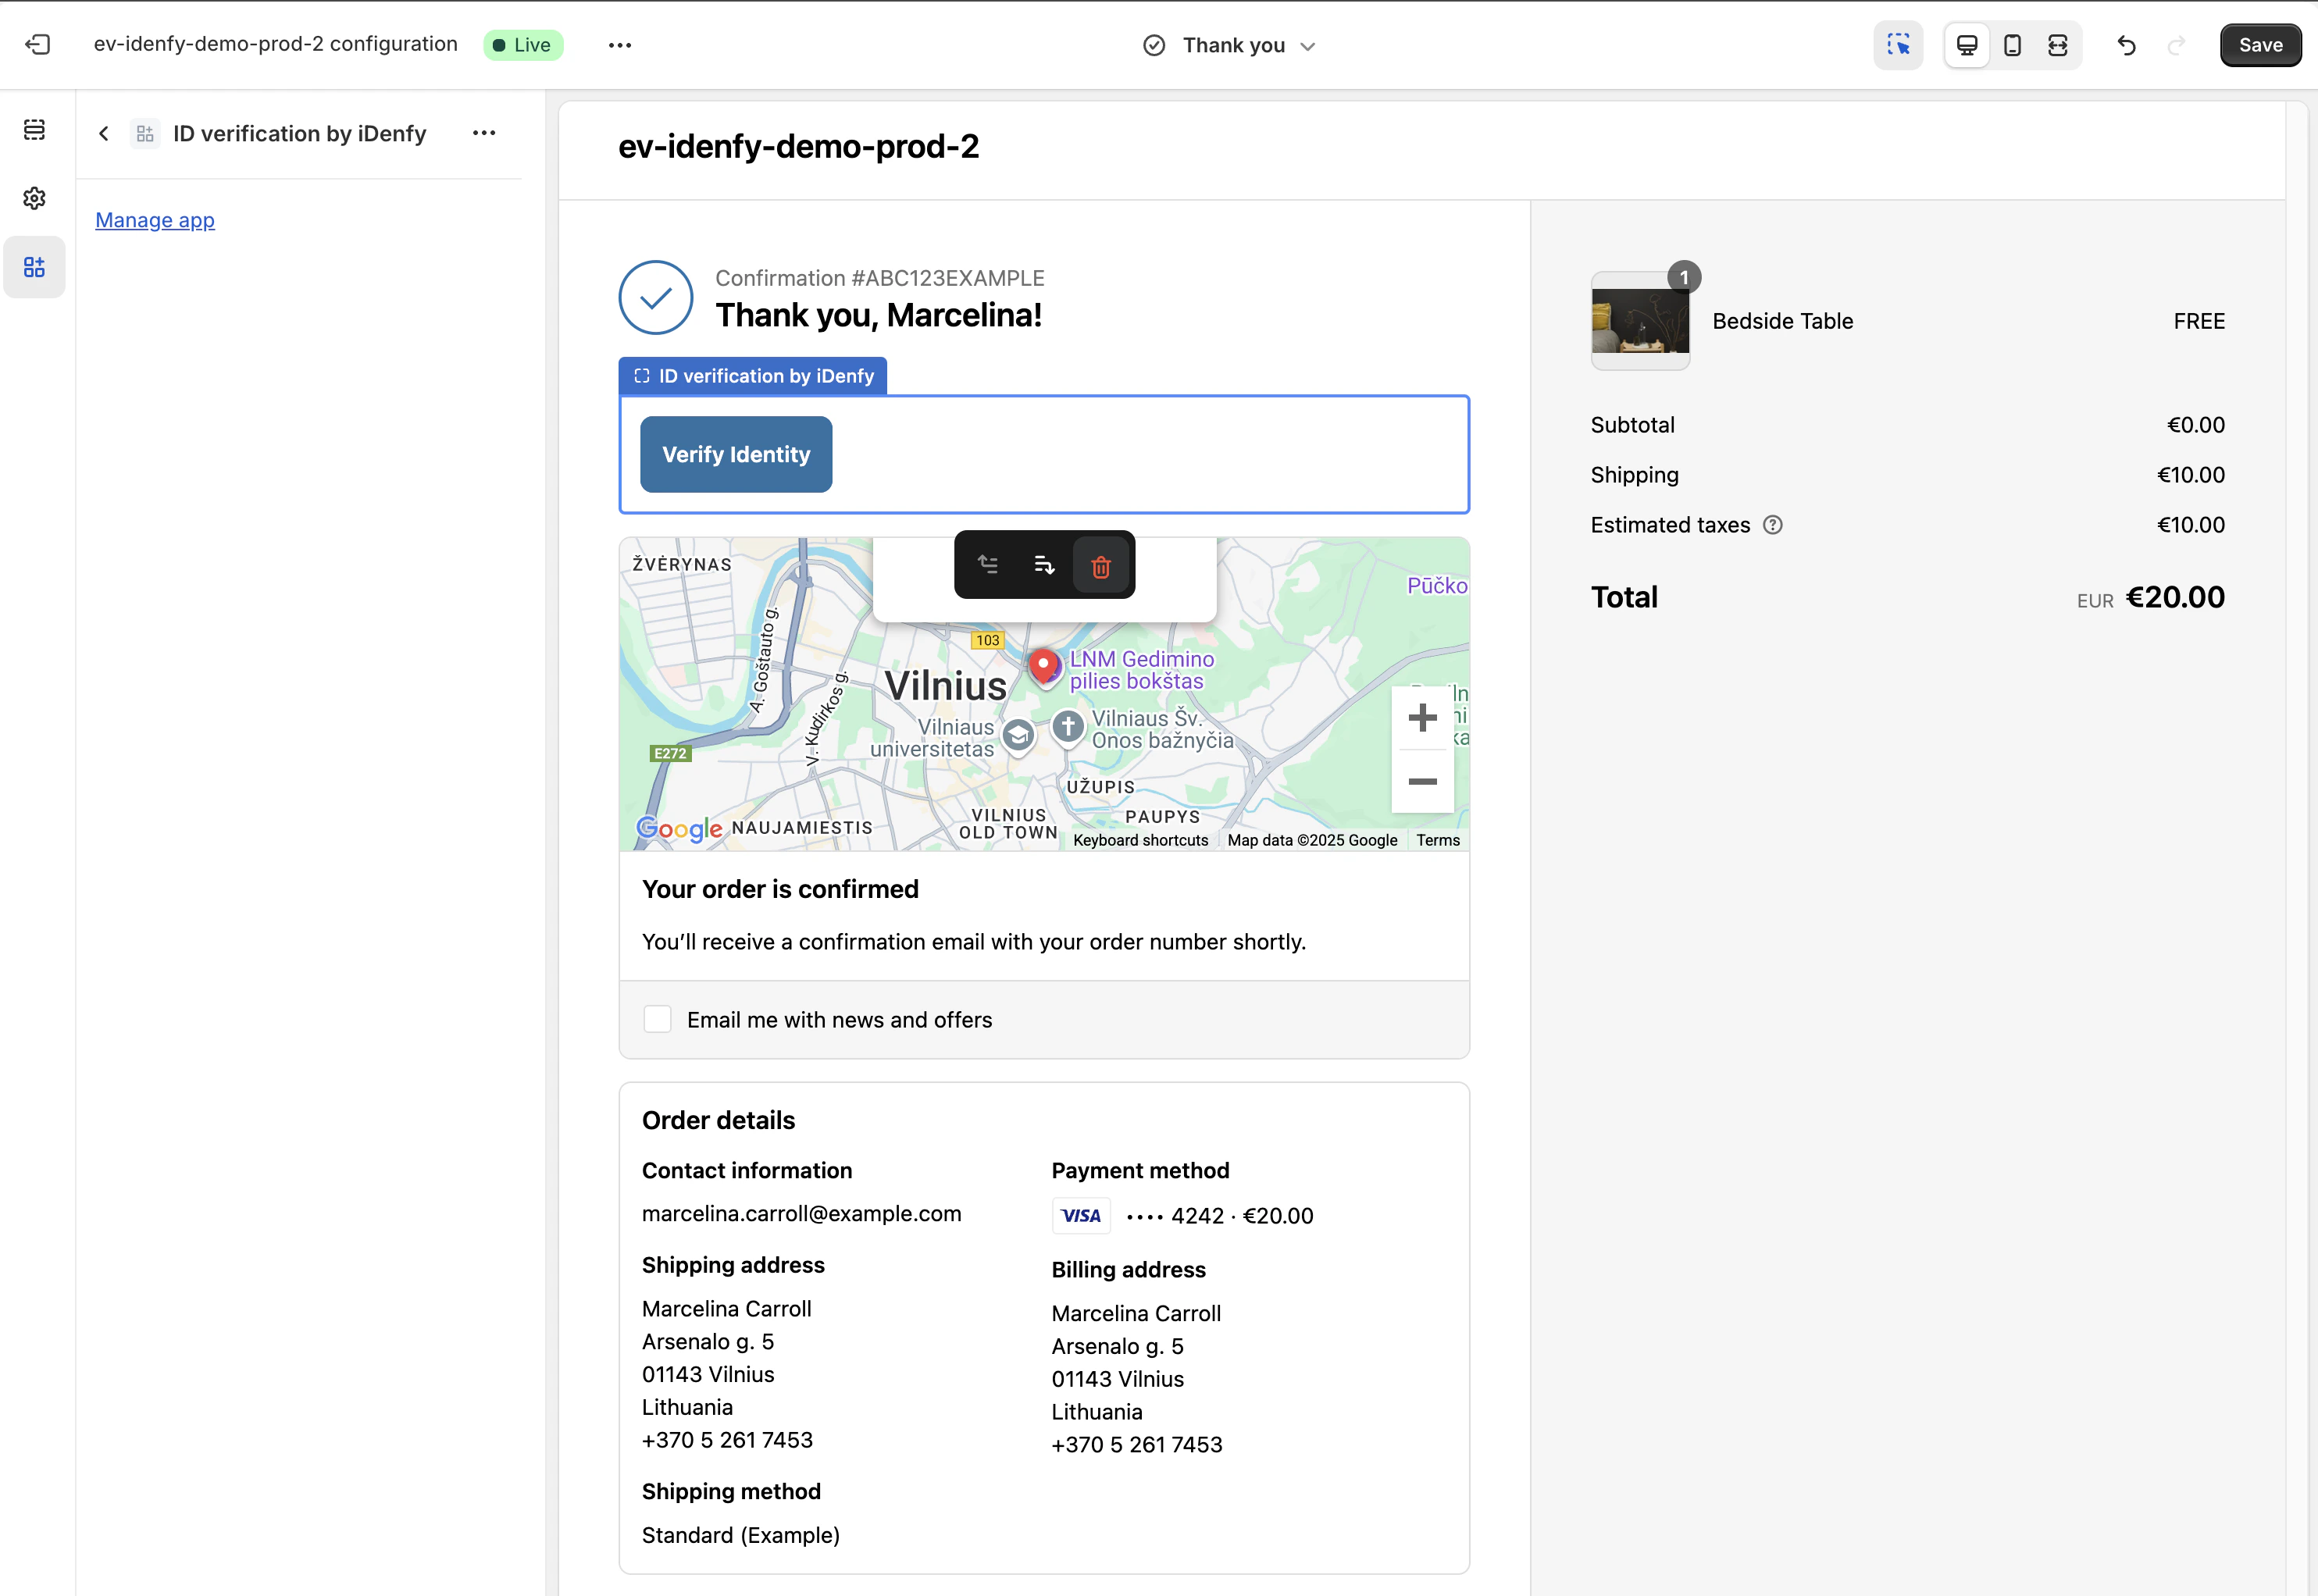
After checkout flow
After checkout flow
The order completes normally; the customer is prompted to verify on the Thank-you and Order status pages. Combined with Order State Management, this enables hold-and-refund behavior.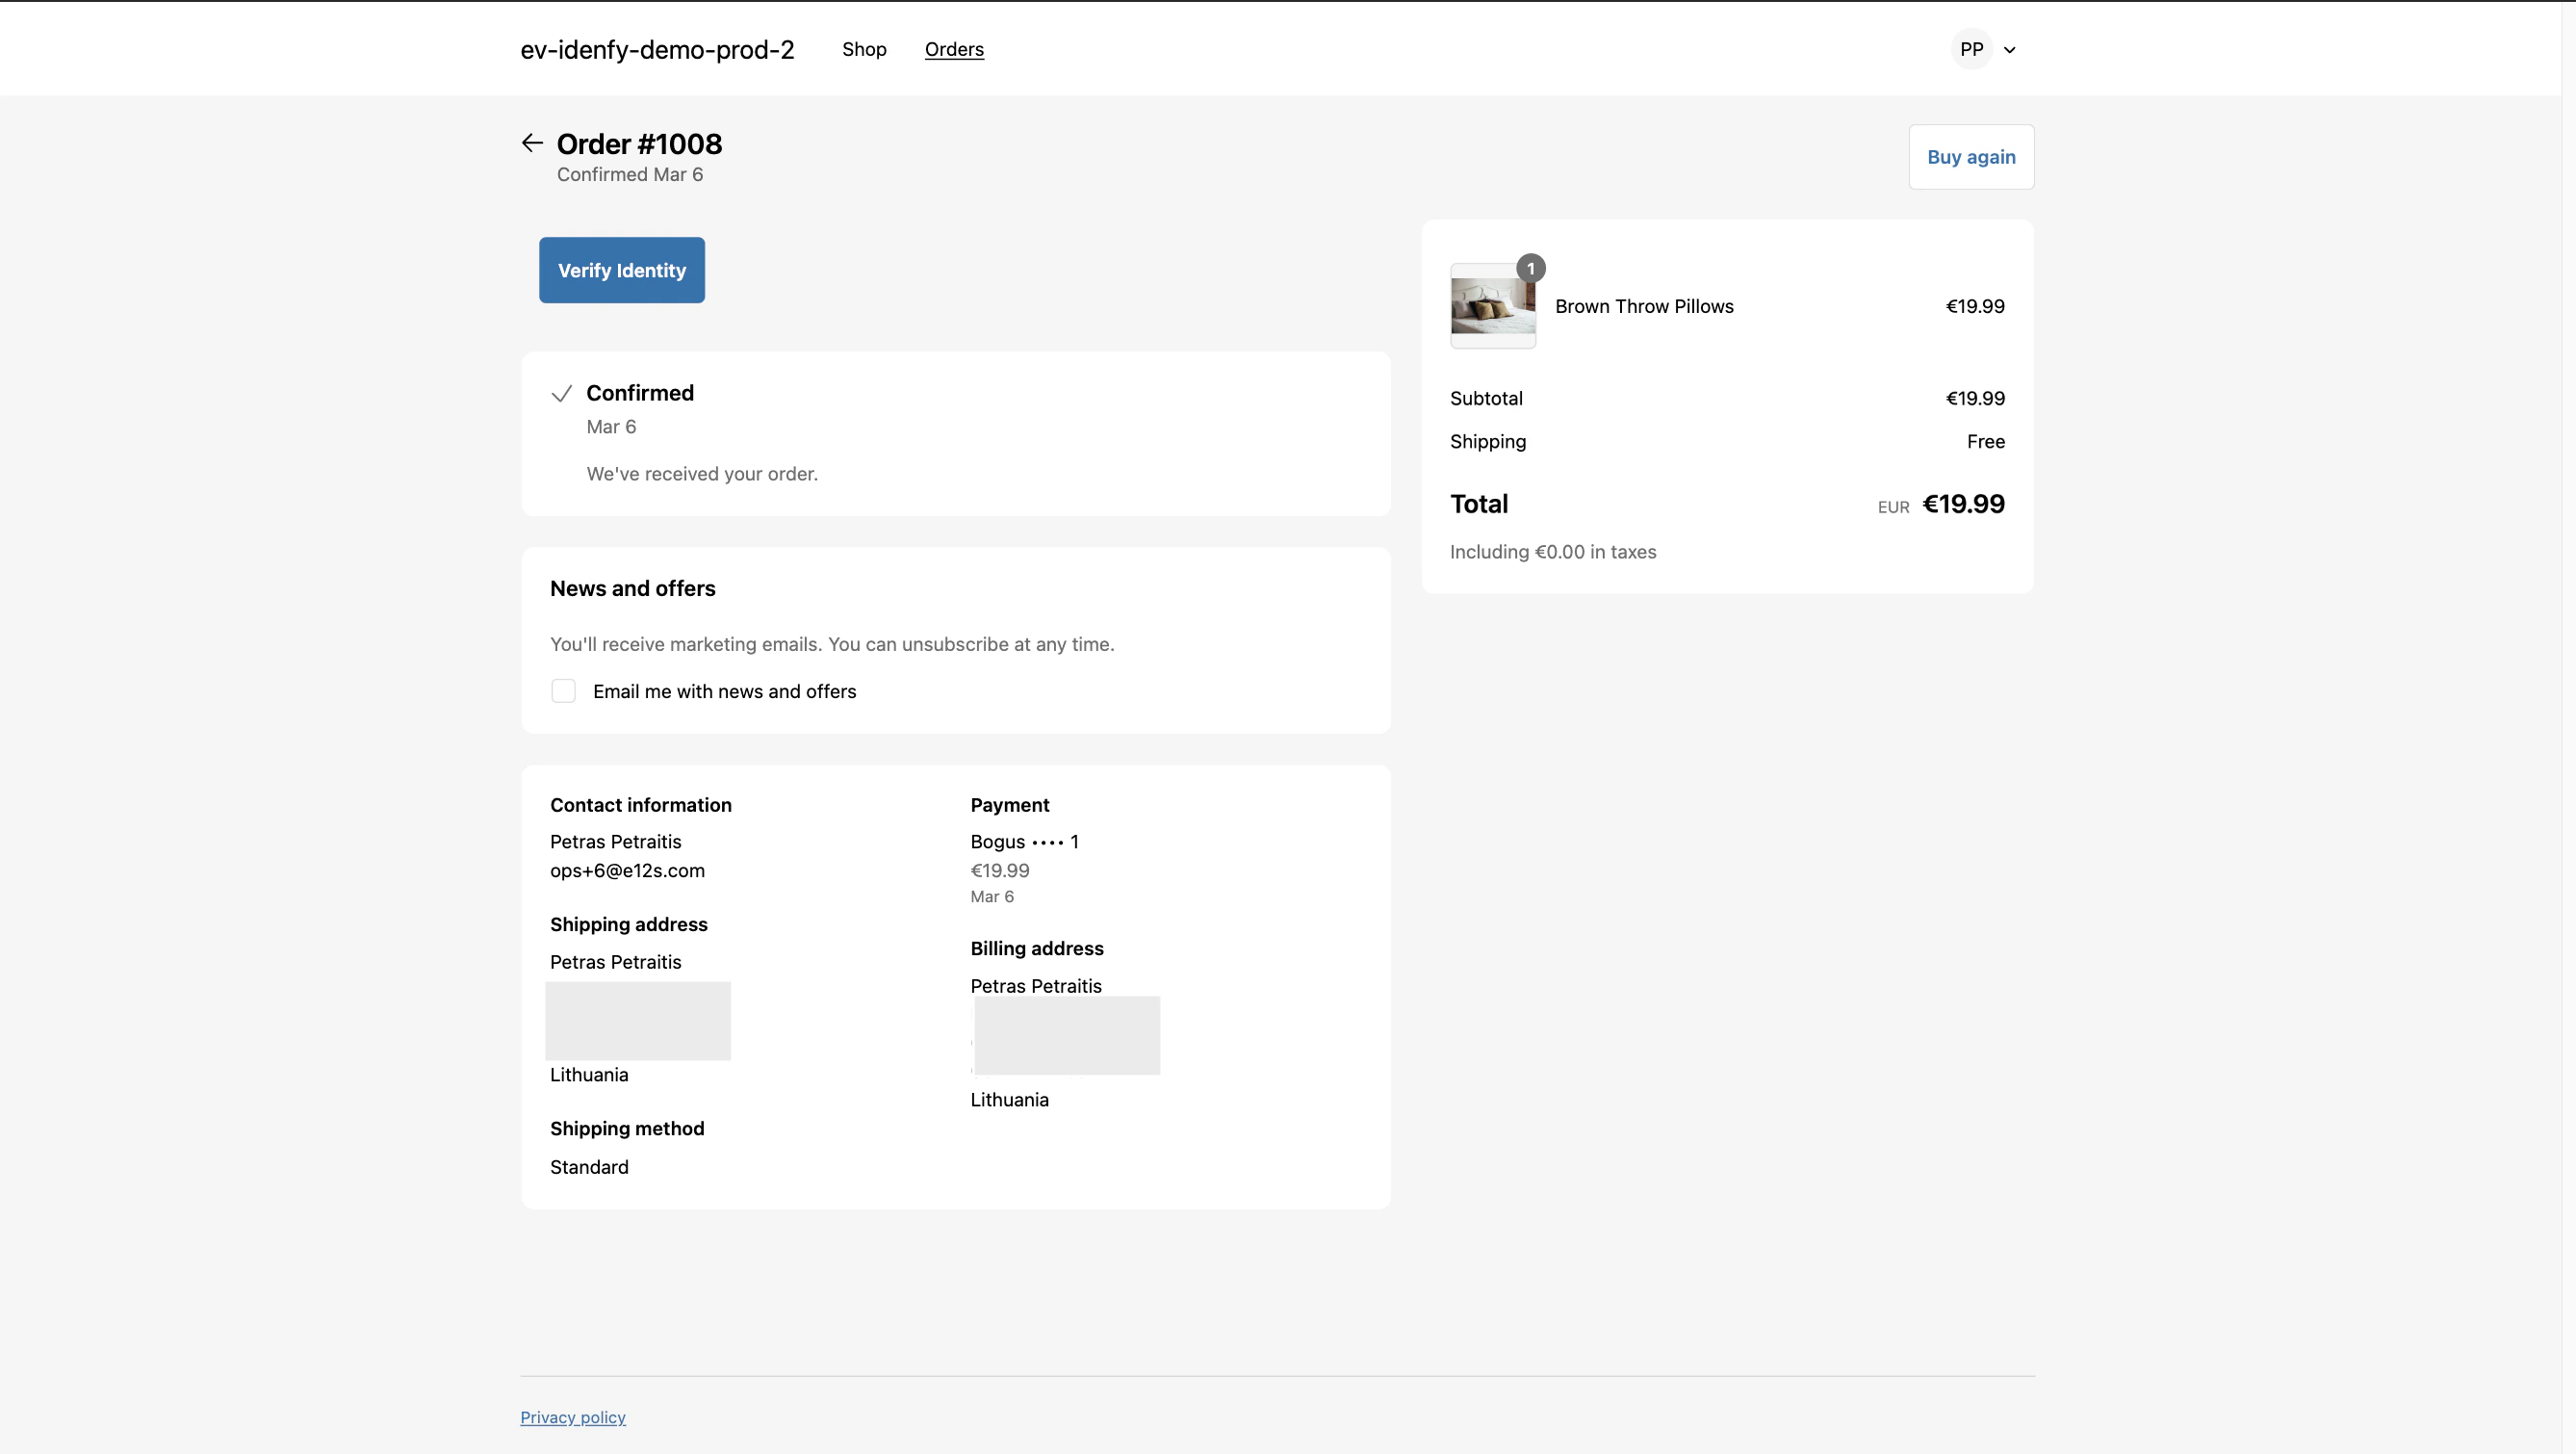
Theme and UI Setup
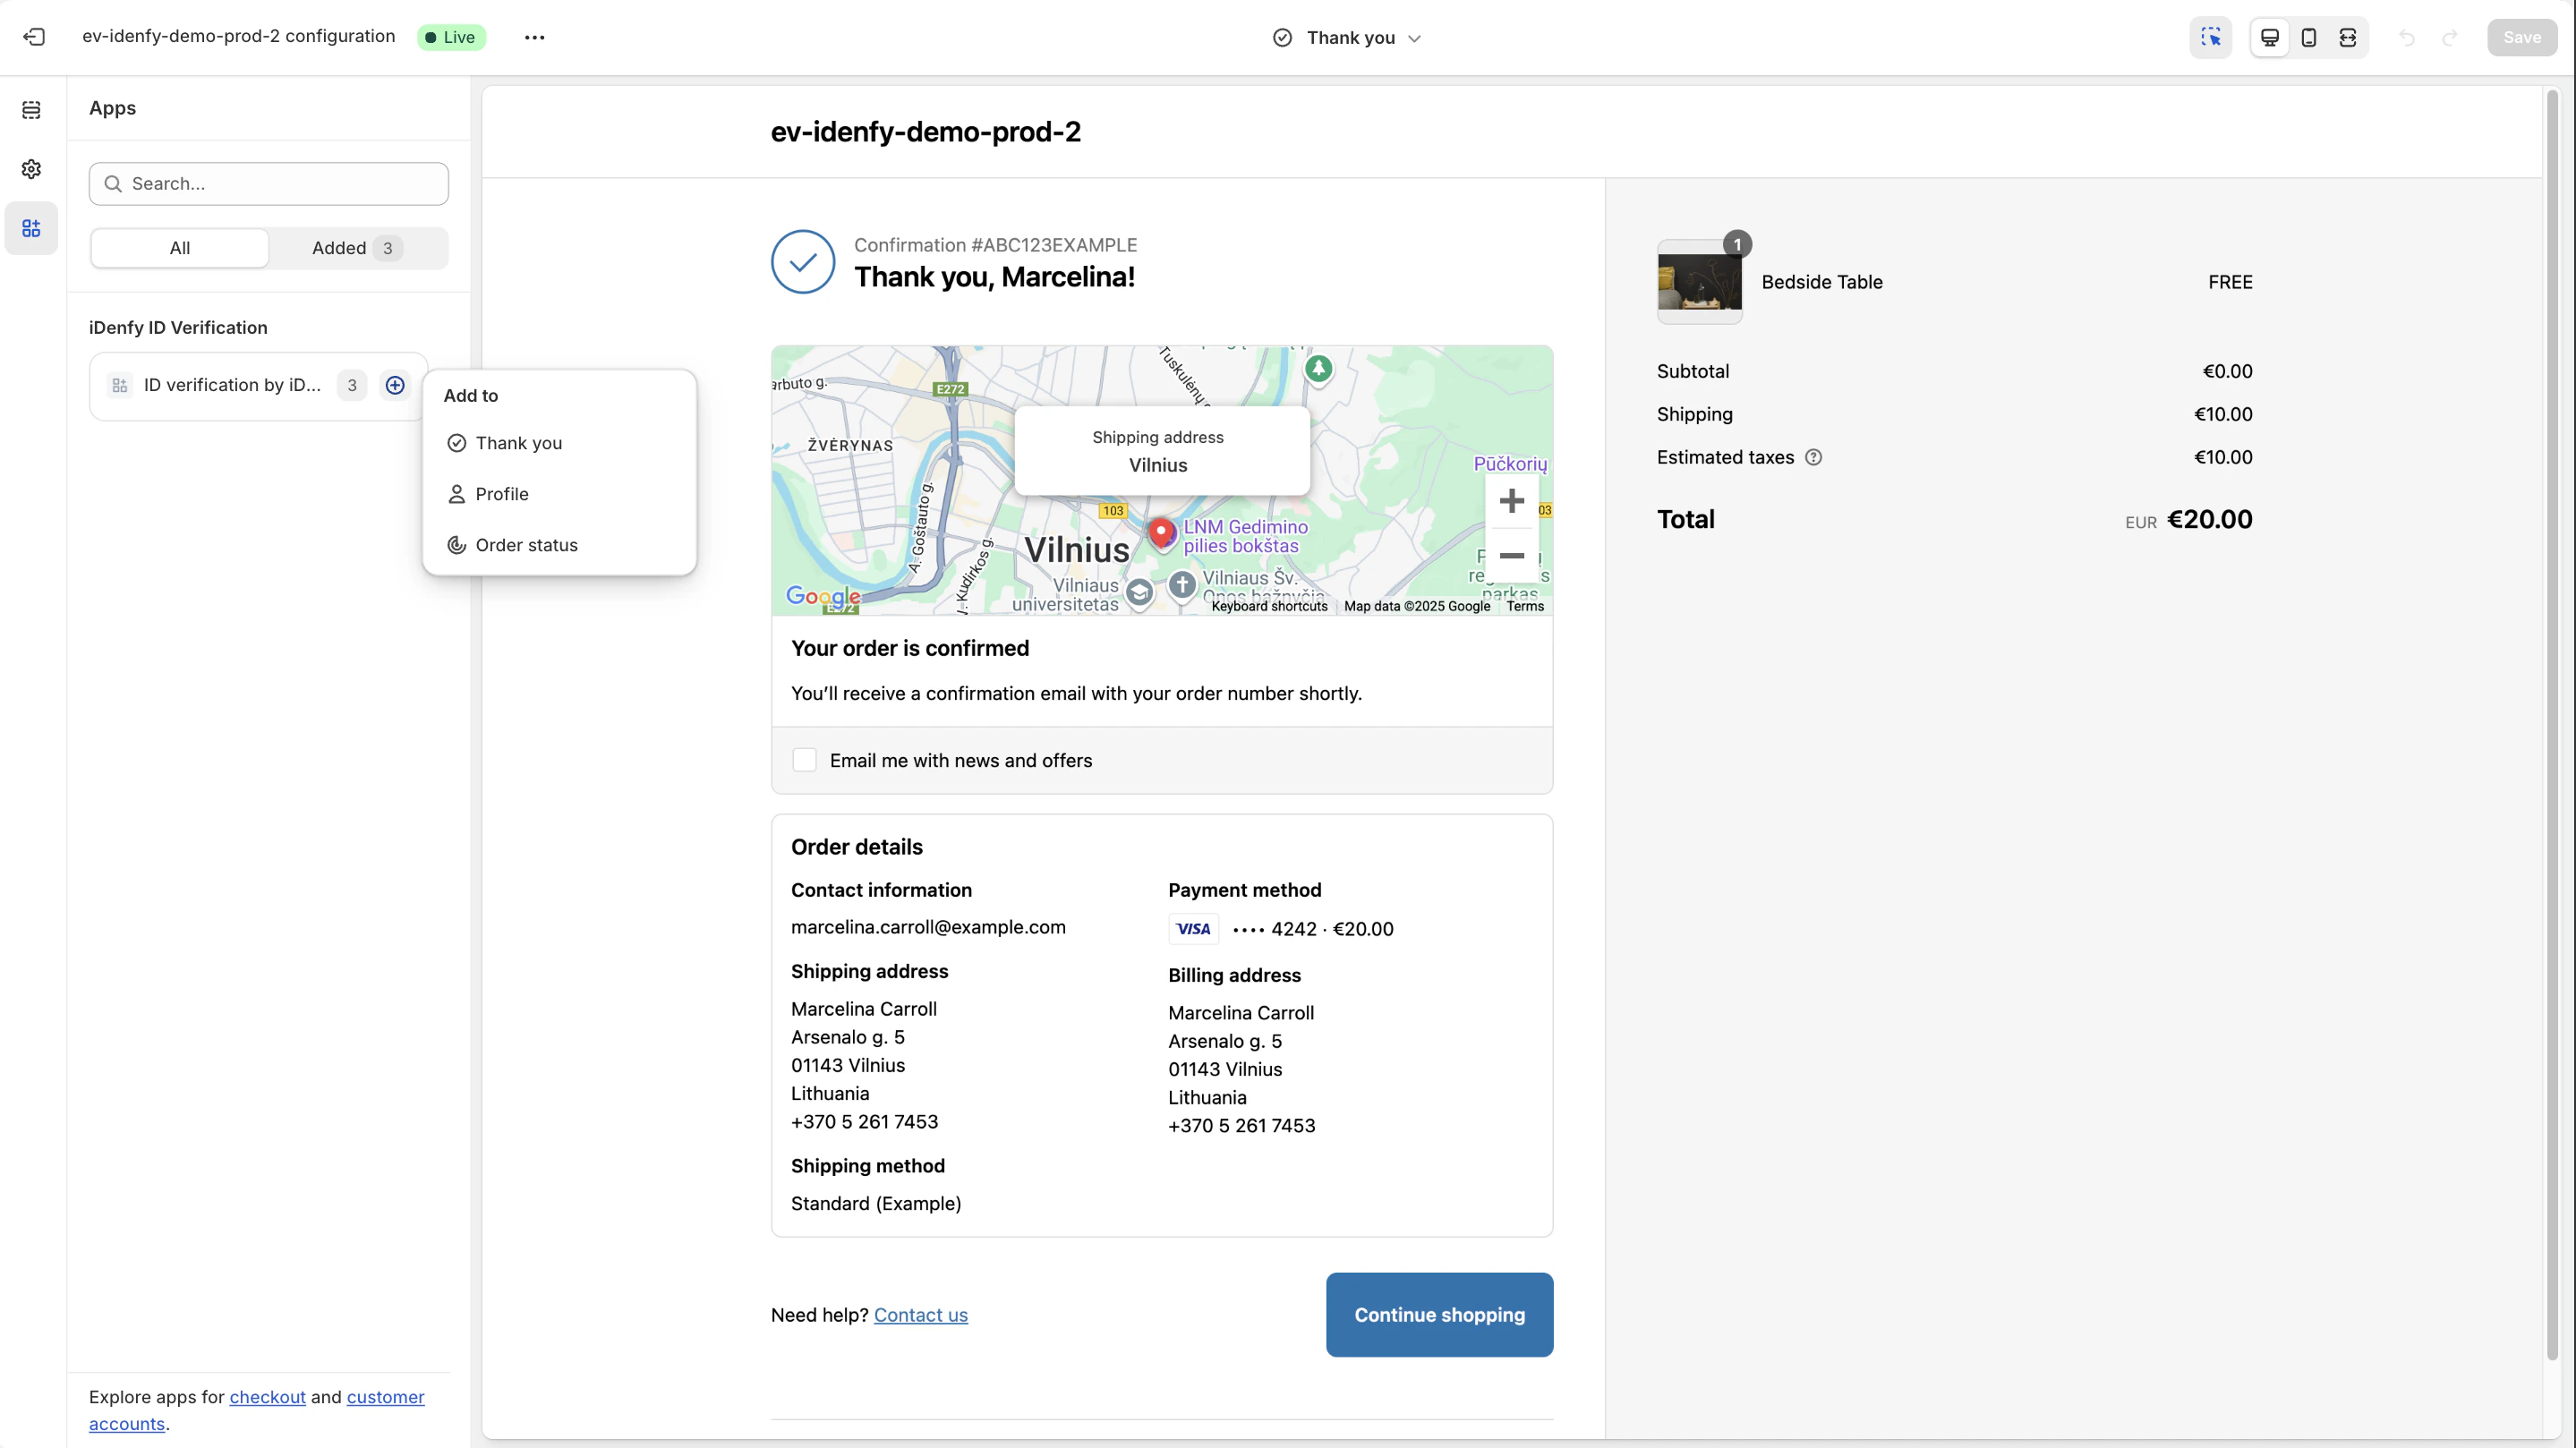
Once a flow is picked, enable its matching extension in Online Store → Themes → Customize.- App Embed Block (Account + Before checkout)
- Checkout / Account UI Extension (During + After checkout)
The Liquid iDenfy ID button app-embed block is injected at the body level.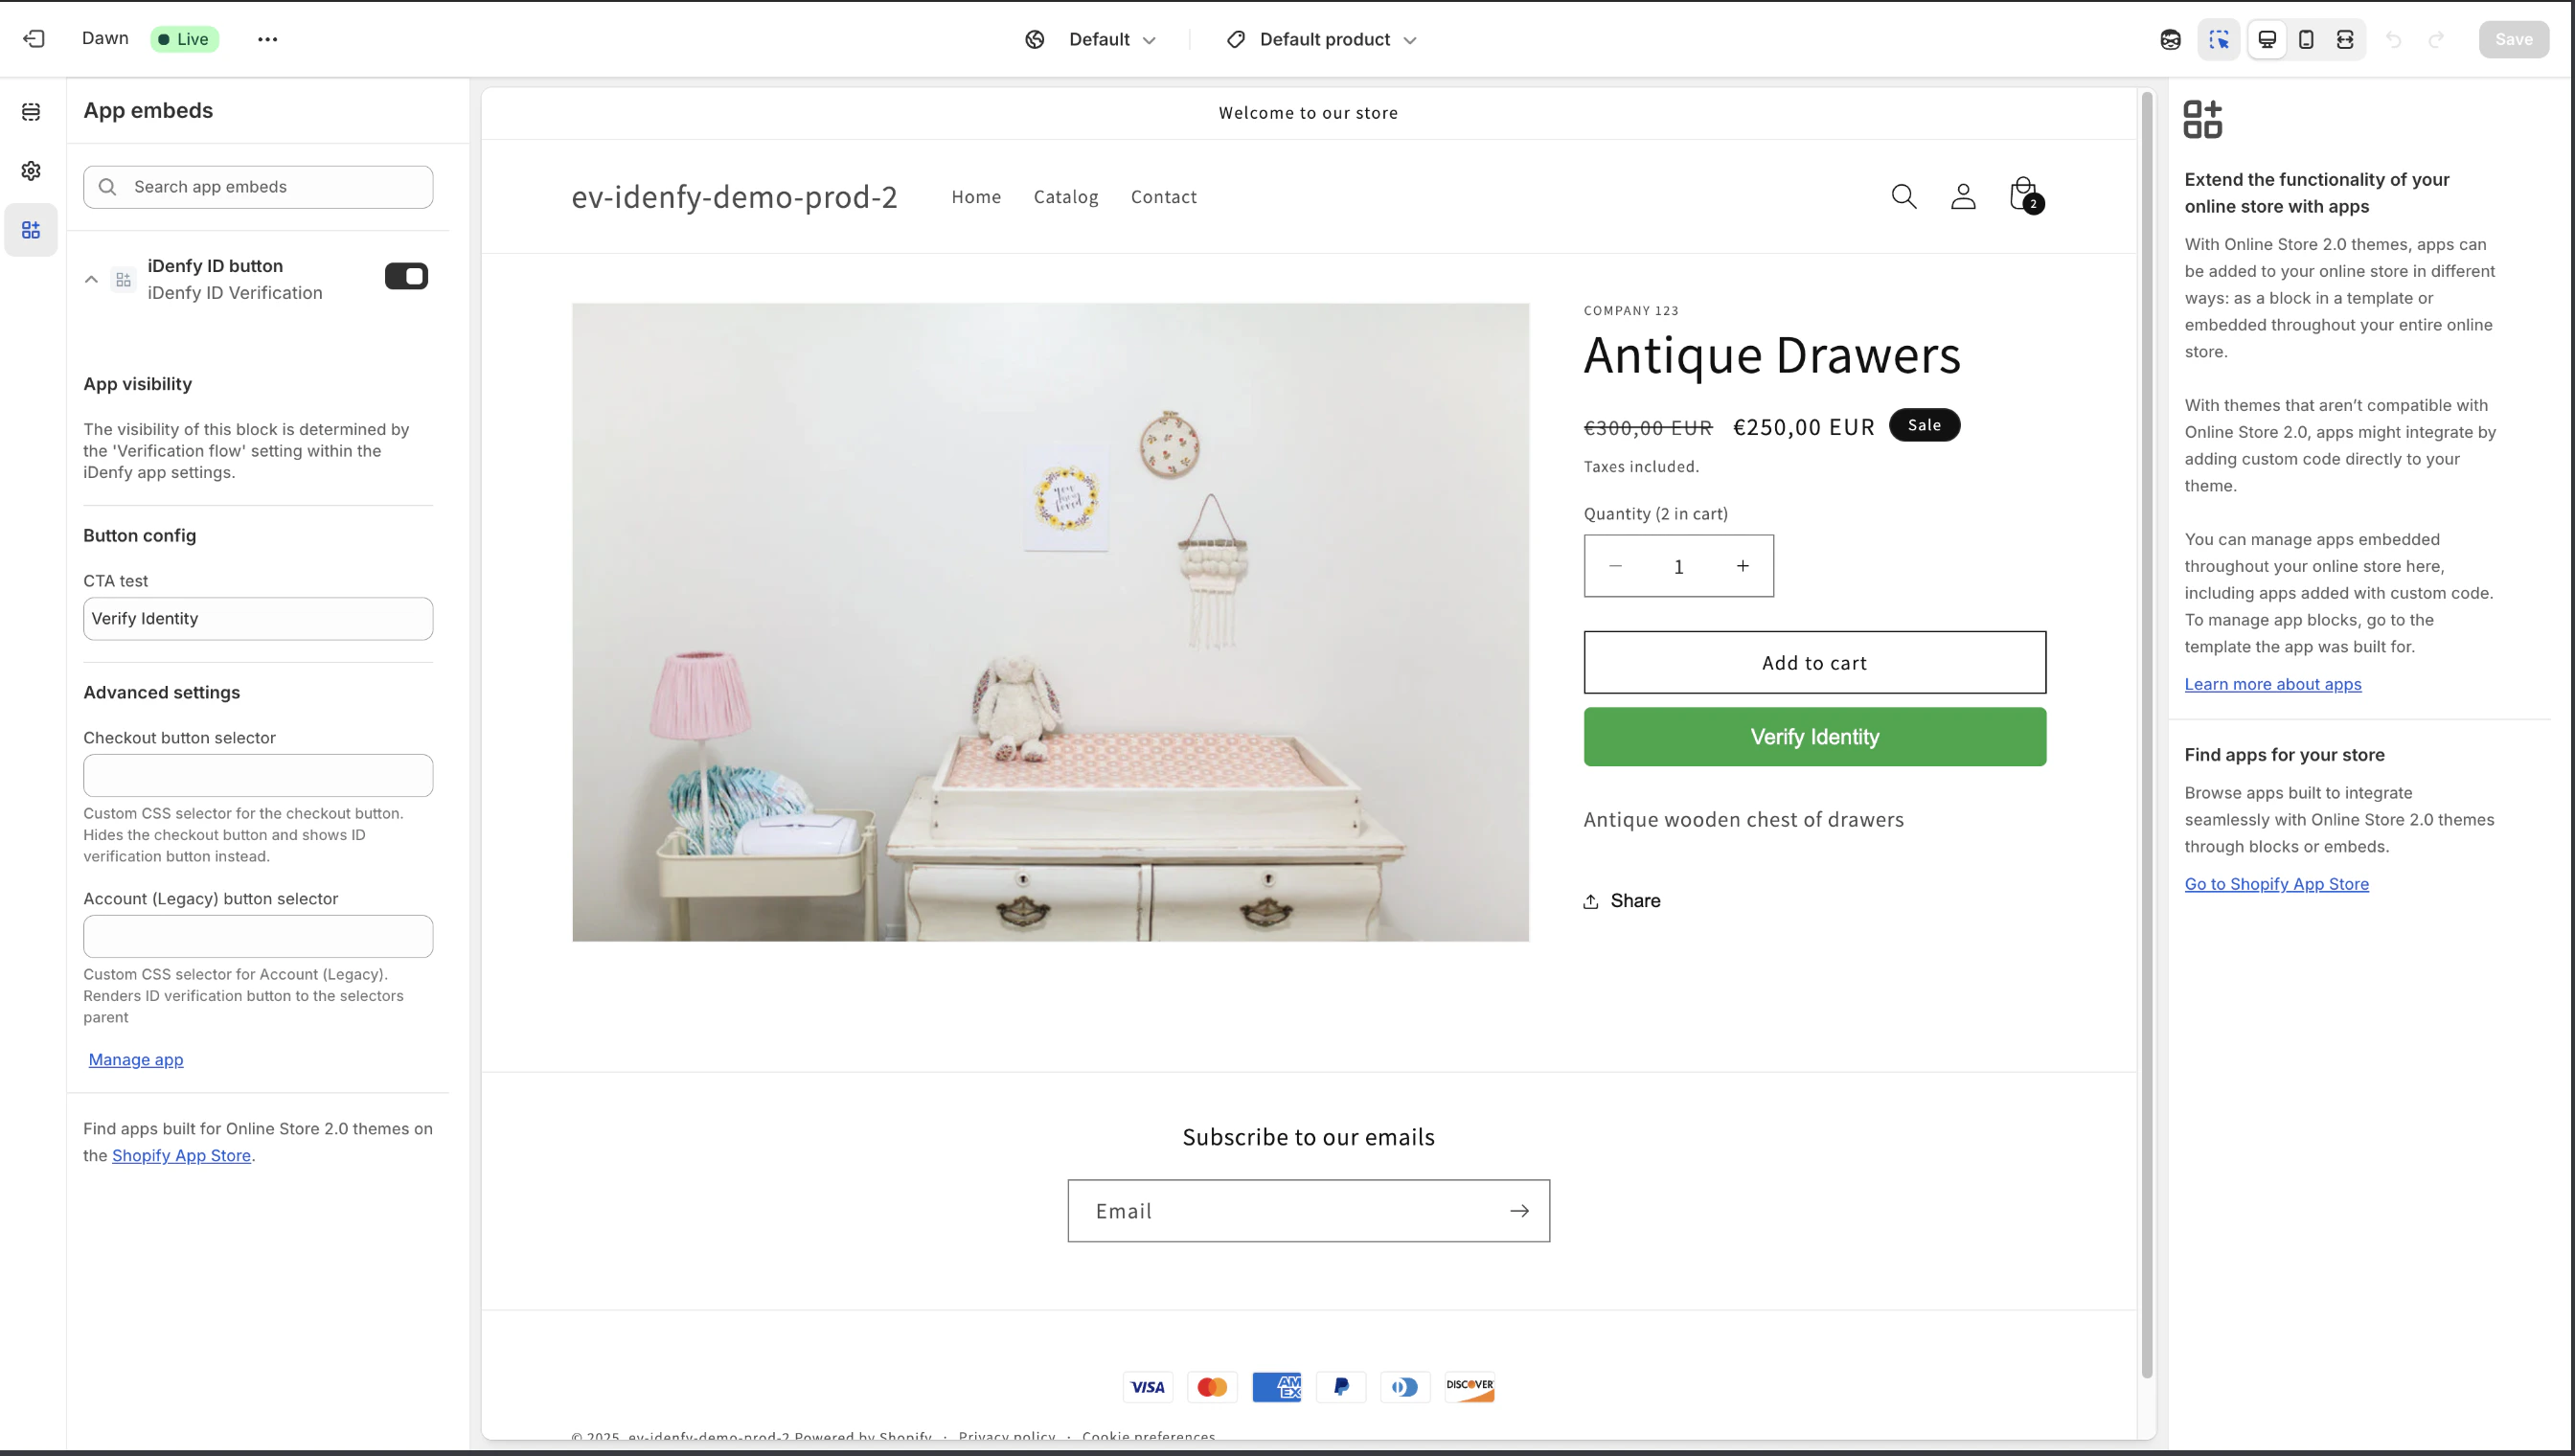
Advanced — CSS variable styling
Advanced — CSS variable styling
The block exposes CSS variables you can override in your theme stylesheet to match your brand.

Triggering Rules
In the ID Verification flow card you can layer multiple conditional triggers. The customer is asked to verify only when at least one rule matches.How browser geolocation works
How browser geolocation works
- The storefront requests the browser’s coordinates via the Geolocation API.
- Coordinates are POSTed to
/apps/sdk/geolocationand stored as customer metafields (idenfy.geolocation_latitude,idenfy.geolocation_longitude,idenfy.geolocation_date). - Coordinates older than ~5 min on the cart page are refreshed automatically. Coordinates older than 1 hour are flagged in logs but still used.
- The server uses PostGIS geometry to check whether the coordinates fall inside any of the configured countries or US states.
Identity Constraints
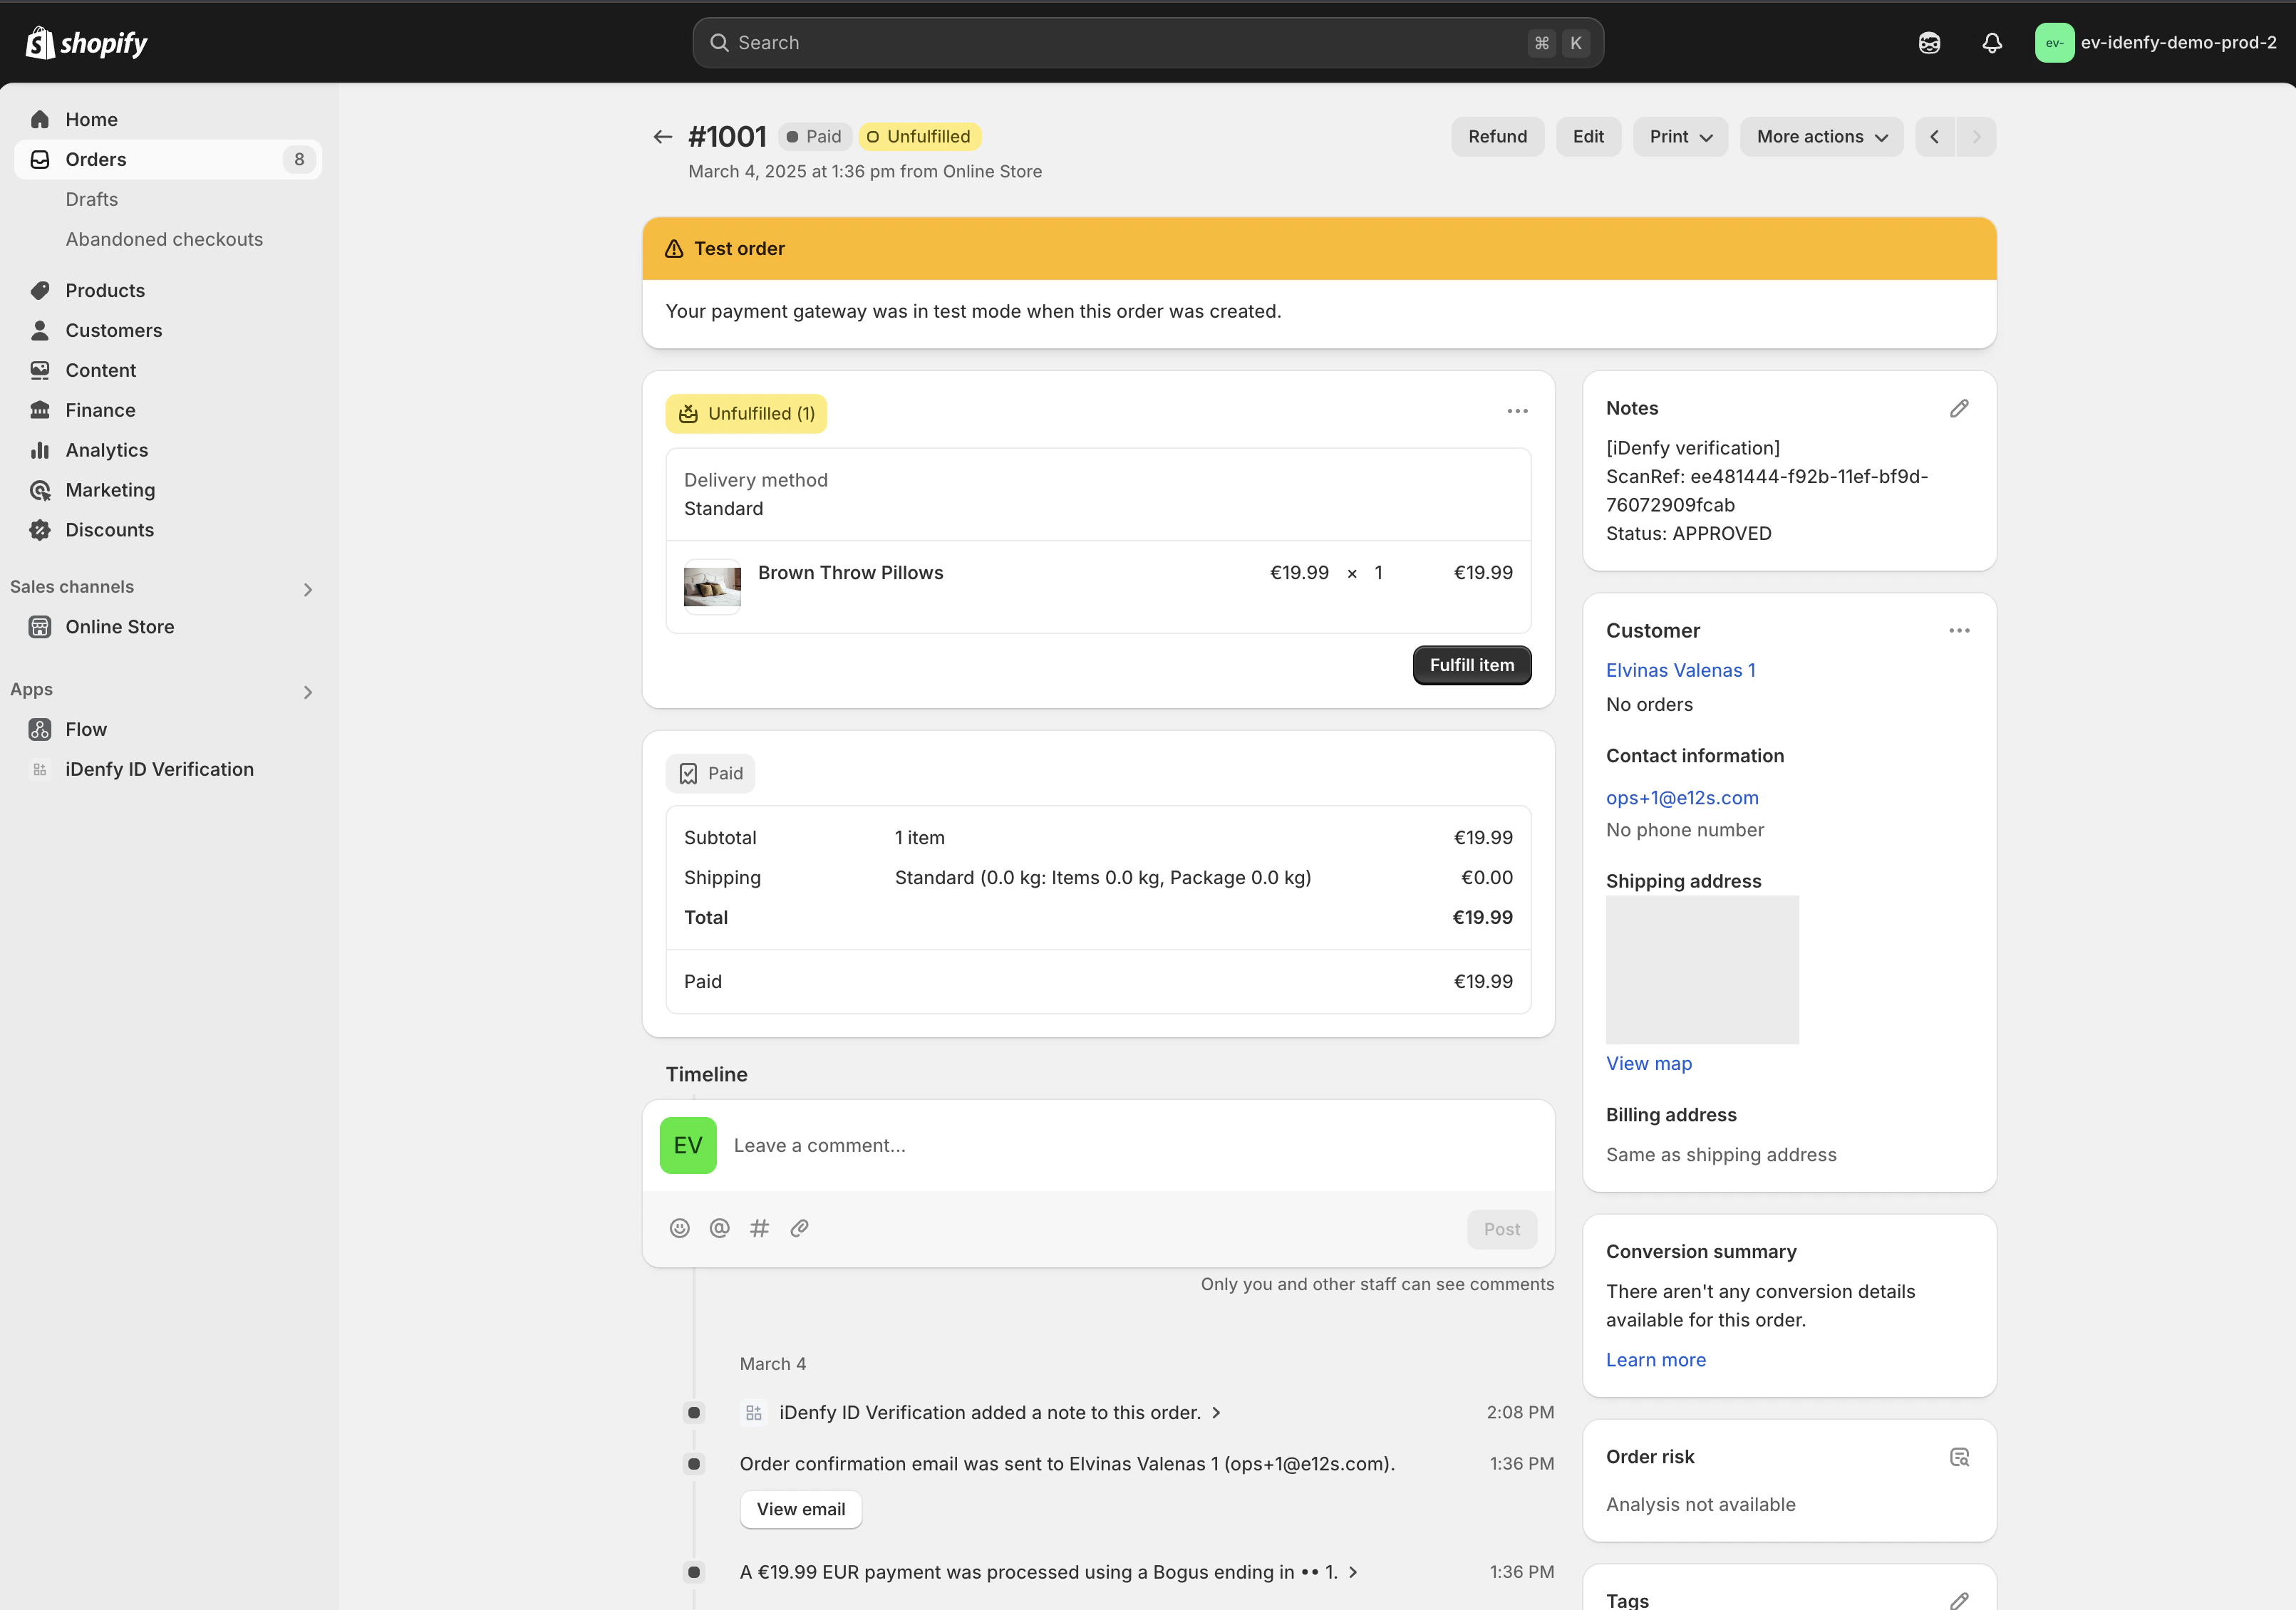
Separate from triggers, the following identity constraints apply to every verification:Order State Management
Available only in the After-checkout flow. When Automatically manage Shopify’s order state is enabled:1
Order placed
If any KYC rule matches the order, the app puts the order’s fulfillment on hold immediately.
2
Customer prompted
The customer sees the verify button on the Thank-you and Order-status pages. Optionally, an email is sent.
3
On success — auto-release
If KYC returns
APPROVED, the hold is released and the order proceeds to fulfillment automatically.4
On timeout — auto-cancel & refund
If verification is not completed within the configured Order refund timeframe (1 hour – 4 weeks), a cron job cancels the order and refunds the customer.
- Ask Complete KYC — sent while the order is on hold.
- Order Cancelled — sent when the order is auto-cancelled.
Email Notifications
The app can send up to four transactional emails:Custom Sender Identity
By default, emails are sent from iDenfy’s shared address. You can configure a custom domain via Resend:1
Configure identity
Open Configure custom email sender identity. Enter a username (e.g.
noreply), domain, and AWS region (us-east-1, eu-west-1, sa-east-1, or ap-northeast-1).2
Verify domain
Open Verify custom email sender identity. Add the DNS records shown to your domain registrar. Resend verifies the records on its side.
3
Edit templates
Once verified, an Edit email template button appears for each email type. You can customize both the text and HTML bodies.
Available template variables
Available template variables
Variable availability depends on the email type:
Custom templates can only be saved while a verified custom identity exists, but they are kept in the database if you later reset the identity — so re-verifying won’t lose your work.
Customer and Order Records
After every verification, the app writes the result onto Shopify.Customer Record
Captured email or phone from the verification is also saved into the customer record when available.
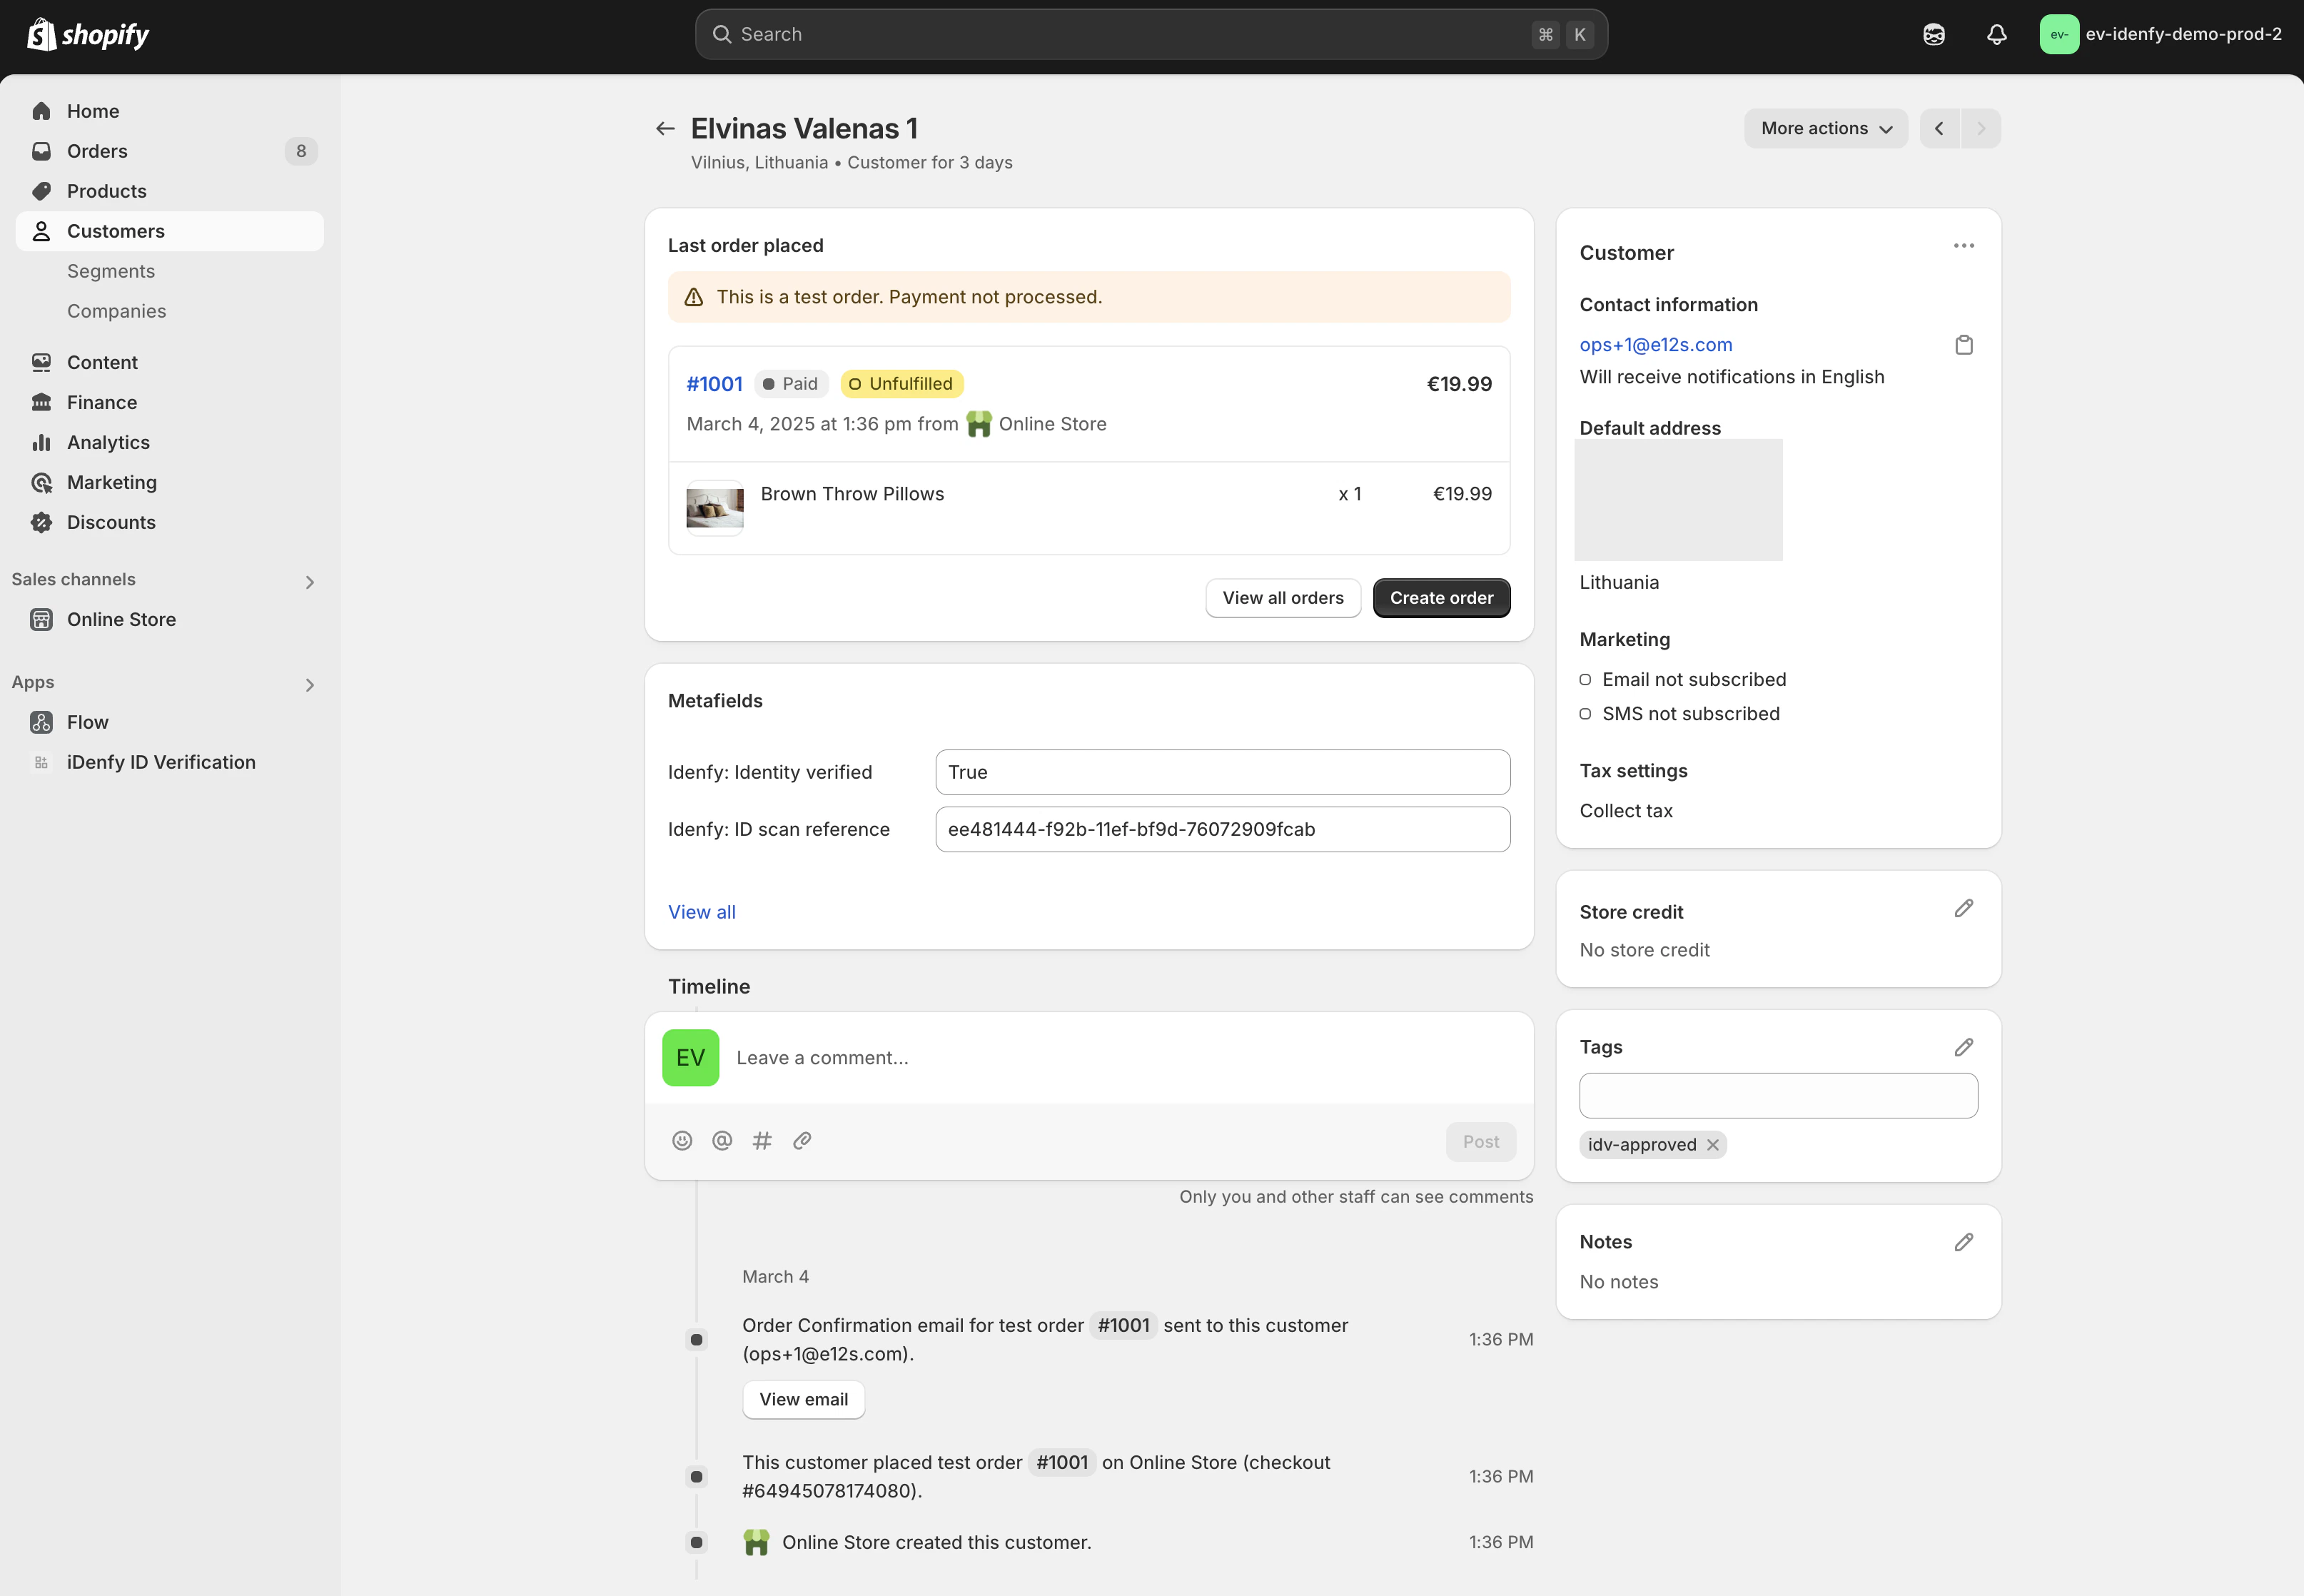
Order Record
When verification is tied to an order (Before checkout with a logged-in customer, During checkout, or After checkout):- Order Notes — the app appends a line summarizing status, scan reference, and any fraud / mismatch tags.
- Order Tags — the same
idv-<status>tag is added. - Fulfillment hold / release — automatic, under Order State Management.
- Order cancellation & refund — automatic, if the order remains unverified past the configured timeframe.
If the customer was not logged in during verification (guest checkout in the Before-checkout flow), only the order is updated. The app has no Shopify customer record to write to.
Additional Settings
- Automatically delete customer scan references — when a customer is deleted in Shopify, their iDenfy scan reference is also deleted via the iDenfy API.
- Customer scan-ref removal table — a searchable, paginated list of customers with an
idenfy.scan_refmetafield. You can manually delete a scan reference; the metafield is then replaced with"Deleted on iDenfy Dashboard"so the action is visible in the customer record.
Reference
Verification Statuses
A
SUSPECTED result returned during checkout triggers a banner asking the customer to retry.Troubleshooting
Webhook signature errors
Webhook signature errors
The signing key on the iDenfy Dashboard webhook must be identical to the API key the Shopify app is connected with. Mismatch causes every webhook to be rejected and no verifications will appear in the store. Re-paste the key on the iDenfy Dashboard if results stop appearing.
Geolocation permission missing
Geolocation permission missing
Verification triggered by By region with browser geolocation requires the customer to grant location permission. The block has configurable “geolocation permission notice” and “retry” copy — make sure those are translated and visible. If the customer denies permission, no coordinates are submitted and the region rule cannot fire.
“Order not ready” / retry
“Order not ready” / retry
On the Thank-you page the app may briefly show an “order not ready” message while Shopify finishes writing the order. The page polls automatically; no action is required.
SUSPECTED verifications
SUSPECTED verifications
SUSPECTED means iDenfy verified the identity but flagged the result for human review. By default these customers are not treated as verified — they appear with the idv-suspected tag and Order State Management keeps the order on hold until the status is changed on the iDenfy Dashboard.What’s Next?
iDenfy Dashboard — KYC settings
Tune document types, liveness, languages, and branding for everything triggered from Shopify.
Webhook payload reference
Full payload spec for the verification results the app receives.
Testing & sandbox
Simulate APPROVED / DENIED / SUSPECTED results before going live.
Other plugins
WooCommerce, Adobe Commerce, WordPress, Zapier.