

Custom Rule
Runs the extraction and comparison for a chosen stakeholder, then flags or blocks the company when the conditions you selected are met.
AI Reviewer
Reads the PoA outcome alongside every other check on the case and issues the final decision — approve, flag for investigation, or deny.
What PoA Matching Compares
The PoA automation extracts five data points from the submitted document:
Name and address are optional inputs. If a stakeholder record has no address on it, there is nothing to compare against and the address portion of the check cannot produce a mismatch. The matching quality depends directly on how complete the workflow step that collects the stakeholder is.
PoA documents are always processed automatically and never enter manual review. If a file cannot be read, the system retries and then raises a mismatch rather than creating a review task.
Choosing the Rule Type
Two automation types cover PoA, and they differ only in whose data the document is matched against:
The rest of this page uses PoA verification beneficiary, which is the more common of the two. The configuration screen is identical for both apart from the Apply for selector.
Step 1 — Create the Custom Rule
Go to Business verifications → Configuration → Custom rules, stay on the Automations tab, and click Create automation.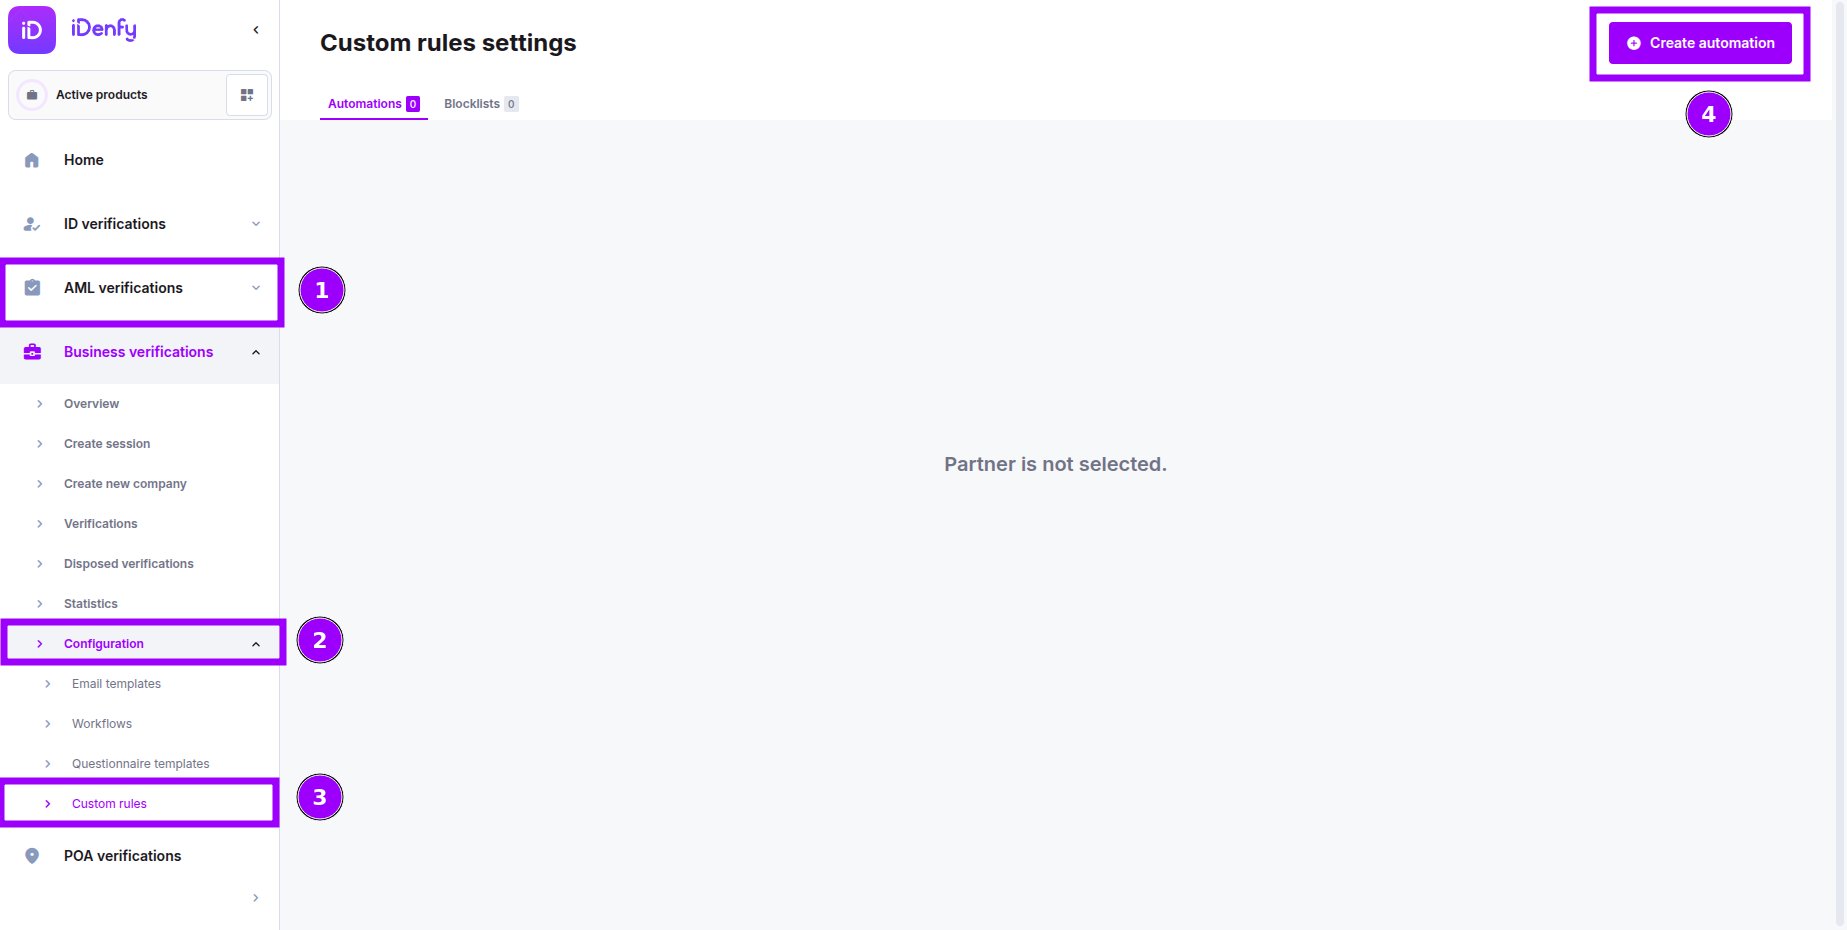
PoA – Director address mismatch (flag) — and optionally a description. The title is how you identify the rule when adding it to a workflow, so avoid a bare PoA if you plan to run more than one.
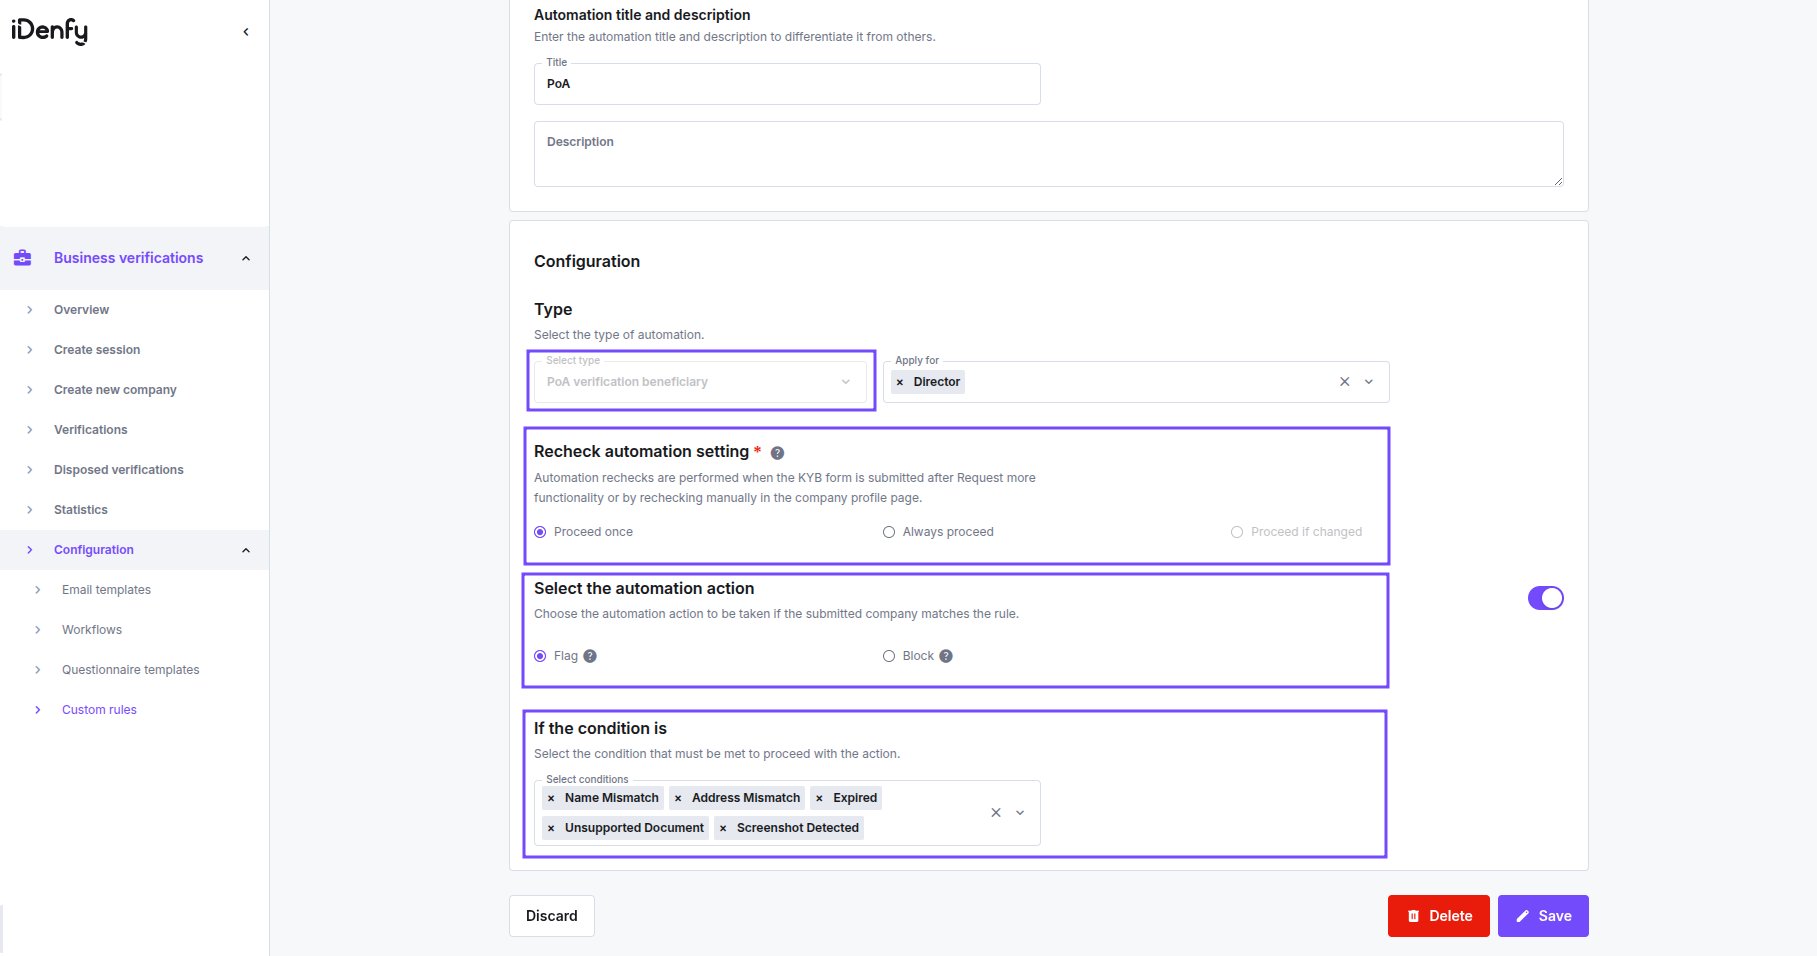
Type
Select PoA verification beneficiary from the Select type dropdown.Apply For
Select which stakeholder roles the rule targets. Each selected role is evaluated independently — a rule applied to both Director and Representative fires if either person’s document fails. Available roles depend on what your workflow collects. See Stakeholder Roles in KYB Workflows for the full list.Recheck Automation Setting
Controls what happens when the KYB form is resubmitted — after a Request more information cycle, or when a reviewer rechecks the company manually from the company profile.
Select Always proceed whenever you ask clients to re-upload a rejected PoA. With Proceed once, the corrected document is accepted without being checked.
Automation Action
Conditions
The If the condition is selector defines which failure modes trigger the action. Select as many as apply — the rule fires if any selected condition is met.
Allowed document types, allowed countries, and the recency window are not set on the rule — they come from your Proof of Address settings. The rule only decides what to do when one of those constraints is breached.
Splitting conditions across several rules gives you finer control than one rule with everything selected. A rule containing only Screenshot Detected and Missing Logo can block outright, while a separate rule for Name Mismatch and Address Mismatch only flags. The two failure classes rarely deserve the same treatment.
Step 2 — Add the Rule to the Workflow
A saved rule does nothing until it is attached to a flow template.- Open the workflow and go to the Custom Rules step.
- Drag your PoA rule from Available rules into Selected rules.
- Position it in the sequence. Rules run top to bottom. Place PoA rules after the automations that could block the case for a cheaper reason, and before any rule whose outcome should depend on the PoA result.
Step 3 — Let the AI Reviewer Decide
The custom rule produces an outcome. The AI reviewer decides what that outcome means for the company as a whole.Open the Configuration
Go to Settings → Business verifications (KYB) → AI reviewer and click Set up next to AI reviewer configuration.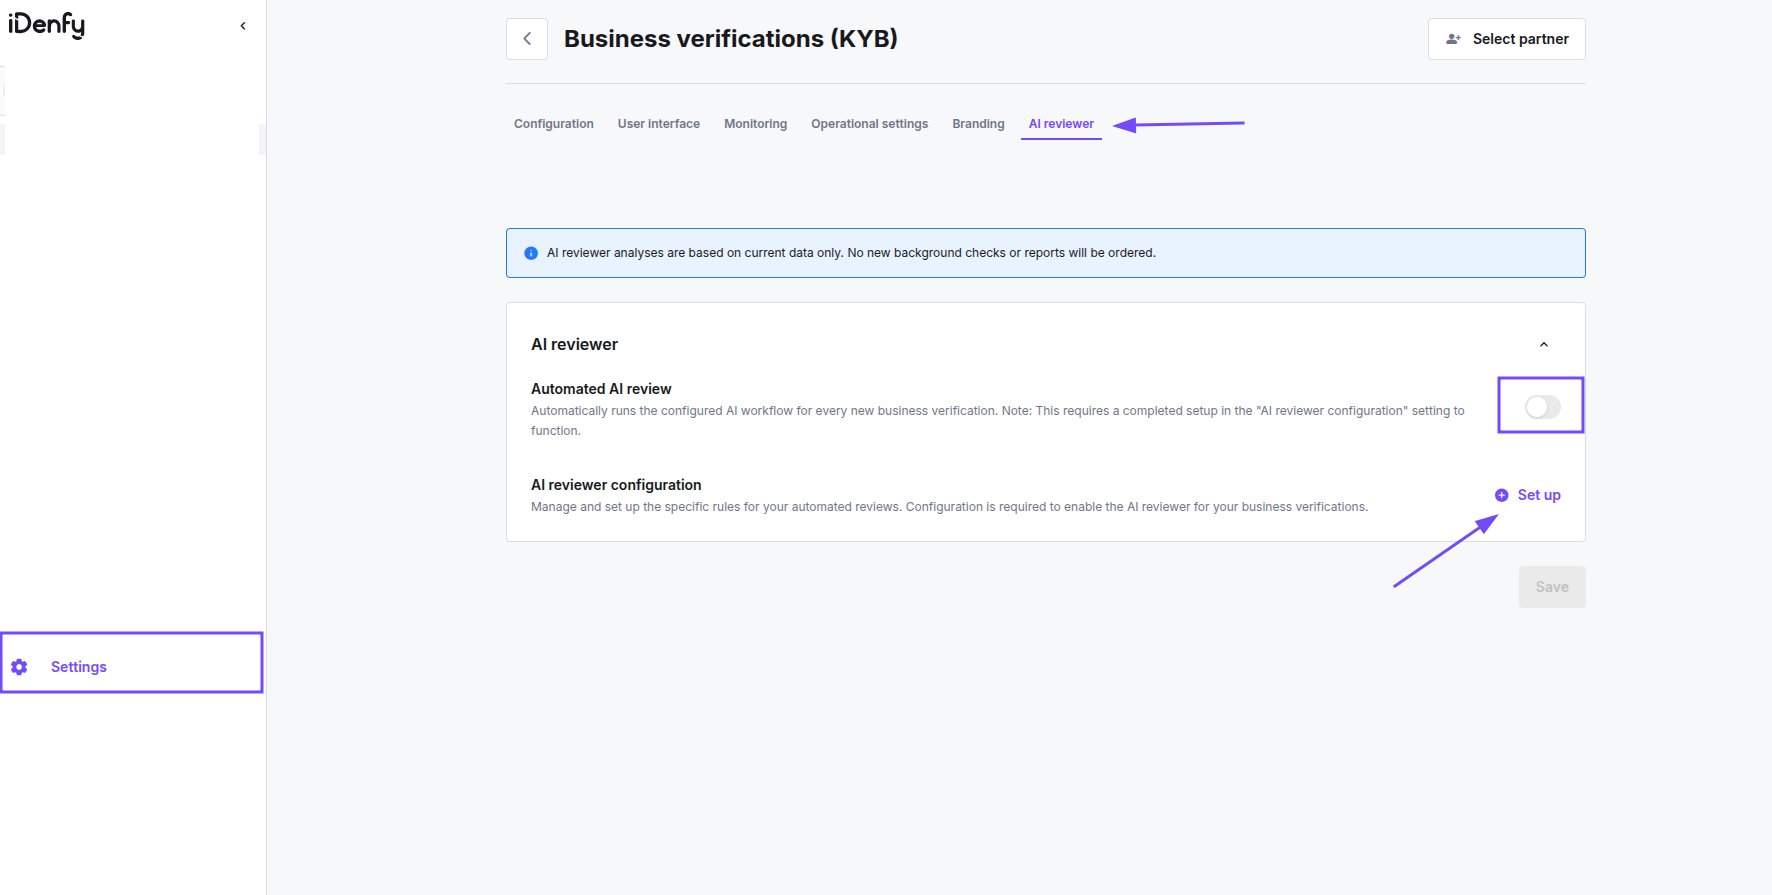
The Automated AI review toggle stays inactive until a configuration exists. Build the flow first, then come back and switch the toggle on — otherwise the reviewer never runs.
Add the Proof of Address Task
In the Choose a task menu, select Proof of address from the Fraud prevention category, then set its parameters.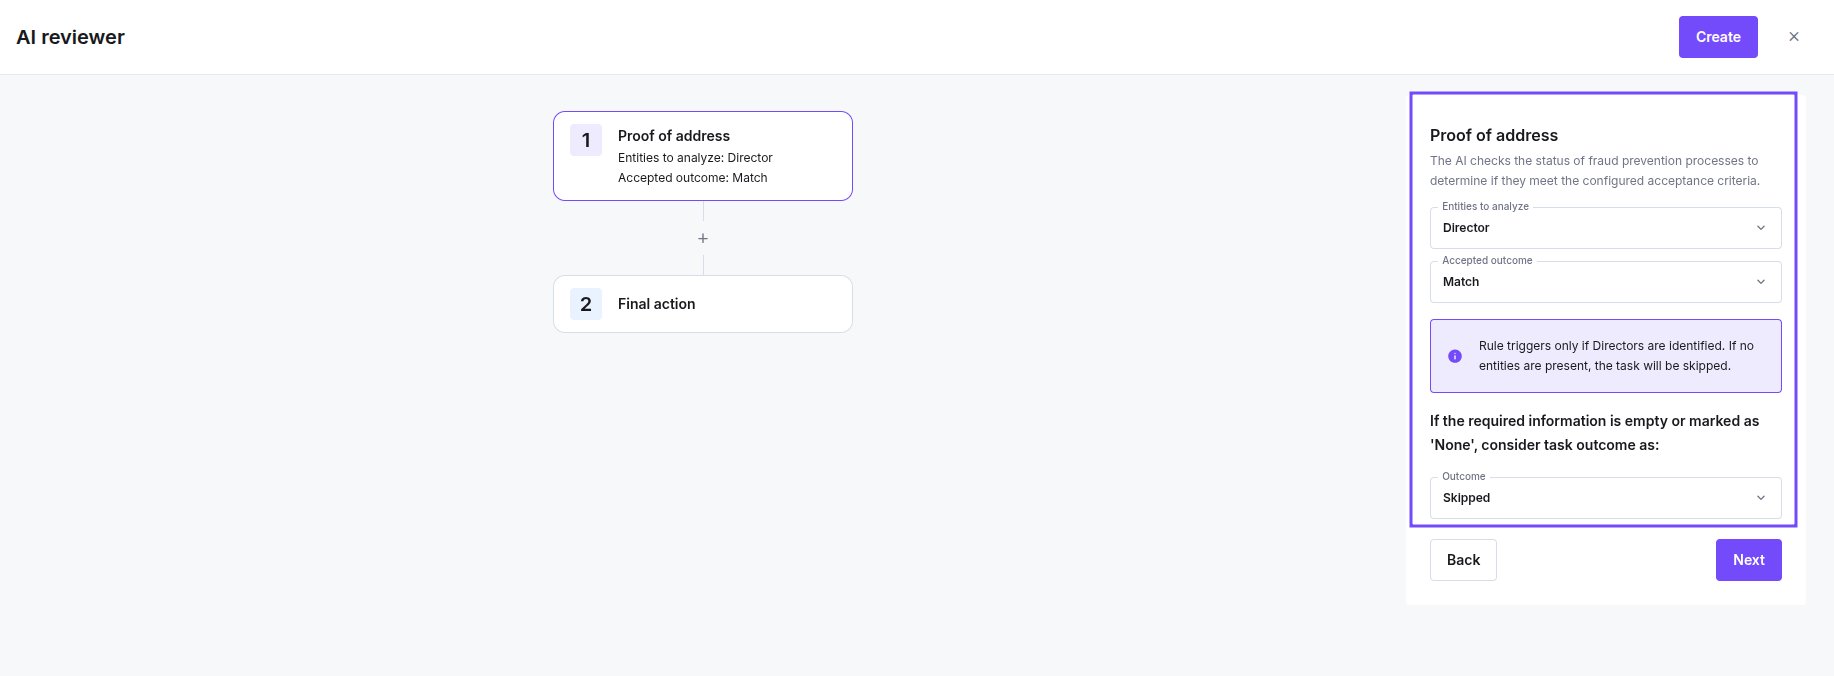
- Skipped — the task is disregarded and does not affect the final action. Use this when a stakeholder may legitimately have no PoA on file.
- Treating it as unaccepted instead makes a missing document as serious as a failed one. That is a deliberate choice, not a default — pick it only when a PoA is mandatory for every targeted stakeholder.
Configure the Final Action
Final action is always the last step in the flow.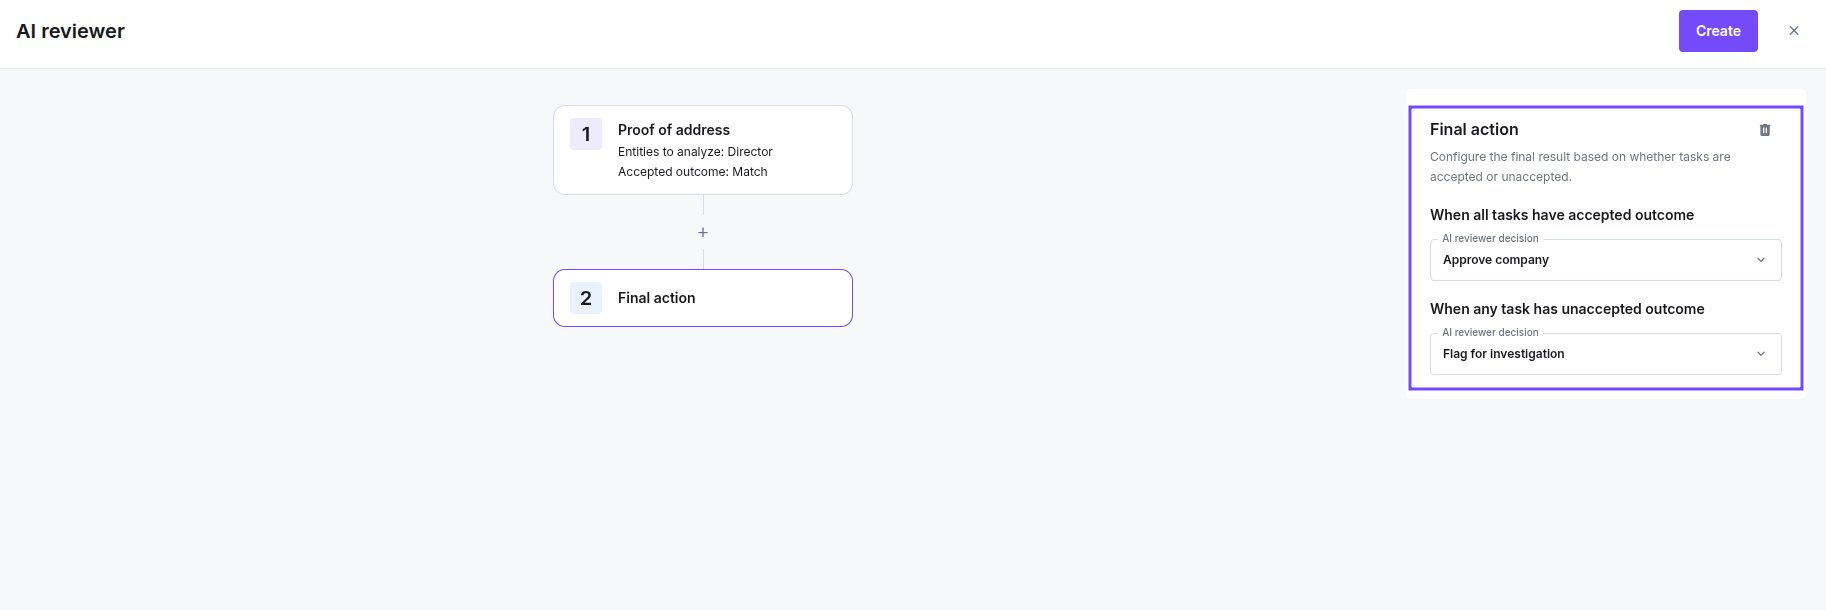
- When all tasks have accepted outcome — the decision applied when every check on the case passes.
- When any task has unaccepted outcome — the decision applied when at least one check fails, including the PoA task.
Decision Patterns
Three configurations that cover most requirements:Strict — PoA Failure Denies the Company
Strict — PoA Failure Denies the Company
Custom rule: action Flag, conditions Name Mismatch, Address Mismatch, Expired, Unsupported Document.AI reviewer: Proof of address task, entities Director + Representative, accepted outcome Match. Final action — all accepted → Approve company; any unaccepted → Deny company.Suitable where an unverifiable address is disqualifying on its own, such as regulated financial onboarding. Expect a higher false-rejection rate from clients whose bills are in a spouse’s or landlord’s name.
Tiered — Mismatches Flag, Forgery Signals Deny
Tiered — Mismatches Flag, Forgery Signals Deny
Rule A: conditions Screenshot Detected, Missing Logo, Unsupported Document → action Block.Rule B: conditions Name Mismatch, Address Mismatch, Expired → action Flag.AI reviewer: Final action — any unaccepted → Flag for investigation.Documents that look manipulated never reach a human. Genuine documents that simply don’t line up go to review, where the analyst can request a replacement. This is the pattern most partners settle on.
Observation — Measure Before Enforcing
Observation — Measure Before Enforcing
Custom rule: action Do nothing, all conditions selected.AI reviewer: no Proof of address task yet.The check runs and results appear on the company profile, but nothing is flagged, blocked, or denied. Run this for a few weeks to see how often each condition actually fires against your real client base, then promote the conditions that carry signal into an enforcing rule.
When the Check Does Not Run
A PoA rule produces no result — rather than a failure — in these cases:
For the AI reviewer, a skipped PoA check is not the same as a passed one. If the targeted role is absent from the case, the task is skipped outright. If the role exists but has no usable PoA result, the empty or “None” outcome dropdown on the task decides whether that counts as skipped or unaccepted. See the Checks Reference for the full skip and failure matrix.
Blocklist matches take priority over automations. If a company matches a blocklist entry with the Block action, no PoA rule is evaluated.
Related Pages
Custom Rules for KYB Risk Automation
The full automation type catalogue and rule creation flow.
AI Reviewer
Building the rules flow and configuring final actions.
Proof of Address Settings
Allowed document types, countries, and the issuing date range.
Checks Reference
Why a check was skipped or marked unaccepted.